|
This task shows you
how to create an area by keying in a size and clicking a location. |

|
1. |
Click the Area button  . . |
|
|
|
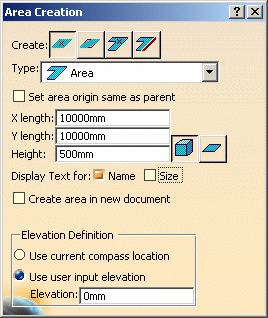
The Area Creation dialog box is
displayed.

|
|
2. |
Select the Rectangular -
Location button
 . . |
|
3. |
Select the Type of area you want
to create:

|
|
4. |
If you need to then check Set area
origin same as parent. This will make the
origin of the area you create the same as the parent object, which is the
current active object. |
|
5. |
Define the size of the
area:
You can only define the X and Y values for the Rectangular - Location
option. The Height value can be defined for all options. |
|
6. |
Select a display option:
-
 (Solid) displays the area at full height.
-
 (Flat) displays the area with no height.
|
|
7. |
Optional. To display descriptive
text on the area, activate either or both of these options:
- Display Text for Name: shows the area name.
- Display Text for Size: shows the area size.
|
 |
You
should be able to see the shape of your area when you move the mouse
pointer. If you do not see it then click the Fit
All In
 button. button. |
| |
8. |
Check Create Area in New Document
if you want to do so. See Saving an Area in a New
Document. |
| |
9. |
Define the elevation of the area
you will create. Check one of the options:
- Use the Current Compass Location: The area will be placed at the same
elevation as the compass (assuming you have placed the compass on an
object).
- Use User Input Elevation: The area will be placed at the elevation
you enter in the Elevation field, and will be relative to the current
active object.
|
|
10. |
You are now ready to indicate a
location for your area by clicking the left mouse button. Before doing so
you can use the Shift key to toggle
the axis to one of the four corners or the center of the area. See below.
The area is displayed after you click the left mouse button. |

|
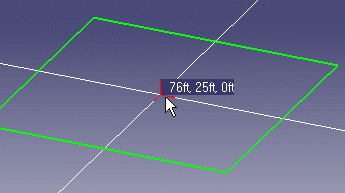
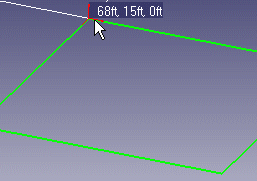
You can use the Shift key to toggle the
axis to one of the four corners or the center of the area you are creating.
After Step 9 above: A. Move your mouse pointer so that your area is
located where you want it.
B. Use the Shift key to toggle the axis. Then go to Step 8. The pictures
below show the axis toggled from center to upper left.


If you have more than one area in your document you can make one active
by clicking the Activate Area button (in the General Environment Tools
toolbar) and selecting an area. |
|
 |

 (Solid) displays the area at full height.
  (Flat) displays the area with no height.

![]()
