-
Click Create Shooting
 to open the Shooting Definition dialog box then access the
Indirect Illumination tab:
to open the Shooting Definition dialog box then access the
Indirect Illumination tab: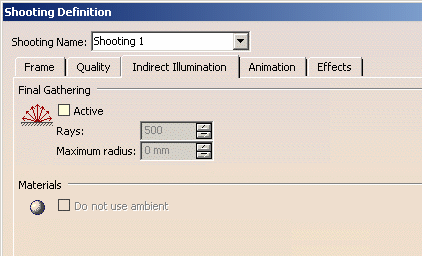
-
Select the Active check box to activate Final Gathering. Once it is selected, the other boxes are activated.
Final Gathering acts like an energy transmitter in the sense that the light striking the object is not only computed from the light sources you may have defined but also from the other elements composing the scene.
More precisely, the hemispherical area surrounding each shaded point is used to calculate the light energy. Rays are sent in the appropriate directions in this hemisphere and, as the light bounces from one object to another, the light energy is computed on any surfaces surrounding the object. This is what we call "indirect illumination":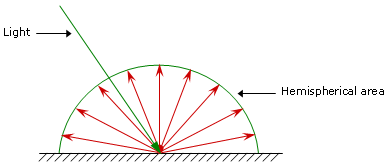
-
In the Rays box, define the number of rays that are going to be sent at random from each pixel in the hemisphere to calculate the indirect illumination factor which will be multiplied by the material diffuse parameter coefficient.
As a consequence, no indirect illumination is computed for materials with a null diffuse value.For instance, in case of a complex scene with many elements and light sources, choosing a high number of rays is a good idea to have a fine result (at the cost of a lower performance).

The trick is to balance the rendering quality and the computation duration: - setting a too low number produces a low quality image since soft patterns of light and shadow may appear but the shooting duration is shorter
- on the other hand, setting a too high value produces a high quality image since a great number of rays are fired but the more rays, the longer the shooting duration.
-
Indicate the Maximum radius in millimeters.
This parameter is used to allow better performance and represents an interpolation: a final gather result could be computed for each pixel but computation time would be unbearable in most cases. As indirect illumination tends to vary rather slowly, it is possible to interpolate from previous final gather results and still get an accurate result.
Each time a final gather point is requested to compute the indirect illumination on a pixel, neighbouring results are checked to see if they can be reused with minimal interpolation errors.
Maximum radius represents the maximum distance of previous final gather points to be reused. As a consequence, any previous points located at a distance greater than the maximum indicated (i.e. outside a sphere whose radius is the maximum radius you indicated) are not taken into account.
Usually, the illumination in a wall does not vary much when you just move over a minimal distance. But in a corner, artifacts may appear if one wall uses points from the other. This is avoided by the maximum radius criterium.
A useful schema to determine the correct value to be used is to first set a high maximum radius then decrease it progressively until you reach a value that does not produce artifacts for the given scene.
Note:-
If set to 0, the maximum radius is computed from the scene extent.
-
The lower the maximum radius, the smoother the shading and the more accurate the illumination as rays are sent closer from each other.
However, there is a price to pay in performance when setting a low value since the number of Final Gathering steps is increased.
-
-
Once Final Gathering is activated, you can select the Do not use ambient option in the Material area in order not to take into account the material ambient coefficient when computing indirect illumination.
Ambient coefficient corresponds to the light intensity diffused in any direction by the object, even if not lit by any light source. This parameter affects the whole object, including the shadowed area.
-
Click OK to validate your parameters.

While tuning your scene parameters, start using a few number of rays (i.e. a value < 100) with a high maximum radius. Then, when satisfied with the scene definition, you can increase the number of rays and decrease the maximum radius value. -
Click Render Shooting
 then select either the Render Single Frame
 button or the Render Animation
 button, depending on the type of render you want to create.
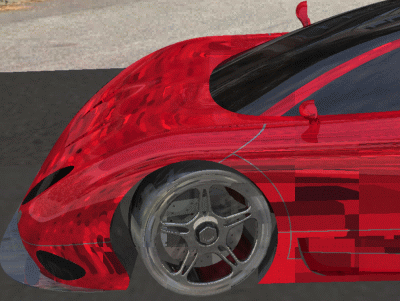
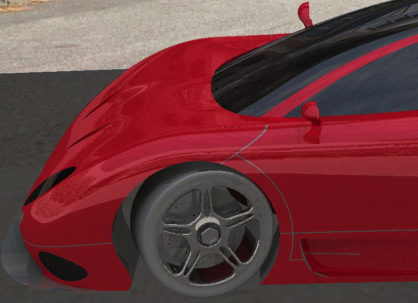
Picture 1 - 5 rays
Maximum radius: 1000
Computation time < 1 minutePicture 2 - 50 rays
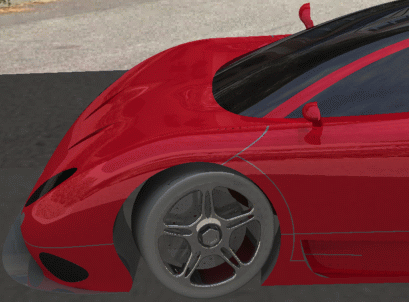
Maximum radius: 500
Computation time < 1 minutePicture 3 - 500 rays
Maximum radius: 100
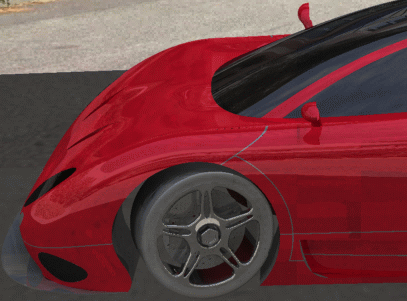
Computation time = 1 minutePicture 4 - 5000 rays
Maximum radius: 80
Computation time = 5 minutes
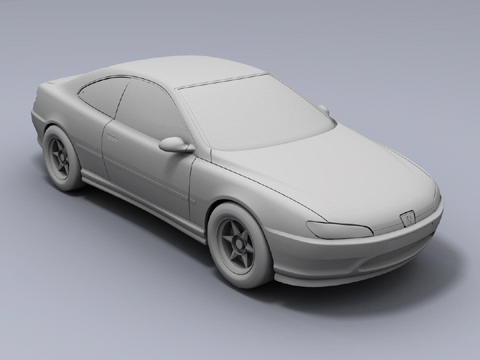
Pay attention to the shooting quality parameters, they have a great influence on performance and image quality. The following picture is another example of Final Gathering:
![]()