 |
The tool path of a machining operation can be simulated
in its entirety or
partially simulated with a chosen start and end point. This procedure
demonstrates both methods. The tool path lines can be optionally
displayed during simulation.
-

-

-
-
-
|
 |
To see the trace of the tool path display during
simulation, select Tool > Options > Machining Simulation > Machine Tool
Path Simulation > Simulation
tab,
and select the Display Tool Path during Simulation check box.
All machining operations need to be up-to-date and tool paths computed
before Machine Simulation is started. |
 |
|
| |
-
In the PPR tree, select Facing.1.
-
Click
Machine Simulation .
-
Run the simulation.
 |
 |
A number of commands can be run while you run the Machine
Simulation command, as is the case with the Process
Simulation command. These shared commands include
simulation commands such as Analysis Configuration and
view commands such as Zoom In  .
When you click on other commands (e.g., Zoom In), the
simulation pauses. Once the command has finished, you can
start a paused simulation from the pause point by clicking Run. .
When you click on other commands (e.g., Zoom In), the
simulation pauses. Once the command has finished, you can
start a paused simulation from the pause point by clicking Run. |
| |
When you use the Zoom In command icon or menu
option, you are using a shared command. Using the mouse to
zoom in is not the same as using the Zoom In in
this context. |
| |
During simulation of a Manufacturing Program, the
following rules are used to decide machine configuration:
- If there are multiple configurations to reach a point,
the configuration that is within travel limits is chosen
- If multiple configurations are within limits, then the
one that causes minimum motion is chosen
- If all possible configurations are out of limits, the
one that causes minimum motion is chosen. Travel limit warnings
are generated.
The user can enforce a specific configuration to be used
for a Machining Activity by introducing a Machine Instruction
activity before the Machining Activity.
The above rules also apply for simulation of a single
Machining Operation. However, single MO simulation is meant to be a
quick validation of the tool path, and therefore does not consider
the configuration of the machine for the previous activities.
|
|
|
This functionality is helpful when you want to simulate just a part of
the machining operation. Note that partial simulation is possible only
after the entire machining operation has been simulated once.
Partial simulation is not possible with a machine instruction activity
because no tool path is created. |
| |
-
Simulate the entire machining operation by following
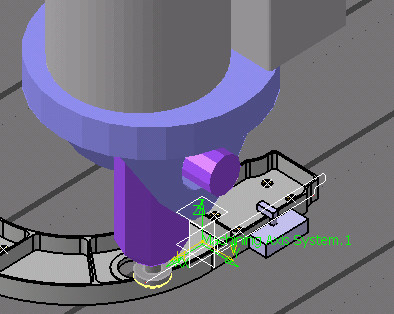
the steps above, then click Machine Simulation .
| The Process Simulation toolbar
disappears; the tool path is displayed as shown below: |
 |
-
Right-click on any segment of the tool path displayed
in the 3D view and select Partial Simulation.
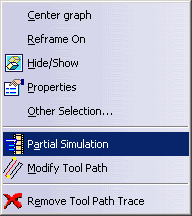 |
| Once you select Partial Simulation, the
machine is placed at the end point of the selected range of
tool path segment
(the tool path segment is highlighted in green). |
 |
See Tool > Options > Machining Simulation > Machine Tool Path
Simulation > Simulation
tab
for information on setting the Modification Range
option. The number of segments highlighted when you select
Partial Simulation depends on the Modification
Range. |
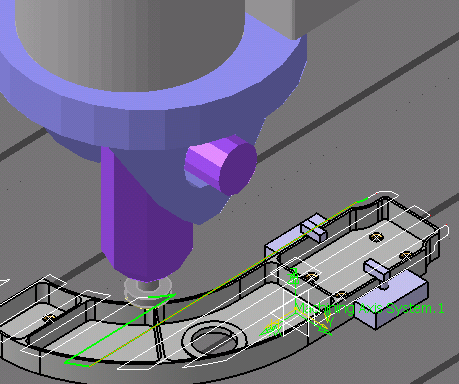 |
| Also, the Partial Simulation dialog box
is displayed. |
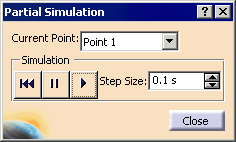 |
-
Use the buttons in the Partial Simulation dialog box to
simulate the path segment you selected.
| Field/Button |
Effect |
| Current Point |
Selecting a point from the Current Point
list makes the simulation jump to the point on the geometry. |

|
Rewind |
 |
Pause |
|
|
Play |
| Step Size |
In the Step Size box, type the
value or use the arrows to change the value. This option
enables you to change the simulation rate for each step.
You can make the sub-steps:
- smaller, which makes the simulation run more slowly, or
- larger, which makes the simulation run more quickly.
|
|
-
Click Close when the Partial Simulation
is complete.
|
|
|
Using Multi-resource Machine Simulation
|
|
|
-
-
-
-
|
|
|
About the Context Menu
|
| |
If you right-click on the manufacturing program,
you can select Simulate Machine using Tool Path
instead of using Machine Simulation described
above. |
| |
For more information about the simulation
commands available using NC code, see
Simulating while Using NC Code. |
| |
For more information about Start Video
Simulation using Tool Path,
see
Video Mode for Material Removal Simulation. |
| |
About the Information Message
|
| |
In some cases you may receive an information message
stating: Change in Machine configuration required to reach the
next point.
Please check travel limits of the machine OR insert Machine Instruction
activity to select a different start configuration.
This message appears if the simulation cannot be carried out any
farther using the current machine configuration, while keeping the
machine within the travel limits. This message appears when the machine
reaches the last feasible point of the tool path using the current
machine configuration. You can continue the simulation because the
machine axis moves back into the limits.
The simulation relies upon the following rules:
- If there are multiple configurations to reach a point, the
configuration that is within travel limits is chosen
- If multiple configurations are within limits, the one that
causes minimum motion is chosen
- If all possible configurations are out of limits, the one that
causes minimum motion is chosen. An out-of-limits configuration
generates travel limit warnings.
|