|
|
This task shows you how to generate NC code in Clfile format from the program in batch mode. | |
|
|
Always save your
program modifications before generating the NC code.
For best results, you should first verify the operations of your program by means of a replay or simulation. There should be no operations to be updated or in an undefined state. In order to generate clfile output, the PP table associated to the machine must be accessible in read mode. Otherwise an error message is issued in the log file. |
|
|
|
1. | Select Generate NC Code in Batch Mode
|
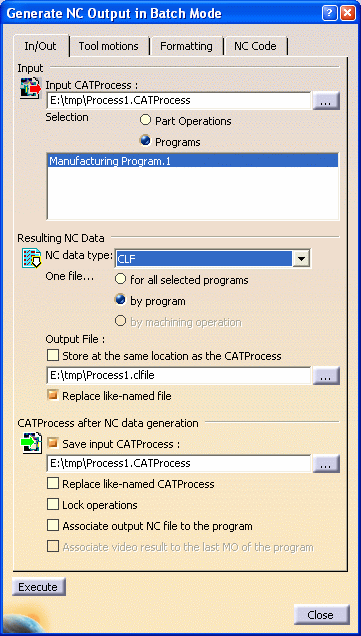
In the In/Out tab page... |
||
| 2. | Select the manufacturing document to be
processed using the Input CATProcess [...] button. The current
document is proposed by default. Select the type of NC entity to be processed. This can be:
|
|
| 3. | Select CLF as the NC data type that you want to generate. | |
| 4. | Select the desired One
file... option to generate a single clfile:
|
|
| 5. | To store the resulting NC data file at the
same location as the input CATProcess, select the Store at same
location as the CATProcess check box. Otherwise, specify the Output file where you want the NC data to be written using the [...] button. A default name is proposed for
the output file (for example, On subsequent batch executions, the filename and the path of the last generated output are remembered if the Store at same location as the CATProcess check box is not selected. If this option is selected, only the filename of last generated output is remembered. |
|
| 6. | Select the Replace like-named file check box if you want to authorize overwriting an existing like-named clfile. | |
| 7. | If needed, you can choose to write the CATProcess document after processing. Select the Save Input CATProcess check box and specify where you want to save it using the [...] button. | |
| 8. | Select the Replace like-named CATProcess check box if you want to authorize overwriting an existing like-named CATProcess document. | |
| 9. | You can
attach the generated output file to the first selected
manufacturing program by selecting the Associate output NC file
to the program check box.
The output file can be accessed by right-clicking the manufacturing program and selecting Display NC File. See Manufacturing Program with Associated NC File for additional information. |
|
| 10. | You can select the Lock operations check box to lock all the machining operations after processing. Please refer to Locked Machining Operations for more information. | |
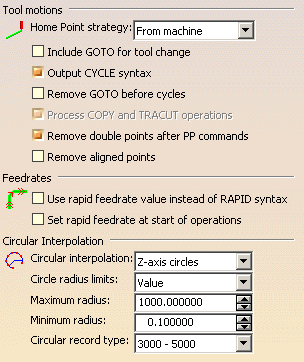
In the Tool Motions tab page... |
||
| 11. | Specify the options to be used in the
processing.
Some of these options take machine characteristics into account (for example, Circular Interpolation). Please refer to NC Data Options for more information. |
|
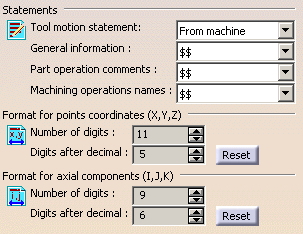
In the Formatting tab page... |
||
| 12. | Specify the formatting options. These options determine
how information is to be presented on the output file (for example,
information statements to be presented with the PPRINT syntax).
Please refer to NC Data Options for more information. |
|
| 13. | Click Execute to request computation of the Clfile code. | |
|
|
Please refer to
Clfile Formats for more information about the NC data output. A log file is also generated in the resulting NC data folder. It contains machining time information similar to that obtained during the interactive tool path replay. |
|
|
|
||


