-
Click the front view.
-
Select Edit > Properties.
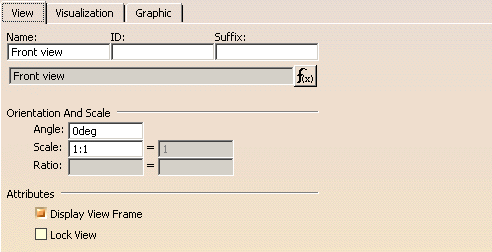
The Properties dialog box appears, displaying the following tabs: View, Visualization and Graphic.
-
Click the Graphic tab.
-
Change the view properties as wanted, and then click OK to validate.
More About the View Properties Dialog Box
This dialog box displays the following tabs:
 View
Tab
 |
- Name / ID / Suffix: enter/modify the name of the view (or
2D component reference when pertinent), an ID or/and a suffix.
You can also create a formula for the view name. For more information, refer to the Knowledge Advisor User's Guide. -
Orientation and Scale
- Angle: define the angle between the view and the sheet.
- Scale: define the scale of the view.
= displays the decimal value with respect to the scale. This field is read-only. - Ratio: define the display size of annotations and symbols. Both the numerator and the divisor can be modified.
-
Attributes
- Display View Frame: show/hide the view frame.
- Lock View: lock the view so that it cannot be modified.
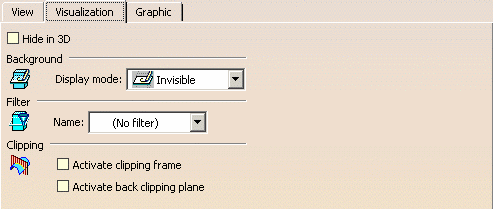
 Visualization
Tab
 |
-
Hide in 3D: select this check box if you do not want any element on the sheet (views, geometry, annotations, and so on) to be visible in the view's 3D background and in a 3D workbench (such as Part Design).
In this case, sheet elements will not be visible in Show or No Show space.
-
Background
-
Display Mode: specify how the view's 2D and 3D backgrounds should be handled:

Standard: shows both the 2D and 3D backgrounds.

Invisible: hides both the 2D background (the 3D representation of 2D elements which do not belong to the current view, but to other views) and the 3D background (the representation of all 3D elements, including edges, faces and 3D wireframe).

Unpickable: prevents selecting all elements in both the 2D and 3D backgrounds, even though you can see them. You can just handle 2D elements which belong to the current view.

Low-intensified: dims all elements in both the 2D and 3D backgrounds.

Unpickable low-intensified: dims all elements in both the 2D and 3D backgrounds. Additionally, although you can see these elements, you cannot select them. You can just handle 2D elements in the current view.
Refer to Managing the Layout View Background for more information.
-
-
Filter
-
Name: select an existing filter to apply to the view. Refer to Creating View Filters for more information.
-
-
Clipping
- Activate clipping frame: check this box to clip the 3D
background of the view using a frame.
Refer to Using the Clipping Frame for more information. - Activate back-clipping plane: check this box to clip the
3D background of the view using a back-clipping plane.
Refer to Using the Back-Clipping Plane for more information.
- Activate clipping frame: check this box to clip the 3D
background of the view using a frame.
 Graphic
Tab
 |
- Global Properties:
- Shown: this property is not available in 2D Layout for 3D Design.
- Pickable:select this box if you want the view to always be selectable.
- Layers: this property is not available in 2D Layout for 3D Design.
- Rendering Style: this property is not available in 2D Layout for 3D Design.
- LowInt: select this box to apply the low-intensity color to the selected view.
Refer to Displaying and Editing Graphic Properties in the Infrastructure User's Guide for more information about these properties.
![]()