-
Click Line
 in the Geometry Creation toolbar.
 -
Use the vertical axis to define the cutting profile as shown below, and double-click to end the line creation.

You could also draw a profile consisting in multiple segments to create an aligned section view/cut or an offset section view/cut. 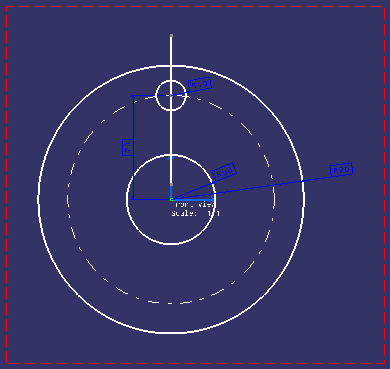
-
Click New Section/Auxiliary View
 in the Layout toolbar (Views sub-toolbar).
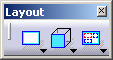
-
Select the line you have just created as the cutting profile.
You cannot select geometry which does not belong to the active view. The Tools Palette toolbar is automatically displayed with the following options:
-
Auxiliary View: creates an auxiliary view.
-
 Section View: creates a section view.
 -
 Section Cut: creates a section cut.
  Create Datum: activate this option to create
a non-associative view. By default this option is not activated.
Create Datum: activate this option to create
a non-associative view. By default this option is not activated.
This option is available only when selecting the New View From command.
These options are also available from the contextual menu.
Furthermore, the contextual menu display the Invert Normal option, that is also available directly in the view, via green manipulators. -
-
Select the Section View icon
. -
Click on the sheet at the location where you want the section view to be positioned.
- Positioning the view defines the section view direction, in
accordance with the projection method.
The projection method (First angle standard or Third angle standard) is defined by the sheet style, as specified in the standard used by the layout. For more information, refer to Sheet Styles in the Administration Tasks chapter. You can change the projection method by editing the layout sheet properties (using Edit > Properties). - Section/auxiliary views are always created using the sheet scale. The primary view scale, when it is different from the sheet scale, is not propagated to other section/auxiliary views.
- If you change the sheet scale (defined in the sheet properties), the scale of all existing views (defined in the view properties) is multiplied by that of the sheet (for example, if existing views already have a scale of 1/10, and if you change the sheet scale to 1/10, then existing views will now have a scale of 1/100).

Note how the view is previewed in the part window. You need to zoom out, as the view box defined in the ISO_3D standard used by the current layout has sides of 1000mm. For more information on the standards, see Administration Tasks.
An empty section view is created, with its plane perpendicular to the active view. Additionally, the Section view item is added to the specification tree.
- Positioning the view defines the section view direction, in
accordance with the projection method.
-
Double-click the section view to activate it. You can now create 2D geometry in this view.
About Section/Auxiliary Views
-
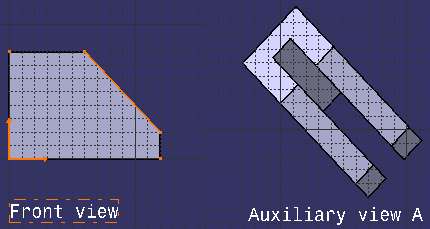
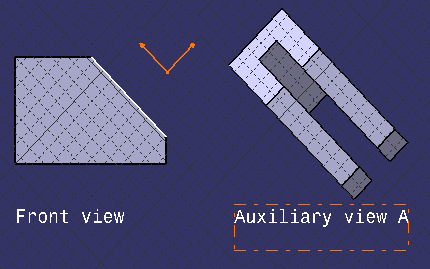
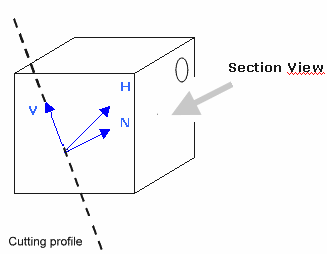
Section views, section cuts or auxiliary views are created using an existing 2D profile (a single line or a multi-segment profile) in the active view. Such views are based on a plane perpendicular to the active view which contains the directional element (the selected line). The projection direction depends on two factors:
-
the cursor location
-
the projection method
Once created, the new view is not associative to the directional element, and this element is not transformed into a callout. Therefore, it is impossible to edit section profiles after the view has been created.
-
- Section views, section cuts or auxiliary views are positioned according to their reference view. Therefore, moving a reference view also moves its linked views.
The case of multi-segment profiles
Selecting a profile made of multiple segments lets you create several section views/cuts in one shot. There are two possible scenarios:
- Aligned profile:

When selecting such a profile, a view is created for each segment.
- Offset profile:
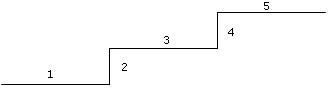
When selecting such a profile, a view is created for each segment parallel to the first one (for example, 1; 3; 5).
When creating views from a multi-segment profile, remember the following points:
- Make sure you select the first segment in the profile (the first-created one) if you want to create section views/cuts. If you do not select the first segment, then only the selected segment is taken into account (and not the whole profile), and an auxiliary is created.
- The views share the same origin in the layout sheet, and their local axes (H and V) overlap.
- The first view of a multi-segment profile has folding lines corresponding to each segment, and the other views only have folding lines corresponding to the current segment.
- The name of each view is suffixed to indicate the view's rank.
- Only section views and section cuts can be created from a multi-segment profile.
- The first segment of a multi-segment profile defines the section orientation.
Section/auxiliary view origin point
The section/auxiliary view origin point is a 3D projection of the active view origin point to the geometry used as a cutting
profile.
See the illustration below:
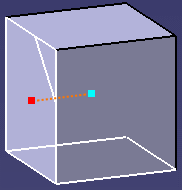
The Front view origin point (represented in red) is a projection of the 3D axis origin (in blue).
For more information, you can refer to Before you begin creating views and layout views customization.
Front View 3D View 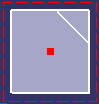
- The slanting line is used as a cutting profile
to create a Section view.
The Front view origin point is projected to the cutting profile to create the Section view origin point (in green).
Front View Section View 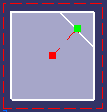
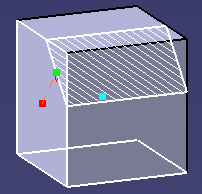
You can see that the section view origin point (in green) is not a projection of the 3D axis origin (in blue), but a projection of the active view origin point (red).
Section/auxiliary view axis orientation
The section/auxiliary view axis orientation is based on the cutting profile
angle defined in the primary view. In this way, the section/auxiliary view axis
follows the projected element plane, in order to simplify the design work.
See illustrations below:
| Front view axis orientation |
 |
|
Auxiliary view axis orientation (angle = 45deg) |
 |
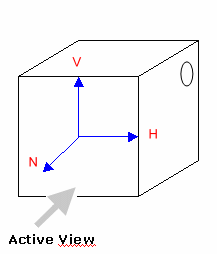
More precisely, here are the rules used to position the H / V / N axis orientation in an auxiliary/section view:
H = has the same axis and the inverse direction of the active view N axis. (As the reference view N axis is always going out of the geometry, so the auxiliary/section view H axis is going inside the geometry).
V = has the same axis as the cutting profile. Its direction depends on N and H: these three directions must form a direct trihedron (right-handed cartesian system).
N = the axis is the chosen point of view (the user's look), the direction is toward the user.
As N is fixed and H is known,
V is deduced.
See illustrations below:
| Active view axis orientation |
Section/Auxiliary view axis orientation |
 |
 |
![]()