|
|
This task shows
you how to edit the insert holder of a turning operation. You can do this in several ways:
|
|||||||||||||||||||||||||||||||||||||||||||||||||||||||||||||||||||||||||||||||||||||||||||
|
|
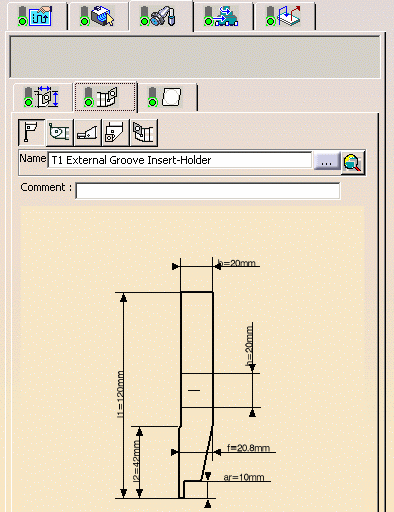
1. | Double-click the operation in the program, then select
the Insert Holder tab
|
||||||||||||||||||||||||||||||||||||||||||||||||||||||||||||||||||||||||||||||||||||||||||
| 2. |
To create a new insert holder: If you want to change insert holder type, select the icon corresponding to the desired type:
In this case the corresponding insert holder representation appears in the 2D viewer.
|
|||||||||||||||||||||||||||||||||||||||||||||||||||||||||||||||||||||||||||||||||||||||||||
|
|
If the same tooling is used on more than one operation,
the parameters of the resource are not accessible for modification (they
are greyed out). In this case, you can create a new resource by entering a new identifier in the Name field. You can then specify the parameters of the new resource. |
|||||||||||||||||||||||||||||||||||||||||||||||||||||||||||||||||||||||||||||||||||||||||||
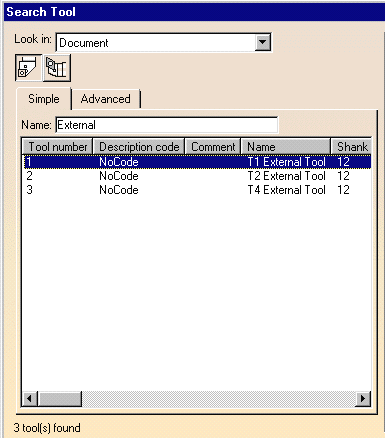
| 3. | To select an insert holder
that is already used in the document:
The insert holder representation is displayed in the 2D viewer. It can be edited as described above. |
|||||||||||||||||||||||||||||||||||||||||||||||||||||||||||||||||||||||||||||||||||||||||||
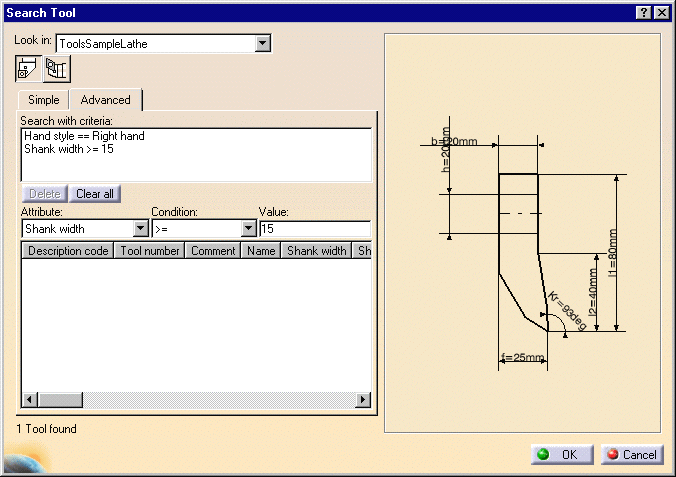
| 4. | To select another insert holder by means of a query:
|
|||||||||||||||||||||||||||||||||||||||||||||||||||||||||||||||||||||||||||||||||||||||||||
|
||||||||||||||||||||||||||||||||||||||||||||||||||||||||||||||||||||||||||||||||||||||||||||
|
||||||||||||||||||||||||||||||||||||||||||||||||||||||||||||||||||||||||||||||||||||||||||||
|
||||||||||||||||||||||||||||||||||||||||||||||||||||||||||||||||||||||||||||||||||||||||||||
| 5. | Click OK to confirm using this new insert holder in the operation. | |||||||||||||||||||||||||||||||||||||||||||||||||||||||||||||||||||||||||||||||||||||||||||
|
|
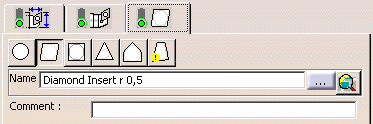
Note that
compatibility is checked between the insert and the insert holder. If there is incompatibility, this is indicated by an exclamation mark symbol on the icon. In the example below, the selected diamond insert
However, it cannot be used on a groove internal insert holder
If, for example, you select a groove internal insert holder, the
diamond insert will no longer be referenced by the tool assembly (the
status light on the Insert tab turns red). Then you will have to select a
compatible insert type (such as groove insert
|
|||||||||||||||||||||||||||||||||||||||||||||||||||||||||||||||||||||||||||||||||||||||||||
|
|
||||||||||||||||||||||||||||||||||||||||||||||||||||||||||||||||||||||||||||||||||||||||||||