Automatic switch to design mode:
If you work with the cache system in visualization mode, you no longer need to use Edit > Representations > Design Mode beforehand as the switch to design mode is automatic (an eye appears as you point the product in the geometry or specification tree). All you need to do is click.
-
Click Cable Joint
 in the Kinematics Joints toolbar or
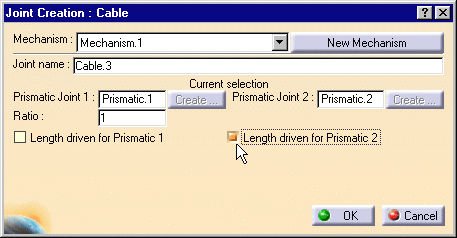
select Insert > New Joint > Cable from the Menu bar.The Joint Creation: Cable dialog box appears. 
Now you need to select two prismatic joints -
Select Prismatic Joint 1 and Prismatic Joint 2 in the specification tree

If the prismatic joints are not created yet, use the create button. The Joint Creation: Prismatic dialog box automatically appears. For more detailed information, see Creating Gear joints and Creating Prismatic Joints -
Assign a command, for example select the Length driven for Prismatic 2 check box.
-
Click Ok to end the cable joint creation.
The mechanism can be simulatedThe cable joint is created and identified in the specification tree.
Now expand the cable joint you just created, the embedded leaf joints are displayed.
Note: the joints involved in a compound joint can be neither edited nor deleted directly.
-
Click the Simulation with Commands icon
 or double-click Mechanism.1 in the specification tree to display the
corresponding simulation dialog box.
or double-click Mechanism.1 in the specification tree to display the
corresponding simulation dialog box. -
Open the Cable_Result.CATProduct document to check your result.

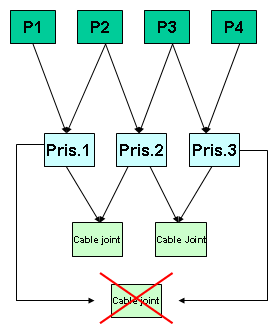
Note: To create a cable joint, the two prismatic joints involved in the cable joint must rely on a same support part.
See picture below: (P stands for Part, Pris. for Prismatic)