|
This section shows you how to use the advanced surface
mesher and how to access the Advanced Surface Mesher
workshop.
-
Enter the Advanced
Surface Mesher workshop.
-
If needed, define local
specifications of the advanced surface mesh (using the
Local Specifications
toolbar).
-
Launch or remove the
simplification geometry and/or the mesh (using the
Execution toolbar).
-
If needed, perform manually
modifications (using the
Edition Tools toolbar).
 |
A specification created or modified after
simplifying the geometry will not be kept on future updates.
That means that: if you modify the geometry, the local
specifications (defined using the
Local Specifications
toolbar) are kept but the modifications (performed using the
Edition Tools toolbar)
will not be kept.
You have to define all the specifications before launching the
geometry simplification. |
At any time, you can:
-
access the global parameters
if you want to visualize parameters you have defined or if you want to
modify some of the global specifications.
-
exit the Advanced
Surface Mesher workshop.
About Advanced Surface Mesher
The Advanced Surface Mesher works as shown here:
-
Open the geometry
 . .
-
Launch the geometrical simplification
 . .
-
Launch the mesh execution
 . .
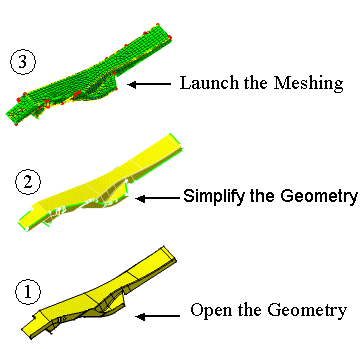
: Open the
geometrical element on which you are going to generate geometrical
simplification from parameters.
: The geometry
is simplified in order to launch the meshing and manage constraints more
easily. The level of the simplification depends on the mesh parameters
previously defined.
: The advanced
surface mesh is created from the geometrical simplification previously
generated.
Methodology
|
Follow the below described methodological approach when
using the Advanced Surface Mesher of the FEM Surface (FMS) product.
Consider that the FEM Surface (FMS) product was developed so that
mesh operation may be as user friendly and as automatic as possible.
-
If you want your constraints to be associative with the
resulting mesh, before you launch the mesh operation apply as many
constraints as possible and as automatically as possible.
-
Still, try to regularly check how constraints result on
the mesh.
Generally speaking, you will start defining parameters,
cleaning the geometry according to the desired resulting meshing and
specifying constraints as soon as possible. You will then launch the
Geometrical Simplification and in one go the mesh operation. |
- define parameters
- clean the geometry
- specify constraints
- launch the Geometrical Simplification
- launch the Mesh operation
- perform constraints modification according to the resulting
mesh elements (not according to the topology)
- if needed, edit the mesh elements
|
|
-
Define parameters.
|
From the very beginning, you need to specify global
parameters: the shape of the elements, the size of the elements, the
sag and the minimum size of these elements.
|
Before:
 |
After:
 |
|
 |
Use automatic algorithm and only define what the
algorithm will not do properly for given cases. |
-
Clean the geometry.
|
From the very beginning, you will also specify
whether or not, you need given holes, button hole gaps (or cracks)
and small faces to be taken into account by the geometrical
simplification and therefore by the mesher.
|
Before:
 |
After:
 |
|
|
|
This must be performed before you launch the
mesh operation. Once the part is meshed, the clean characteristics
can no more be modified. |
-
Specify constraints.
|
You will also specify the constraints that are
absolutely necessary for performing the Analysis computation. For
example, you will impose the desired constraints in order to generate
connections between meshes and to create boundary conditions such as
restraints and loads.
|
Before:
 |
After:
 |
|
|
|
Specify as many constraints before you launch
the mesh operation: these constraints will be associative. Specify
these constraints as automatically as possible and avoid modifying
them manually (for example dragging a node). |
-
Simplify the geometry.
|
The Geometrical Simplification computation is based
on the global parameters and the constraints imposed by the user. The
system will create an additional set of new constraints that will
automatically help the mesher in creating elements of a higher
quality.
 |
|
|
Avoid applying too many modifications before
simplifying the geometry: launch the Geometrical Simplification and
before modifying manually, check how the resulting mesh looks like. |
-
Launch the mesh operation.
|
As soon as the mesh elements are generated, a
feedback on the quality is provided. You can then perform manual
modifications on the mesh elements, if needed.
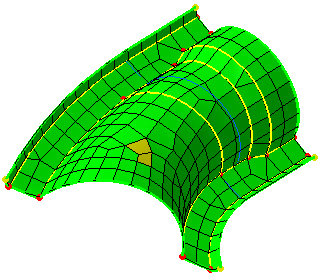 |
|
|
BE CAREFUL: this operation can be reversed. Even
though you launch the mesh operation, you can apply modifications to
the specifications. First have a look at the domains that seem to be
problematic. Add more or delete existing constraints instead of
modifying the mesh elements manually. |
-
Modify the mesh (re-mesh).
|
Although the algorithms were developed in order to
minimize user interactions, after the Mesh operation was performed,
you can still modify the generated mesh elements. In other words, you
can:
-
modify the geometrical simplification generated by
the system
-
modify the nodes distribution
-
apply local re-meshing (for example, the size or
the type of the mesh elements)
-
edit mesh elements and apply manual modifications.
|
|
|
Make sure you cannot remove the mesh and modify the
constraints specifications instead. These modifications will not be
associative.
Advanced Users
If you are an advanced user and know very well how
the advanced surface mesher behaves, you can launch the geometrical
simplification, perform the above mentioned re-meshing modifications
and then launch the mesh operation in order to fill the gaps. |
|
Resuming Editing on Mesh Part
Open the sample05.CATAnalysis
document from the samples directory.
-
Enter the Advanced Surface Mesher
workshop. To do this,
-
Double-click Advanced Surface Mesh.1
in the specification tree (below Nodes and Elements).
-
Click OK (Continue anyway?)
in the warning message.
-
Mesh the surface part.
To do this, click Mesh The Part
 . .
-
Exit the Advanced Surface Mesher
workshop.
-
Edit the
Advanced Surface Mesh.1 mesh part. To do this, double-click
Advanced Surface Mesh.1 in the specification tree.
|
A
message lets you decide whether you want to edit the meshed CATAnalysis
with:
OR
- the meshing last created.
|
|
|
If the geometry was not properly updated, the .CATAnalysis will be edited anyway with the initial meshing. |
|