The command allows you to define two types of patterns:
- Rectangular
- Circular as illustrated in the scenario below
- User Pattern
To create a circular pattern, you need to choose the types of parameters you wish to specify so that the application will be able to compute the location of the items you copied. This task shows you how to do so.
-
Click the Pattern icon
 .
.
The Pattern dialog box is displayed. -
Click the Circular Pattern icon
 to access the parameters specific to this type of pattern.
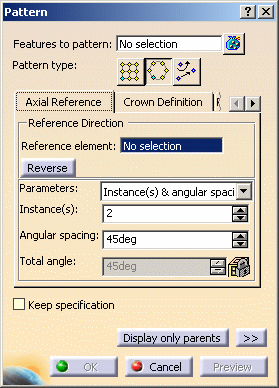
Keep Specifications Option
Checking the Keep specification option creates instances where a limit (To Plane/Surface, To Shell, Extend across removed faces, Trim to Shell) defined for the original feature is used for each instance. In the example below, the limit defined for the prism, i.e. the To Plane/Surface limit, applies to all instances. As the limiting surface is not planar, the instances have different lengths.
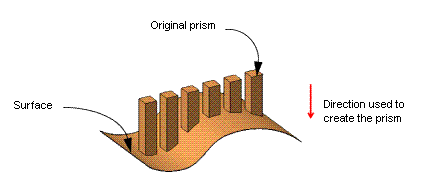
But for the purposes of our scenario, as the limit defined for the prism is Length, activating the Keep specification option is meaningless.
-
Select Protected Prism.2 as the feature to pattern.
When selecting several features, the field displays the number of selected elements. To act on this selection, just click the
 icon to display the Element
list dialog box that allows you to:
icon to display the Element
list dialog box that allows you to:- view the selected elements
- remove any element clicking the Remove button
- replace any element using the Replace button and selecting a new one in the geometry or in the specification tree.
Axial Reference
To define a direction, you can select an edge, a line, a planar face or a plane. After selecting an edge, a line or a planar face, if necessary, you can also select a point to define the rotation center. If you select a plane, selecting a point is mandatory.
-
Click the Reference element field and select the upper face to determine the rotation axis. This axis is normal to the face. An arrow indicating the direction is displayed on the functional body.
Checking the Reverse button or clicking the arrow reverses the direction.
-
The Parameters field lets you choose the types of parameters you wish to specify so that the application will be able to compute the location of the items copied.
These parameters are:- Instances & total angle: the application computes the angular spacing after you specified the number of instances you wish to obtain and a total angle value.
- Instances & angular spacing: the application computes the total angle after you specified the number of instances you wish to obtain and an angular spacing.
- Angular spacing & total angle: the application computes the instances you can obtain by specifying an angular spacing and a total angle.
- Complete crown: the application computes the angular spacing between the instances you decide to obtain.
Keep the Instances & angular spacing options.
-
Enter 7 as the number of instances you wish to obtain in the first direction.
-
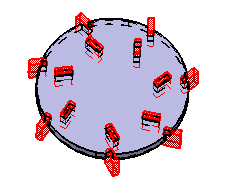
Enter 50 degrees as the angular spacing.
The circular pattern looks like this: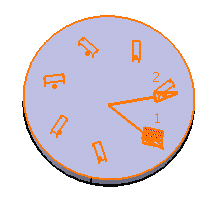
Crown Definition
-
Click the Crown Definition tab to access options allowing you to create an additional set of instances around the instances you have just defined in the previous steps.
Parameters
X Feature to pattern __
Distance between the feature and the rotation axis __
Circle spacing __
Crown thickness -
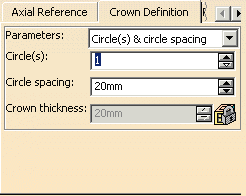
The Parameters field lets you choose the types of parameters you wish to specify so that the application will be able to compute the location of the items copied.
These parameters are:- Circle & Circle spacing
- Circle & crown thickness
- Circle spacing and crown thickness
Set the Circle & Circle spacing options to define the parameters you wish to specify.
-
Enter 2 in the Circle(s) field.
-
Enter -24 mm in the Circle spacing field.
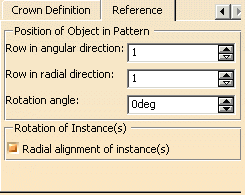
Reference
-
Click the Reference tab to access options enabling you to modify the position of the initial protected prism. Such a modification will affect all instances too.
-
Enter 2 in the Row in angular direction field.
The initial protected prism as well as the instance nest to it are slightly moved in the angular direction.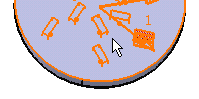
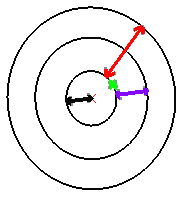
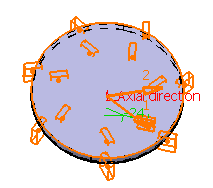
Entering 2 in the Radial direction field makes the instances of the crown move in the radial direction as illustrated below:
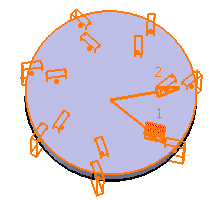
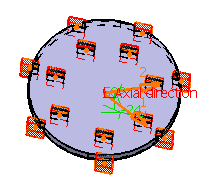
The Radial alignment of instances option allows you to define the instance orientations. By default, the option is selected, meaning that all instances have the same orientation as the original feature.
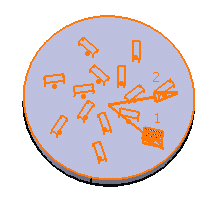
Otherwise, if the option is off, all instances are normal to the lines tangent to the circle as illustrated below:
-
Click OK to confirm the operation.
The circular pattern composed of 14 instances is created:
Circular Pattern.X is added to the specification tree in the Solid Functional Set.X node.
Removing Instances
Clicking an instance once removes the instance from the specifications.