This task shows how to group surfaces by boundary, that means finding
nodes and 2D elements located within an area bounded by boundary curves and
located on supports. Element detection is based on associativity between
the geometry and the mesh.
You will use the Groups toolbar.
Available if one of three following products is installed: Elfini Structural Analysis (EST), FEM Surface (FMS) or FEM Solid (FMD).
Groups created using the Groups toolbar are stored under a Groups set. You can also create groups under a particular mesh part using the Create Group contextual menu in the Generative Structural Analysis workbench. The groups created using the contextual menu are not stored under the Groups set. They are directly linked to the specified mesh part. For more details about this contextual menu, refer to Creating Groups under Mesh Parts.
You will find here the method used to create a surface group by boundary.
In this particular example:
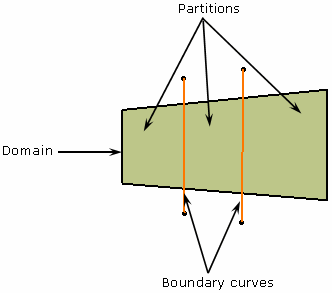
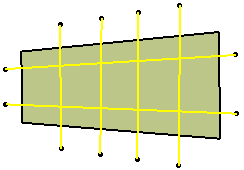
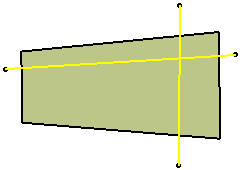
The two Boundary curves split the Domain into three domain partitions (called Partitions).
For each partition:
-
if all the boundary curves bound it, then the partition is valid.
If several partitions are valid, no node (or element) is finding.
To know more about the valid configurations to find nodes and elements, click here.
Open the sample60.CATAnalysis document from the samples directory.
-
Click Surface Group by Boundary
 .
.The Surface Group by Boundary dialog box appears.

-
Name: lets you specify the name of the group.
-
Supports: lets you select the surfaces from which you want to find 2D elements.

-
You can select only 2D features as surface group by boundary Supports.
-
This group enables to find node elements, edge elements and all the 1D elements.
-
If you create a surface group by boundary under a mesh part, the Supports field is automatically initialized with the mesh part support.
-
-
Boundary: lets you define the boundary curves.
Multi selection of curves is available.
-
-
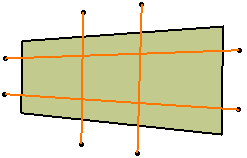
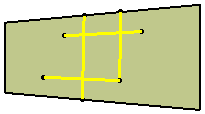
Select the support.
In this particular example, select Fill.2 under Geometrical Set.1 in the specification tree.
-
Activate the Boundary field.
-
Select the boundary curves.
In this particular example, select Line.1, Line.2, Line.7 and Line.10 in the specification tree.

For a better visualization, you can hide the lines that are not selected as boundary curves (using the Hide/Show contextual menu).
-
Click OK.
Both Groups.1 and Surface Group by Boundary.1 appear in the specification tree.
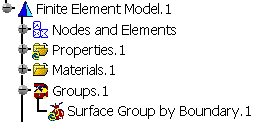
Note that the group is not updated.
In case of a surface group by boundary created under a mesh part, the resulting specification tree is:
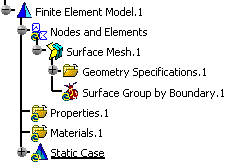
Note that no Groups set is created.
To know more about groups under a mesh part, refer to Creating Groups under Mesh Parts. -
Update the surface group by boundary.
-
Analyze the surface group by boundary.
-
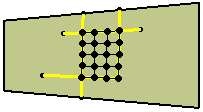
Select the Node, Element and Face of Element check boxes in the Group Content dialog box.
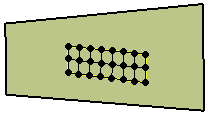
Nodes, elements and faces of element (that have been found) are displayed.
The Group Content dialog box gives you the number of finding nodes, elements and faces of element.
-
Click OK in the Group Content dialog box.
-
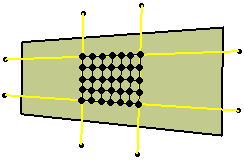
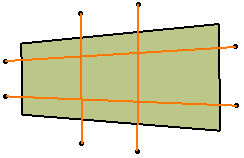
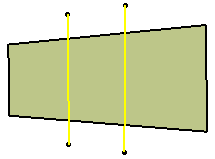
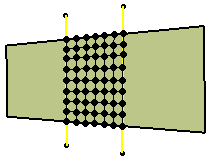
You will find here the result of a surface group by boundary depending on the selected support and boundary curves.
|
Specifications |
Result |
Comments |
|
|
|
Nodes and elements have been found. |
|
|
|
Nodes and elements have been found. |
|
|
|
Nodes and elements have been found. |
|
|
|
Nodes and elements have been found. |
|
|
|
Nodes and elements have been found. |
|
|
|
No node (nor element) has been found. |
|
|
|
No node (nor element) has been found. |

You can manually edit or delete a group.
To do this, right-click the group object in the specification tree and
select the desired contextual menu.
![]()