This
task shows how to create a Node Interface Property.
A node interface property is a property that you will apply to an existing
Point Analysis Interface.
In a assembly context, the Point Analysis Interface must be created in the sub-analyses.
Only available with the Generative Assembly Structural Analysis (GAS) product.
-
Open the sample36.CATAnalysis document from the samples directory.
A point analysis interface has been created in the first sub-analysis. -
Make sure you know all you need about what type of property you will use for what type of connection.
-
Activate the first sub-analysis.
To do this, double-click Analysis Manager under Part1 (Part1.1) in the specification tree.
-
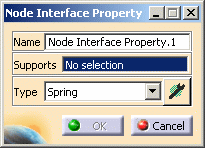
Click Node Interface Property
 in the Connection Properties toolbar.
The Node Interface Property dialog box appears.
-
Name: lets you change the name of the connection property.
-
Supports: lets you select the connection you want to associate to a property.

You can apply the node interface property to Point Analysis Interface of the Generative Assembly Structural Analysis (GAS) product.
For more details, refer to About Connection Properties.
- Type:
-
Spring: the connection is meshed using spring elements.
To know more about spring elements, refer to the Finite Element Reference Guide. -
Component Edition
 :
lets you specify the associated material.
:
lets you specify the associated material.
The Component Edition button can have two status:
-
valid:
-
invalid:

-
-
-
-
Select a point analysis interface.
In this particular example, select the Points Analysis Interface.1 object under Part1 (Part1.1) in the specification tree.

-
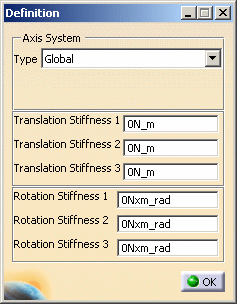
Click the Component Edition button
to specify the parameters.The Definition dialog box appears.
-
Axis System: lets you specify the axis system you want to use.
For more details, refer to Axis System Type. -
Translation Stiffness: lets you enter the translational stiffness values.
-
Rotation Stiffness: lets you enter the rotational stiffness values.
-
-
Set the desired parameters in the Definition dialog box.
-
Click OK in the Definition dialog box.
-
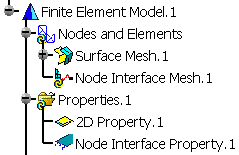
Click OK in the Node Interface Property dialog box.
A Node Interface Property.1 property appears in the specification tree under the Properties.1 set and a Node Interface Mesh.1 mesh part appears under the Nodes and Elements set (in the first sub-analysis).
-
You can edit the Nodes to Nodes Connection Mesh.1 object.
To do this, double-click the Node Interface Mesh.1 object in the specification tree.
The Node Interface Mesh dialog box appears.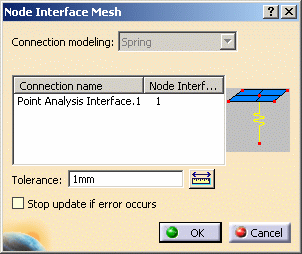
For more details about the nodes to nodes connection mesh part, refer to Creating Node Interface Mesh in the Advanced Meshing Tools User's Guide.
-
You can visualize the node interface mesh (spring elements).
To do this:-
Compute the mesh only (for more details, refer to Computing Objects Sets).
-
Generate a Mesh image (for more details, refer to Generating Images).
-
Edit the Mesh image and select the Display small elements option.
-
![]()