This task shows you how to create a Point Analysis Interface.
Only available with the Generative Assembly Structural Analysis (GAS) product.
Open the sample39.CATAnalysis from the samples directory.
-
Click Point Analysis Interface
 in the Analysis Supports toolbar.
The Point Analysis Interface dialog box appears.
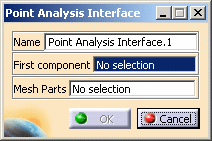
- Name: lets you change the name of the connection.
- First component: lets you select a point, a vertex
or a set of geometrical points.
Do not select points that are already associated to a mesh node. - Mesh Parts: lets you select the associated mesh
part.
The mesh part selection is mandatory. If you do not select any mesh part, a warning message appears after launching the update operation.
-
Select points as First component.
In this particular example, select six geometrical points.
You can select in the specification tree: Point.1, Point.2, Point.3, Point.4, Point.5 and Point.6.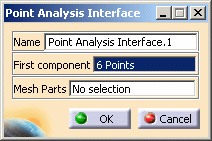
-
Activate the first Mesh Parts field.
-
Select the desired mesh part.
In this particular example, select the Surface Mesh.1 mesh part in the specification tree.
-
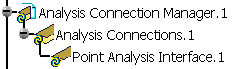
Click OK in the Point Analysis Interface dialog box.
Point Analysis Interface.1 appears in the specification tree under the Analysis Connection Manager.1 set.
- You can update analysis connections.
For more details, refer to Updating Analysis Connections. - You can now apply a node interface property on the connection you
just have created.
For more details, refer to Creating Node Interface Properties.