This task shows how to edit and lock the Color Palette on a Von Mises Stress display.
The Von Mises Stresses, the Displacements, the Precision, the Principal Stress distributions are employed along with a Color Palette. Editing the palette enables you to emphasize on particular values spread on the parts.
Open the sample26.CATAnalysis document from the samples directory.
-
Select View > Render Style > Customize View and make sure the Edges points option is not active and the Materials option is active in the Custom View Modes dialog box.
-
Compute the solutions.
To do this, click Compute and select the All option.
 -
Set the Static Case as the current one.
For more details, refer to Changing a Current Analysis Case. -
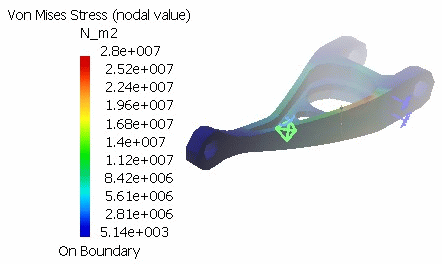
Activate the Stress Von Mises image.
To do this, right-click the Von Mises Stress (nodal values).1 image in the specification tree and select Activate/Deactivate .
.
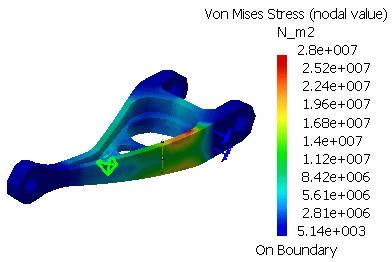
Editing the Color Palette
-
Double click on the color palette to edit it.
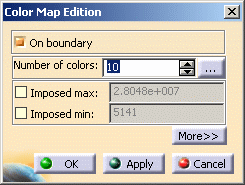
The Color Map Edition dialog box appears.
-
On boundary: lets you choose to compute the colors according to the boundary (based on elements) or the overall entities.
-
Number of colors: lets you modify the number of colors.
Click the
 button. The Color Edition dialog box appears.
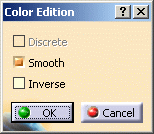
-
Discrete: lets you display images using a discrete color map. This option is useful when number of separate values is not large. In this case the number of colors in the color map is deducted from the number of separate value (for example: Material images).
The Discrete option is available only if the number of separate values is less than 30.
The Discrete check box is only available with the ELFINI Structural Analysis (EST) product.
-
Smooth: lets you smooth the colors.
-
Inverse: lets you inverse the colors order.
-
-
Imposed max: lets you impose a maximal value.
-
Imposed min: lets you impose a minimal value.
-
More/Less buttons: lets you enlarge/reduce the Color Map Edition dialog box.
The More/Less buttons are only available with the ELFINI Structural Analysis (EST) product. 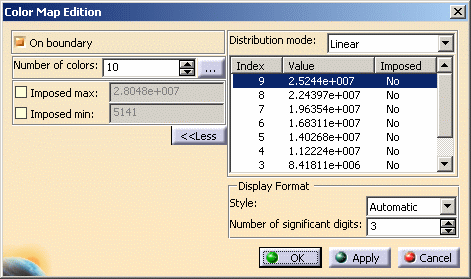
-
Distribution mode:
-
Linear: regular values distribution between the minimum value (computed or imposed) and the maximum value (computed or imposed).
-
Histogram: values distribution so that each interval contains the same number of entities.

Only available if the Imposed max and Imposed min options are deactivated. -
Logarithmic: logarithmic values distribution between the minimum value (computed or imposed) and the maximum value (computed or imposed).
Only available if the minimum value (computed or imposed) is strictly positive.
-
-
Distribution edition: it is possible to edit the distribution using contextual menus.
You can as well impose a particular value for a threshold in order not to modify it when setting other values. (impose)
After each new value entered for a threshold, the list is computed to take into account the potential interactions between this threshold and the two other thresholds which flank it. If an interaction is detected, the former values are distributed taking into account if possible the imposed values. (edit)
-
Display Format:
-
Style: Scientific, Decimal and Automatic
-
Number of significant digits
-
-
-
-
Modify the desired parameters.
-
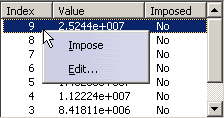
Right-click the first value of the distribution.
-
Select the Impose contextual menu.
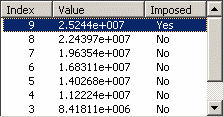
As a result, the Imposed value is Yes as shown below:
-
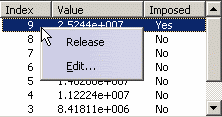
Right-click the first value of the distribution.
-
Select the Release contextual menu.
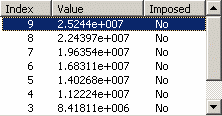
As a result, the Imposed value is No as shown below:
-
Right-click the first value of the distribution.
-
Select the Edit... contextual menu.
The Edit Value dialog box appears.
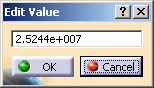
In this particular example, enter 2.6e+007 and click OK in the Edit Value dialog box.
As a result, the value you have just edited is automatically imposed as shown below: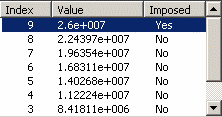
-
Click on Apply to check if the palette fits. If yes, click on OK.
The palette dialog box disappears and the modifications will be valid only for this display.
You can move the Palette in the viewer.
-
Select the Palette and move it with the middle mouse button to the desired place.
When the Palette is selected, the part viewer is deactivated and the part is shaded.
-
Click again on the Palette to fix it there.
![]()
Locking the Color Palette
You can lock the color palette (global maxima and minima).
Only available with the ELFINI Structural Analysis (EST) product.
At any time, you can lock / unlock the Color Palette.
When a palette is locked, the color values are not updated anymore whatever
the modifications you perform on the image (using the Selections
tab of the Image Edition dialog box).
It is an alternative to the Imposed min and Imposed max
options and an easy way to set the palette scale being independent of what
is visualized.
For example, when dealing with an assembly, and if you select one part in the assembly, the palette is automatically updated and all the colors are now defined in accordance with the selected color.
Open the Analysis2_Lock01.CATAnalysis document from the samples directory.
-
Compute the solution.
To do this, click Compute
and select the All option. -
Activate the Stress Von Mises image.
To do this, right click the Von Mises Stress (nodal values).1 image in the specification tree and select Activate/Deactivate.
-
Edit the Von Mises Stress image.
To do this:
-
Double-click Von Mises Stress (nodal value).1 in the specification tree.
-
Select the Selections tab in the Image Edition dialog box.
-
Double-click OCTREE Tetrahedron Mesh.1: Part1.3.
-
Click OK.
-
-
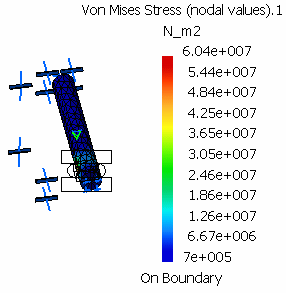
Right-click the color palette and select Lock
 .
.The color palette is locked:
-
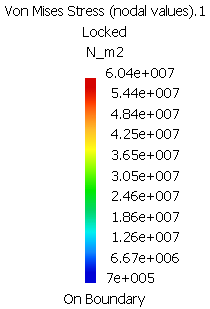
Edit the Von Mises Stress image.
To do this:
-
Double-click Von Mises Stress (nodal value).1 in the specification tree.
-
Select the Selections tab in the Image Edition dialog box.
-
Click the
 button.
 -
Click OK.
The image visualization is modified but the values displayed in the color palette does not change:
-
-
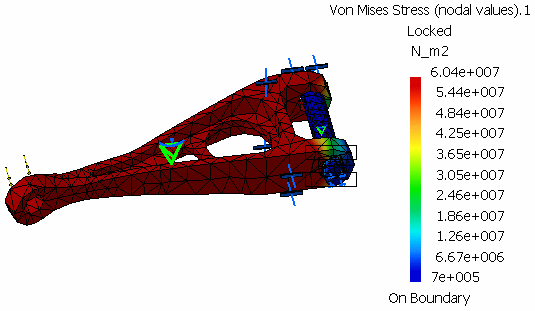
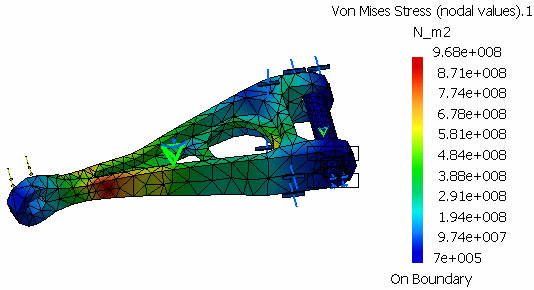
Right-click the color palette and select Unlock
 .
.Both the image visualization and the values of the color palette are modified:
![]()