This task shows how to update and compute a .CATAnalysis document using a batch:
Computing a document will enable the analysis of any object of Restraints, Loads and Masses type, without requiring the computation of a Solution.
For more details about computation, refer to Computing Object Sets.
To know how to use the batch monitor, refer to Running Batches using the Batch Monitor in the Infrastructure User's Guide.
Local Mode
-
Open the Batch Monitor.
For more details about the use of the Batch Monitor, refer to Running Batches using the Batch Monitor in the Infrastructure User's Guide.
-
Double-click AnalysisUpdateBatch in the Batch Monitor.
-
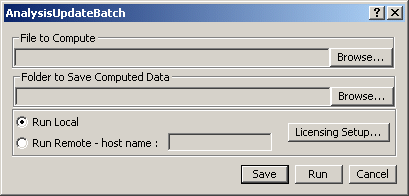
Click the Browse... button to choose the file to compute.
The File Selection dialog box appears to let you select the .CATAnalysis document you want to compute.
In this particular example, you can select the sample00.CATAnalysis from the samples directory and click OK in the File Selection dialog box.
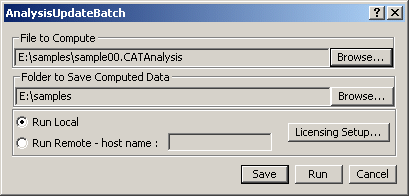
Note that the Folder to Save Computed Data field is automatically updated.
By default, this folder is the same as the .CATAnalysis document.You can change the default folder.
-
Click the Browse... button if you want to change the folder in which the computed .CATAnalysis document (and the associated .CATAnalysisResults and .CATAnalysisComputations files) will be saved.
The Folder Selection dialog box appears.
You can change the folder or create a new one.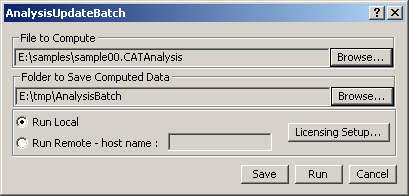
-
Click Run in the AnalysisUpdateBatch dialog box.
-
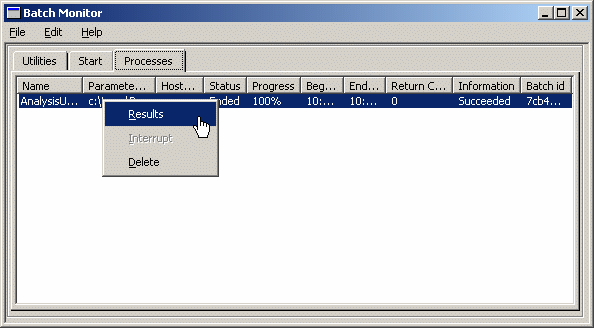
Select the Processes tab of the Batch Monitor.
The batch computation has been successfully done if you get 0 as Return Code.
-
Right-click the AnalysisUpdateBatch line and select the Results contextual menu.
The Results dialog box appears.
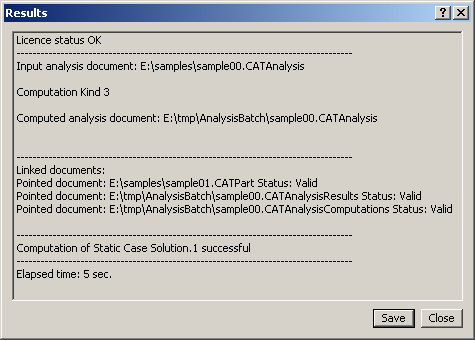
You can retrieve the computed .CATAnalysis file and also the associated .CATAnalysisResults and CATAnalysisComputations files in the same folder.
Remote Mode
The recommended methodology to work in remote mode with the AnalysisUpdateBatch batch is:
-
Send the .CATAnalysis file and the pointed documents from the client to the server using the Send To menu.
-
Run the AnalysisUpdateBatch batch on the server.
-
Send the .CATAnalysis file and the pointed documents (including the computed documents) from the server to the client using the Send To menu.
You can find here the supported configurations (client and server machines must be in Network File System visible):
|
Supported configurations |
Server |
||
|
Windows |
Unix |
||
|
Client |
Windows |
|
|
|
Unix |
|
|
|
*: for this configuration, a manual edition of the .xml batch parameter file is required:
Save the .xml parameter file as MyBatch.xml.
Edit the file and enter the path for the input .CATAnalysis file:
/u/samples/MyAnalysis.CATAnalysisAssociate the modified .xml parameter file to the AnalysisUpdateBatch batch using the Associate a parameters file contextual menu.
Edit the properties to specify the remote machine using the Properties contextual menu.
Run the batch using the Run contextual menu.
For more details about the edition of the .xml batch parameter file, refer to Running Batches using the Batch Monitor in the Infrastructure User's Guide.
-
Open the Batch Monitor.
-
Double-click AnalysisUpdateBatch in the Batch Monitor.
The AnalysisUpdateBatch dialog box appears.
For more details about this dialog box, click here.
-
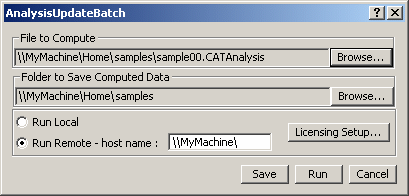
Select the Run Remote option and enter the name of the remote machine in the host name field (MyMachine for example).
-
Click the Browse... button to choose the file to compute.
The File Selection dialog box appears to let you select the .CATAnalysis document you want to compute.
Note that the Folder to Save Computed Data field is automatically updated.
By default, this folder is the same as the .CATAnalysis document.You can change the default folder.

-
In remote mode, the folder you indicate in the Folder to Save Computed Data field will not be taken into account.
-
Make sure that the path of the .CATAnalysis document is:
-
-
Click Run in the AnalysisUpdateBatch dialog box.
-
Select the Processes tab of the Batch Monitor.
The batch computation has been successfully done if you get 0 as Return Code.
-
Right-click the AnalysisUpdateBatch line and select the Results contextual menu.
The Results dialog box appears.
The Updated file field gives you the directory (on the remote machine) of the computed file.
![]()