The
CATUTIL functionality, available on both Windows and UNIX, lets you
run some of the batches available in Version 5.
These batches can be run either from the command line,
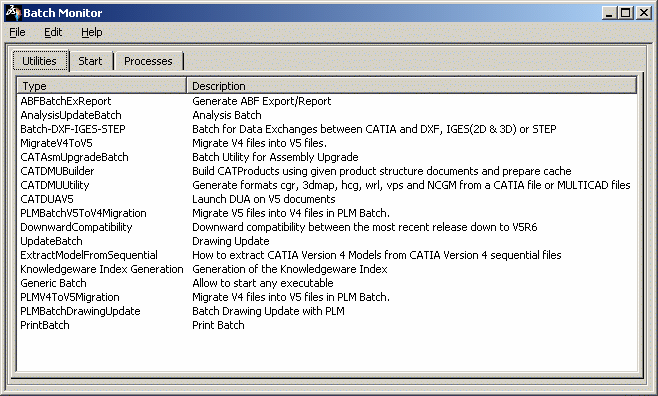
or using a dedicated tool called the Batch Monitor.
- the Batch Monitor does not run within the Version 5 process, whether it is accessed from a Version 5 session or from the command line. The Batch Monitor is a standalone process which means that it remains open after closing your Version 5 session
- you must not run batches using the root userid on UNIX (if you do so, the batch returns an error code 45).
Accessing the Batch Monitor
Method 1: Accessing the Batch Monitor from the command line
-
Access the default installation folder:
C:\Program Files\Dassault Systemes\Bn\OS_a\code\bin(on Windows)or
/usr/DassaultSystemes/Bn/OS_a/code/command/(on UNIX)(where
nis the current release number) -
Still in the default folder, enter the command:
CATUTIL(on Windows)or
./catstart -run CATUTIL(on UNIX)The Batch Monitor opens.
Method 2: Accessing the Batch Monitor from a Version 5 session
-
Start a Version 5 session.
-
![]()
Getting contextual help
You cannot use F1 to access contextual help. The methods available for displaying the online documentation are detailed below:
Selecting Help > Batch Monitor Help lets you access the general online documentation on the Batch Monitor. This menu item is available in all tabs, i.e. Utilities, Start and Processes. Note that in the Utilities tab, the Batch Monitor Help command opens the general documentation if no batch is selected in the list.
When a batch is selected in the Utilities tab, you can use the Batch Monitor Help contextual command or select Help > Batch Monitor Help to open the batch-specific online documentation.
This batch-specific documentation can also be accessed when clickingin the top-right corner (on Windows) or Help (on UNIX) in the corresponding batch interface.
However, when accessing the online documentation from the Batch Monitor, the framed layout containing the Home Page, Full-Text Search, Workbench Indexes, Automation, Conventions and Copyrights buttons is not available.
Defining the batch parameters
-
Access the Batch Monitor, either from the command line or from a Version 5 session.
-
Double-click the batch to run from the list. This opens the corresponding batch interface, as shown below with PrintBatch as an example (click the thumbnail to enlarge the picture):
-
Set the batch parameters as explained in the corresponding documentation.
In our example, the following parameters have been defined: 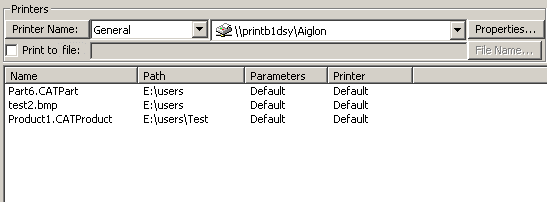
-
Click Licensing Setup... and select a license authorizing the use of the batch you want to run.
If you run a batch without previously selecting a license, the system reads the License.CATSettings file and tries to run the batch with the licenses found in this file.
Because this file does not contain the licenses acquired in Tools > Options > General > Shareable Products, if the batch monitor was started using Tools > Utility..., the batch will not acquire any licenses of this type.
If you do not succeed in running the batch due to a licensing problem, click Licensing Setup... and select a license from the list.
When you click this button, the system searches for both nodelock licenses installed on your computer and network licenses accessible from your computer and displays the list of licenses found. The list displayed contains the same licenses visible in Tools > Options > Licensing.
Then, select the appropriate license from the list.
The license is only acquired temporarily for the duration of the batch execution. -
Click Save then navigate to save your XML file in the desired location. By default, it is saved in a temporary folder.
Of course, the content of this XML file varies according to the batch you run since it contains the values you set for the parameters displayed in the batch interface.
This file is named "BatchParameters" suffixed with the hour at which the batch was run (for instance, "BatchParameters_14.41.25.xml" to indicate that the batch was run at 14.21.25 PM).When saved, this file can be edited manually and used later on to run the batch directly without having to re-access the batch interface. However, bear in mind that to be able to open and edit the XML file, you must use a text or XML editor.

It is recommended to open the XML file in a text editor, other than Internet Explorer. As the Parameters.dtd file is not located in the same folder than the XML file being validated, the file may not open. To open the file in Internet Explorer, copy the Parameters.dtd file from intel_a\resources\batchdesc to the folder of the XML file. You can now either click Run to run the batch from the interface of the selected batch, or click Cancel to close the batch window and go back to the Batch Monitor window (if you want to start other batches for instance).
-
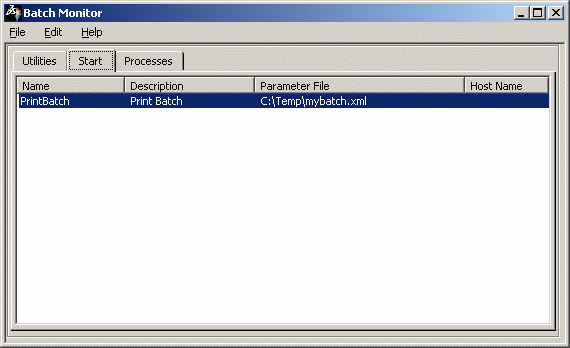
In the Batch Monitor window, access the Start tab which now displays the name and location of the XML file containing the batch parameters you defined in the previous steps (as well as the name of the host computer if you run the batch in remote mode):
-
If you did not run the batch in step 4, select File> Run (or right-click the batch to run then select Run): the batch executes.

The Start tab lets you instantiate another batch while the current batch is running. It also lets you delete a batch from the list by selecting it from the list then choosing Edit > Delete (or by right-clicking then selecting Delete). -
Access the Processes tab to get some information on the batch execution (click the thumbnail to enlarge the picture):

The following batch-related information is displayed: - name of the batch
- name of the parameter file used to run the batch
- name of the host computer (if you run the batch on a remote computer)
- status of the batch ("Ended", "Running", etc.)
- feedback on the batch completion in the "Progress" column. "100%" is displayed when the batch is ended
- start and end time, respectively in the "Beginning at" and "Ending at" columns
- return code: "0" means that the batch executed correctly ; a code other than zero means that the batch has failed. For more information, refer to Generic Batch Monitor Error Codes and to Generic Batch Error Codes
- result of the batch execution (either "Succeeded" or "Failed")
- batch identification number.
The Processes tab also lets you interrupt the batch execution. To do so, right-click the desired batch from the list then select Interrupt.
You can also delete a batch from the list by right-clicking the corresponding line then selecting Delete. -
To display the result of the batch execution, double-click the desired batch in the list to open the Results window:
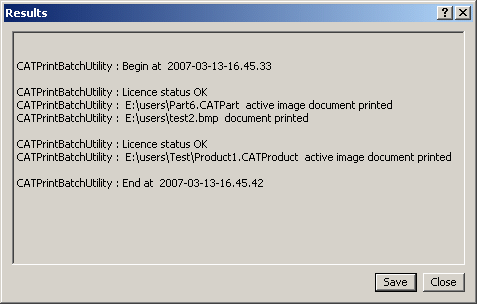
This window indicates the beginning and end date and time of the batch execution as well as the name and path of the documents that have been processed. You can then:
- click Save to save your results in the folder of
your choice. The file formats available are .txt and .xml.
Note that this file is different from the one you save from the batch interface: the Save button in the Batch Monitor lets you save the batch results (i.e. the data displayed in the Results window displayed above) whereas the Save button available in the specific batch interface lets you save the batch parameters. - click Close to close the window and go back to the Batch Monitor .
- click Save to save your results in the folder of
your choice. The file formats available are .txt and .xml.
-
To read the reports generated by the batch execution, access the folder
c:\temp\batchID(on Windows) or/temp/batchID(on UNIX).Three files are created: - a report in text format named batchIDLOG.txt
- a report in XML format named batchIDLOG.xml
- a log containing the output named batchIDOUTPUT.xml. This .xml file can contain information such as the database connection, the user name and password (i.e. encrypted or not), the server, etc. Of course, this depends on the batch you run. Refer to the documentation of interest for more information about the batch information that can be stored in the .xml file.
where batchID is the number identifying the batch.
You can modify the default storage location of these files by exporting the following variable: set BATCH_HOME=new_path(on Windows)or
export BATCH_HOME=new_path(on UNIX)where
new_pathis the path of the new storage location. -
Select File > Exit to exit the Batch Monitor.
![]()
Running a batch directly from the Batch Monitor
If you already have an XML file containing all the necessary inputs, there is no need for you to define the batch parameters and therefore, you can run the batch directly by associating the corresponding XML file to the batch to be run.
-
Access the Batch Monitor, either from the command line or from a Version 5 session.
-
In the Utilities tab, click the batch then select File > Associate a parameter file (or right-click the batch then select Associate a parameter file), navigate to the folder in which you saved the XML file then click Open.
If you set the DLName environment as "Current" in Tools > Options > General > Document, the usual File Selection dialog box is replaced by the following one dedicated to the DLName environment: 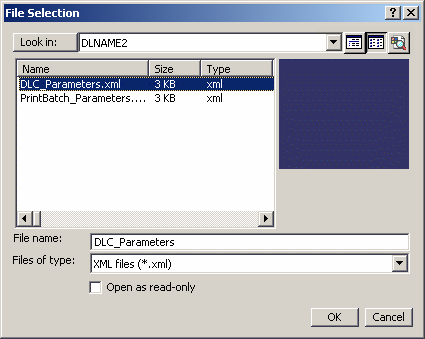
The DLName document environment lets you restrict the access to specific folders referenced by logical names referred to as "DLNames" (each folder is assigned a logical name).
In this mode, the different file opening and saving commands only allow end users to access documents in directories referenced by DLNames.The File Selection dialog box displayed above lets you navigate to the DLName in which the parameter file to be used is stored. You can also search for DLNames using a specific interface by clicking
 .
.
For detailed information on how to use this dialog box, refer to the Document task.Click OK when finished selecting your documents.
-
Access the Start tab which now displays the name and location of the XML file you associated to the batch:

-
Select File > Run (or right-click the batch to run then select Run): the batch execution starts.

You can instantiate another batch while the current batch is running.
The Start tab also lets you delete a batch from the list by selecting it from the list then selecting Edit > Delete (or by right-clicking then selecting Delete). -
Access the Processes tab to get some information on the batch execution (click the thumbnail to enlarge the picture):

The following batch-related information is displayed: - name of the batch
- name of the parameter file used to run the batch
- status of the batch ("Ended", etc.)
- start and end time, respectively in the "Beginning at" and "Ending at" columns
- return code: "0" means that the batch executed correctly ; a code other than zero means that the batch has failed. For more information, refer to Generic Batch Monitor Error Codes and to Generic Batch Error Codes
- result of the batch execution (either "Succeeded" or "Failed")
- batch identification number.
Generic Batch Monitor Error Codes
1: Command line syntax error.
2: Error in XML parameter file.
3: Communication layer error.
5: License acquisition error.
6: Invalid library error.
7: Error attempting to launch a batch requiring a graphic adapter on a machine without an adapter.
9: Miscellaneous.Generic Batch Error Codes
0: Batch completely successful.
4: Batch partially successful.
8: Batch failed.
20: Error checking licenses.
21: Error accessing INPUT/OUTPUT.The Processes tab also lets you interrupt the batch execution. To do so, right-click the desired batch in the list then select Interrupt. You can also delete a batch from the list by right-clicking the corresponding line then selecting Delete.
-
To display the report of the batch execution, double-click the desired batch in the list to open the Results window:

This window indicates the beginning and end date and time of the batch execution as well as the name and path of the documents that have been processed. You can then:
- click Save to save your results (i.e. the data displayed in the Results window) in the folder of your choice. The file formats available are .txt and .xml
- click Close to close the window and go back to the Batch Monitor.
-
Select File > Exit to exit the Batch Monitor.
![]()
Running a batch from the command line
Using CATBatchStarter
-
Access the default installation folder:
C:\Program Files\Dassault Systemes\Bn\OS_a\code\bin(on Windows)or
/usr/DassaultSystemes/Bn/OS_a/code/command/(on UNIX)(where
nis the current release number) -
Run the following command:
CATBatchStarter -input xml_file(on Windows)or
./catstart -run "CATBatchStarter -input xml_file"(on UNIX)where
xml_fileis the path and name of the XML file.For instance:
CATBatchStarter -input e:\users\my_parameters.xml -
To check if the batch executed correctly, access the folder
c:\temp\(on Windows) or/temp/(on UNIX).A .txt file named "BatchMonitorResults_" suffixed with the hour at which the batch was run (e.g. "BatchMonitorResults_8.46.34.txt") gives you information on the batch execution and indicates the folder where the reports generated by the batch execution are stored. -
To read the reports generated by the batch execution, access the folder
c:\temp\batchID(on Windows) or/temp/batchID(on UNIX).Three files are created: - a report in text format named batchIDLOG.txt
- a report in XML format named batchIDLOG.xml
- a log containing the output named batchIDOUTPUT.xml. This .xml file can contain information such as the database connection, the user name and password (i.e. encrypted or not), the server, etc. Of course, this depends on the batch you run. Refer to the documentation of interest for more information about the batch information that can be stored in the .xml file.
where batchID is the number identifying the batch.
You can modify the default storage location of these files by exporting the following variable: set BATCH_HOME=new_path(on Windows)or
export BATCH_HOME=new_path(on UNIX)where
new_pathis the path of the new storage location.
Using CATUTIL
-
Access the default folder:
C:\Program Files\Dassault Systemes\Bn\OS_a\code\bin(on Windows)or
/usr/DassaultSystemes/Bn/OS_a/code/command/(on UNIX)
wherenis the current release number. -
Run the following command:
CATUTIL -Name batch_name xml_file(on Windows)or
./catstart -run "CATUTIL -Name DownwardCompatibility
				xml_file"
(on UNIX)where
batch_nameis the name of the batch you want to run andxml_fileis the path and name of the XML file.For instance:
CATUTIL -Name DownwardCompatibility e:\users\my_parameters.xml -
To check if the batch executed correctly, access the folder
c:\temp\(on Windows) or/temp/(on UNIX).A .txt file named "BatchMonitorResults_" suffixed with the hour at which the batch was run (e.g. "BatchMonitorResults_8.46.34.txt") gives you information on the batch execution and indicates the folder where the reports generated by the batch execution are stored. -
To read the reports generated by the batch execution, access the folder
c:\temp\batchID(on Windows) or/temp/batchID(on UNIX).Three files are created: - a report in text format named batchIDLOG.txt
- a report in XML format named batchIDLOG.xml
- a log containing the output named batchIDOUTPUT.xml. This .xml file can contain information such as the database connection, the user name and password (i.e. encrypted or not), the server, etc. Of course, this depends on the batch you run. Refer to the documentation of interest for more information about the batch information that can be stored in the .xml file.
where batchID is the number identifying the batch.
You can modify the default storage location of these files by exporting the following variable: set BATCH_HOME=new_path(on Windows)or
export BATCH_HOME=new_path(on UNIX)where
new_pathis the path of the new storage location.
![]()
Running Batches in Remote Mode
However, certain batches are CPU-intensive, so in certain cases it may be advisable to distribute batch processing to optimize CPU time on the local machine. The batch monitor lets you submit certain batches on remote machines accessible on your network.
Two implementations for remote batch execution are supported:
- with the first implementation, the batch monitor requires no external software as a prerequisite since it can work using the communications backbone packaged with the core Version 5 software
- if you install and configure the IBM MQSeries Version 5.2 product, you will be able to run and monitor batches on a remote computers using both the batch monitor and the MQSeries command line syntax.
This section concentrates on running remote batches using the batch monitor.
For full details about the administration tasks involved in setting up both the local and remote machines using both implementations, refer to Setting Up Batch Monitoring Using the Communications Backbone and MQSeries in your Infrastructure Installation Guide.
Using the Communications Backbone
-
Log onto the remote machine on which you want to run the batch.
-
Start the server monitor as follows:
On Windows
- Open a Command Prompt window and go to the following Version 5 installation folder, for example:
C:\Program Files\Dassault Systemes\B18\intel_a\code\bin- Run the command:
catstart -run "CATBatSrvMonitorExe BB"A message will confirm that the BB service has been started.
On UNIX
- Open a window and go to the following Version 5 installation folder, for example:
/usr/DassaultSystemes/B18/os_a/code/command
where "OS_a" is:
- aix_a
- hpux_b
- solaris_a.
- Run the command:
catstart -run "CATBatSrvMonitorExe BB"
-
Log onto the local machine and start a Version 5 session.
-
Select the Tools > Utility to access the Batch Monitor.
-
Select a batch which can be run on a remote machine (for example, the Downward Compatibility batch) by double-clicking it in the list.
As is the case for all batch dialog boxes supporting remote batch execution, the dialog box contains the following area: 
By default, the "Run Local" option is active. -
Check the "Run Remote" option and enter the hostname of the remote machine on which you started the server monitor:

-
Click Licensing Setup....
If the following error message occurs: Client Batch Monitor ERROR : cannot connect to xxxxit is due to one of the following causes:
- the remote machine "xxxx" to which you are trying to connect does not exist
- the server monitor was not started on the remote machine "xxxx".
The list of licenses installed on or accessible to the remote machine is displayed:
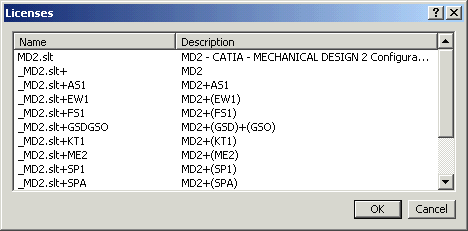
It is essential to understand that the list of licenses comes from the remote machine. -
Select a license and click OK:
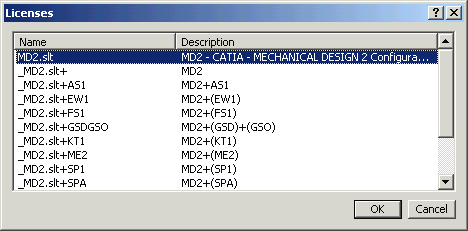
If you run the batch without selecting a license using the Licensing Setup… button, the software uses the Licensing.CATSettings file located on the local machine, transmits the license requests to the remote machine, and tries to locate the license on the remote machine. If no license is found, it will try to locate and use a nodelock license on the remote machine.
-
Submit the batch.
Using IBM MQSeries
On the local machine from which you submit the batch for remote execution:
- you need the Version 5 core software
- the local machine must be configured as an MQSeries client
- and the remote machine must be configured as an MQSeries server
- the server monitor must be started on the remote machine
- and a variable must be exported on the local machine before starting Version 5.
-
Once all the IBM MQSeries setup tasks on both the client and server have been performed (including starting the server monitor as was the case for the communications backbone) log onto the local machine.
-
Export the following variable on the client:
CATBATCHMQ=1
to specify that you are using the MQSeries communications driver. -
Start a Version 5 session.
-
Select Tools > Utility to access the Batch Monitor.
From here onwards, you submit remote batches in exactly the same way as described above for the communications backbone.
![]()
