This task shows you how to insert a preprocessing case and then how to fill this preprocessing case.
Preprocessing case is a new type of Analysis Case gathering a collection of preprocessing sets (loads, multi loads, restraints, masses) and containing no solution.
Several preprocessing cases can be created in the same analysis document. A preprocessing case is a useful tool to organize and store preprocessing specifications and to reuse them in solution-based cases.
Any type of load, mass and restraint specifications can be defined in preprocessing sets.
Regarding loads, in addition to standard loads, preprocessing cases will be central for the following scenarios:
-
Transfer of loads
-
Multiple Load Set will usually be used to compute several Load Sets defined in a preprocessing cases.
You will see how to:
You will also find a recommended methodology to use the transfer of loads.
Only available with the ELFINI Structural Analysis (EST) product.
Open the sample14.CATAnalysis document in the samples directory.
-
You cannot create any sensor in a preprocessing case.
-
You can generate images on a set belonging to a preprocessing case.
To do this you have to perform a Mesh Only computation before generating images.
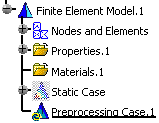
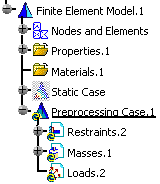
Inserting a Preprocessing Case
-
Select the Insert > Preprocessing Case
 menu.
menu.An empty Preprocessing Case.1 feature appears in the specification tree.
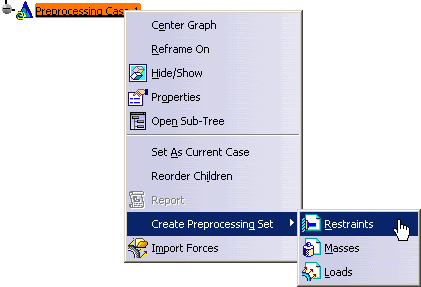
You can now access the following contextual menus:
-
-
Restraints: lets you create an empty restraint set under the preprocessing case you just inserted.
To know more, refer to Creating a Restraints Set. -
Masses: lets you create an empty mass set under the preprocessing case you just inserted.
To know more, refer to Creating a Masses Set. -
Loads: lets you create an empty load set under the preprocessing case you just inserted.
To know more, refer to Creating a Loads Set.
-
-
Import Forces: lets you import forces defined in other load sets.
To know more, refer to Importing Forces.
-
Creating a Preprocessing Set
Creating a Restraints Set
You can create a restraints set under a frequency analysis case (on the condition that the case does not contain any restraint set) or a preprocessing set.
In this particular example, you will create a restraint set under a preprocessing set.
-
Static and frequency cases cannot contain more than one restraints set.
-
Preprocessing cases can contain as many restraint sets as you want.
In this case, you have to select in the specification tree the restraint set in which you want to create restraint specifications.
-
Right-click Preprocessing Case.1 and select Create Preprocessing Set > Restraints.
An empty Restraint.2 set appears in the specification tree.
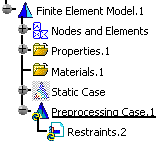
You can now insert restraints under this set, you can also insert an other restraint set.
-
Create as many restraints as you want under the Restraints.2 set.
To do this, refer to the Restraints section.
Creating a Masses Set
You can create a Masses set under a static analysis case, frequency analysis case (on the condition that the case does not contain any masses set) or a preprocessing set.
In this particular example, you will create a masses set under a preprocessing set.
-
Static and frequency cases cannot contain more than one mass set.
-
Preprocessing cases can contain as many mass sets as you want.
In this case, you have to select in the specification tree the mass set in which you want to create mass specifications.
-
Right-click Preprocessing Case.1 and select Create Preprocessing Set > Masses.
An empty Masses.1 set appears in the specification tree.
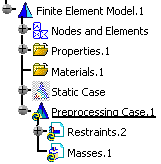
You can now insert masses under this set, you can also insert an other mass set.
-
Create as many masses as you want under the Masses.1 set.
To do this, refer to the Mass Equipment section.
Creating a Loads Set
You can create a loads set under a static analysis case (on the condition that the case does not contain any loads set) or a preprocessing set.
In this particular example, you will create a load set under a preprocessing set.
-
Static cases cannot contain more than one loads set.
-
Preprocessing cases can contain as many loads sets as you want.
In this case, you have to select in the specification tree the loads set in which you want to create load specifications.
-
Right-click Preprocessing Case.1 and select Create Preprocessing Set > Loads.
An empty Loads.1 set appears in the specification tree.
You can now insert loads under this set, you can also insert an other mass set.
-
Create as many loads as you want under the Loads.2 set.
To do this, refer to the Loads section.
Importing Forces
You can import load specifications that have been exported.
The import of loads is the second step of the load transfer between a
document to another.
To know how to export computed loads, refer to Exporting Computed Loads.
-
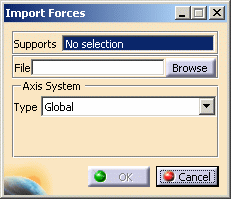
Right-click Preprocessing Case.1 and select Import Forces.
The Import Forces dialog box appears.
-
Supports: lets you select the support on which you want to apply the forces you import.
Non homogeneous multi selection of supports is available.
If you do not select any support, all the model is selected by default. -
File: lets you select an exported file (.CATAnalysisExport).
-
Axis System: lets you define the axis system in which the imported loads will be taken into account.
To know more about axis system, refer to Axis System Type.
-
-
Select the support.
-
Select the file containing the imported data.
-
Choose the axis system.
-
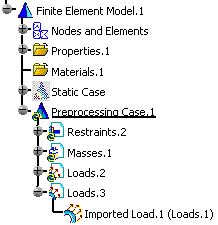
Click OK.
A new loads set (Loads.3) containing the imported data (Imported Loads.1) appears under the Preprocessing Case.1 in the specification tree.
More About Transfer of Loads
You will find here the recommended methodology to use the transfer of loads.
You can use the transfer functionality to perform the two following scenarios.
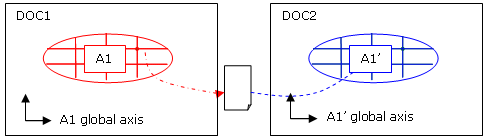
Transfer from an Assembly to Sub Analysis
![]()
-
You make a copy of the sub analysis A1.
-
You compute loads at the assembly level (AA).
-
You export local loads from assembled analysis and import them in the copy of the sub analysis.
-
You can generate images.
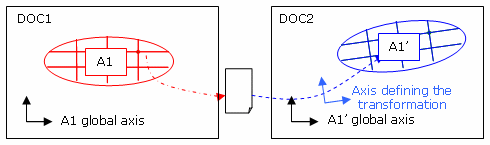
Transfer between Two Analyses Based on Identical Mesh
![]()
-
You make a copy of the analysis A1.
-
You export local loads from assembled analysis and import them in the copy of the analysis.
-
You can generate images.
About Axis System Management
You can select an axis system
-
Transfer of displacements from an assembly of analysis to a sub-analysis:
The displacements exported on file will be expressed in the local axis of the sub analysis.
Consequently, if the file is imported in a copy of the sub analysis, there will be no need to specify a user axis.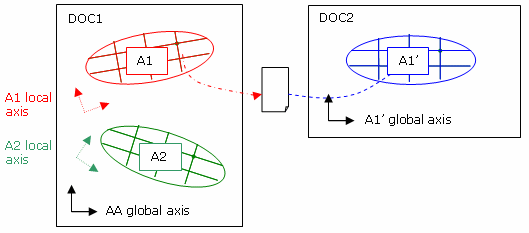
-
Transfer from an analysis to another:
The displacements exported on file will be expressed in the global axis of the analysis.
Consequently:-
If both analyses have the same position, the import must be done in the global axis.
-
If they have not the same position, the import must be done in a user axis reflecting the transformation.
-
Synchronization Mechanism
There is no automatic synchronization mechanism.
If a CATAnalysisExport file already imported is re-generated
from a modified solution and then re-imported in the same Preprocessing
Case, then the last import always deletes and replaces the imported loads
created after the previous import.
Update Mechanism
If the imported forces are invalidated (for example, after
a mesh modification), you cannot update these forces. The only way is to
re-import the CATAnalysisExport file using the Import
Forces functionality.
Open the sample46.CATAnalysis document from the samples directory for this task.
-
Compute all the solutions.
To do this, refer to Computing Object Sets.
-
Export loads corresponding to the Static Case Solution.3.
To do this:
-
Right-click Static Case Solution.3 and select Export > Computed Loads.
The Export Solution dialog box appears.
-
Select the directory in which the .CATAnalysisExport file will be saved, enter a file name and click Save.
-
Select User preferences in the Select occurrences list.
-
Click
 .
. -
Hold down Ctrl and select Loads.1 and Loads.3.
-
Click OK in the Modes dialog box.
-
Click OK.
-
-
Right-click Preprocessing Case.1 and select Import Forces.
The Import Forces dialog box appears.
-
Click Browse and select the .CATAnalysisExport file you generated.
-
Click OK.
Two new loads sets (Loads.4 and Loads.5) containing the imported data appears under the Preprocessing Case.1 in the specification tree.
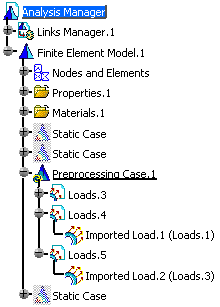
Each new loads set corresponds to a selected occurrence.
![]()