This task shows you how to generate a drawing view, using various representation options.
You can use the Getting Started sample to perform this scenario.
Make sure the Drafting > View options are set as follows:
Open the Tools > Options... menu, then Mechanical Design > Drafting > View tab:
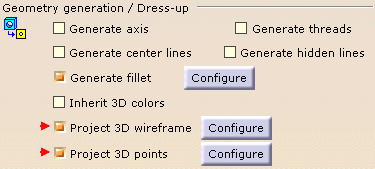
In the Geometry generation / Dress-up frame, select the following options:
Project 3D wireframe
Project 3D points
For more information, refer to the View tab documentation.
-
Open the Tools > Options... menu, then in the Equipment & Systems > Electrical Harness Discipline category, select the Electrical Harness Flattening item to define the electrical drawing catalog.
To do so: -
Click Add
-
Browse to the catalog:
.../online/ehfug_C2/samples/GraphicReplacement/CATDraw2DElectricalDetail.catalog. -
Click OK to validate.
This catalog contains the 2D detail for devices, supports and ends of protective coverings.
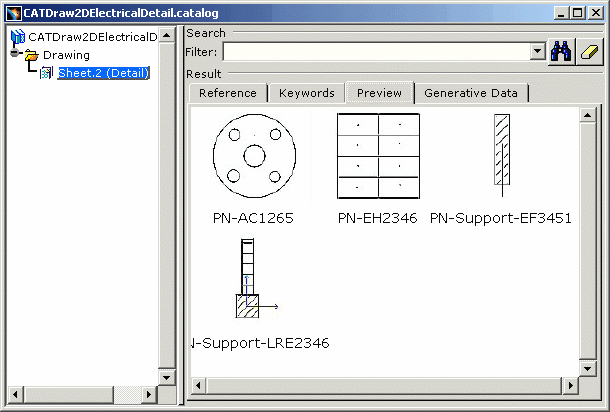
In the case of devices and supports, a mapping is done between the external reference (or the part number if there is no value for the external reference) and the name of the 2D detail.
- If an equivalence is found, the corresponding 2D detail replaces the device in the drawing.
- If not, the 3D projection is displayed.
In the case of ends of protective coverings, the mapping is done with respect to the external reference only.
For support sections, 2D details in the catalog are named after the external reference (or part number) of the support plus the suffix _section.
-
-
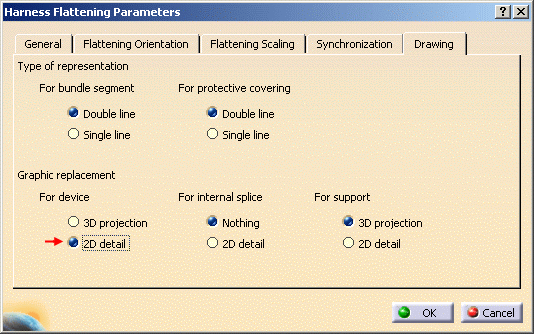
In the Drawing tab, select:
- Double line for For bundle segment and For protective covering representation
- 2D detail option for For device graphical representation
-
Click OK to validate.
-
Using the flattened harness obtained from the Getting Started document, perform the mapping:
-
Right-click a connector to display the properties,
for example: RectangularConnector-MX10 (Connector-5) -
Click More... to display the Electrical tab.
-
Enter
PN-AC1265in the External Reference field.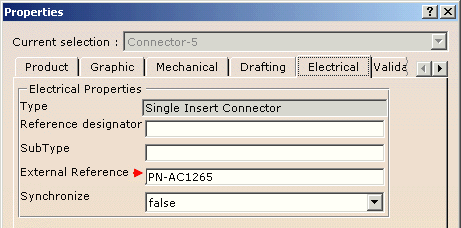
-
Click OK to validate.
Once this is done, you will generate the drawing.
-
-
Open a new drawing document.
-
Click the Front View icon
 and select the top-face of the rectangular connector as Plane.
The drawing document updates according to this choice: 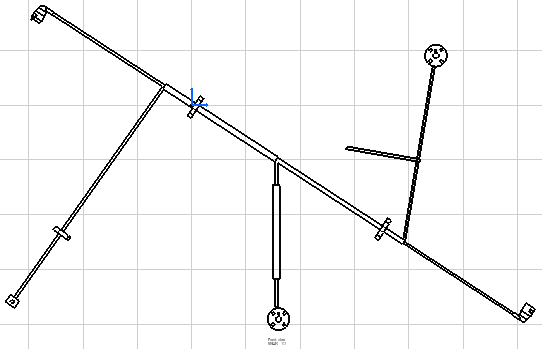
The rectangular connectors have been replaced with the chosen 2D detail and the protective coverings and bundle segments are displayed with a double line.
Note that the External Reference
attribute does not exist for the support and you need to create it.
To do so:
-
Right-click the support to display the Properties.
-
At the bottom of the Product tab, click Define other properties...
The dialog box displays: 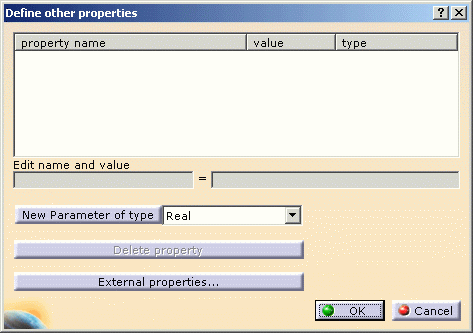
-
Select
Stringin the list box and click New Parameter of type. -
Edit the name:
External ReferenceThis property is added to the support. 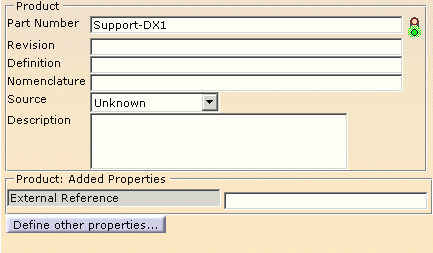
-
You can now enter a value to map a catalog 2D detail.