![]()
-
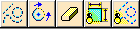
Select Tools > Sketch Analysis from the menu bar.
Or alternatively, click Sketch Analysis
 in the Tools toolbar (2D Analysis Tools
sub-toolbar).
in the Tools toolbar (2D Analysis Tools
sub-toolbar).

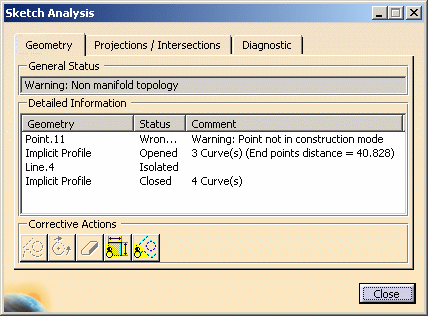
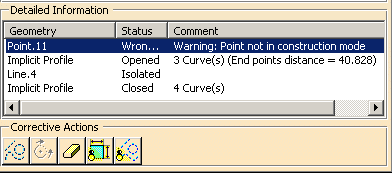
The Sketch Analysis dialog box appears. It contains three tabs: Geometry, Projections / Intersections and Diagnostic.
Note that on the sketch, some geometrical items and constraints are highlighted so that you can see them easily.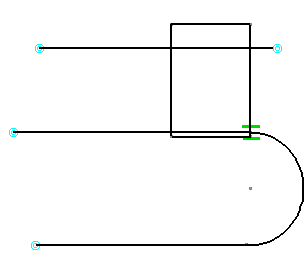
The Geometry tab displays information helping you know whether the sketch geometry is valid.- General Status: analyzes several elements globally.
Note that "Implicit Profile" refers to all profiles except for profiles created via Output Feature and Profile Feature
 .
For more information, see Creating Output
Features and Creating Profile
Features.
.
For more information, see Creating Output
Features and Creating Profile
Features. - Detailed Information: provides a detailed status/comment on each geometrical element of the sketch.
- Corrective Actions
 : according to the
analyzed element you select and which is not correct, you will be
able to:
: according to the
analyzed element you select and which is not correct, you will be
able to:- turn this element into a construction element,
- close a profile that is not,
- erase a disturbing element,
- hide all constraints on the sketch,
- hide all construction geometries on the sketch and in the detailed information area of the Geometry tab.
- General Status: analyzes several elements globally.
-
In the Detailed Information table, select Point.11.
-
Click the Set in Construction mode icon to turn the standard mode point into a construction mode point and solve the problem.
Diagnosing Geometry
-
Click the Diagnostic tab.
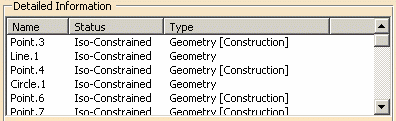
The information on this tab displays a full diagnosis of a sketch geometry. It provides a global analysis of the sketch as a whole, and specifies whether individual geometrical elements in the sketch are under-constrained (under-defined), over-constrained (over-defined) or iso-constrained (well defined):
- Solving Status: provides a quick overall analysis of the sketch geometry.
- Detailed Information: provides a detailed status on each constraint and geometrical element of the sketch, and lets you know what type of element it is (geometry, constraint).
- Action
 :
according to the analyzed element you select, you will be able to:
:
according to the analyzed element you select, you will be able to:- hide all constraints on the sketch and in the detailed information area,
- hide all construction geometries on the sketch and in the detailed information area of the Diagnostic tab.
- erase geometry
If you select items from the Detailed Information table, they will be highlighted on the sketch, which enables you to identify them easily. To solve constraint-based problems in the sketch, you need to edit the sketch directly.
-
Close the Sketch Analysis dialog box.
-
Right-click the Point.3 item in the sketch or from the specification tree, and select Point.3 object > Fix.
-
Repeat this operation for the Line.1, Circle.1, Line.2 and Point.8 items.
-
Re-open the Sketch Analysis dialog box and click the Diagnostic tab.
You can notice that the items you fixed are now iso-constrained.