
|
This task shows you how to align a cloud of points with a reference by
defining constraints
(made of pairs of constraint elements) based on canonic shapes
(points, lines, planes, spheres, cylinders, circles and their inverted
elements)
and applying a priority order on those constraints.
|
 |
See the glossary for the
definition of Cloud to Align, reference, constraint and constraint element. |
| |
This operation is useful with mechanical shapes, where
canonic shapes can be defined.
When such shapes can be used, this kind of alignment is quicker than the
other types
proposed by V5.
You need to recognize canonic shapes
- on the Cloud to Align (Quick Surface Reconstruction offers a Basic
Surface Recognition command),
- then on the References (by extracting faces or creating points, lines
and planes representing fixed constraints).
These canonic shapes are not necessarily the same (any association of
points/lines/planes is possible).
Then match the canonic shapes by pair, one on the Cloud to Align, the
other on the References.
It is possible to match one constraint element of the Cloud to Align with
several constraint elements
(whatever their type) of the References, or vice versa
(a plane can be matched with three different points in three different
constraints, for example).
Be careful to have consistent constraints, regarding the geometry. For
example:
- do not match three points with two different planes,
- if you match two normals to planes, be careful that they have the same
orientation,
- when you select a cylinder or a circle, the constraint element taken
into account is their center axis, i.e. a line.
- when you select a sphere, the constraint element taken into account is
its center point.
- even if overconstraints are accepted, in some cases it might be
necessary that the constraints form an isostatic system:
A 3D object has 6 degrees of freedom, i.e. 3 translations and 3 rotations.
Creating an isostatic system means that the 3 translations and the 3
rotations are locked.
Here are the degrees of freedom locked by each pair of constraints:
| |
point |
line |
plane |
| point |
3 translations |
2 translations |
1 translation |
| line |
2 translations |
2 translations and 2 rotations |
1 translation and 1 rotation |
| plane |
1 translation |
1 translation and 1 rotation |
1 translation and 2 rotations |
In a general case, you should combine the constraints to lock all the
degrees of freedom.
|
 |
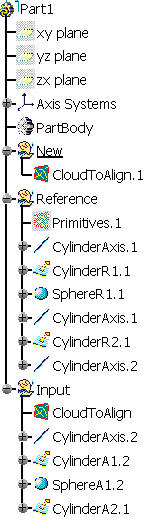
Open the
AlignConstraint1.CATPart model from the samples directory:
- In the Geometrical Set Input, you will find a Cloud to
Align (CloudToAlign) and a set of constraint elements
computed on it,
- In the Geometrical Set Reference, you will find
a set of constraint elements computed on Reference.
- You can use the Geometrical Set New as the Define In
Work Object.
|

|
-
Select the Geometrical Set where you want to create the
output cloud, if any, and select Define In Work Object.
-
Click Align with Constraints
 in the Reposit toolbar.
-
Select a
Cloud to Align (we have selected CloudToAlign).
Once the
Cloud to Align is selected, the button
Add becomes
available.
-
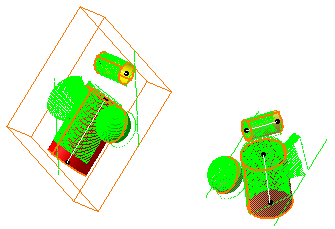
Click Add.
Select the large cylinder recognized on the Cloud to Align, then the large
cylinder on Reference.
-
Repeat step 4. with the small cylinder, and once again
with the sphere.
The colors of the constraint elements picked change:
-
A color is associated to each couple of constraint
elements that define a constraint.
-
The constraint element selected on the Cloud to Align is displayed in a solid color,
-
The constraint element selected on the Reference is
displayed in a transparent color,
-
Another color is associated to the next couple of
constraint elements, etc
 |
|
|
|
- The orientation of lines or axes selected on the Cloud to Align can be
set automatically or
manually using the Orientation options Automatic or
Manual.

- when Automatic is selected,
the orientation of the constraint element is not displayed and is
automatically optimized.
- when Manual is selected,
the orientation of the constraint element is represented by a red arrow.
It can be inverted by clicking the arrow.
- The Automatic option may be more time consuming.
- This functionality is not available for constraint elements on the
reference.
If you need to invert the orientation of constraint elements on the
reference,
you can use the Invert Orientation command.
|
|
| |
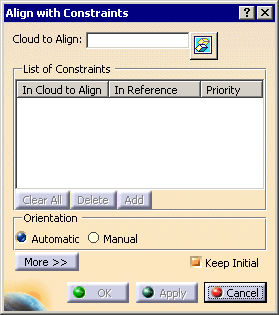
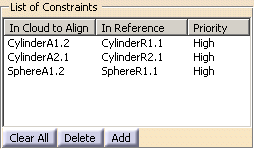
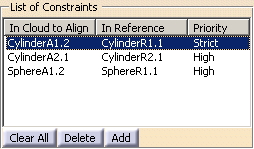
-
The constraints created are listed in the dialog box.
 |
- Clear All
deletes all the constraints.
- Delete
deletes the constraint selected.
- Add adds new constraints.
- In the In Cloud to Align column, you see which
element has been picked on the Cloud to Align.
- In the In Reference column, you see which element has
been picked on the reference.
- In the Priority column, you see which kind of
priority is applied to this constraint.
|
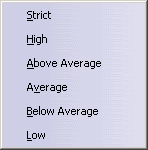
-
Right-click the line with CylinderA1.2 and
select Strict.
This contextual menu displays the priorities that can be applied on each
constraint,
from the highest priority (Strict) to the lowest (Low).
 |
| The dialog box is updated accordingly. |
 |
-
|
|
|
|
|
|
-
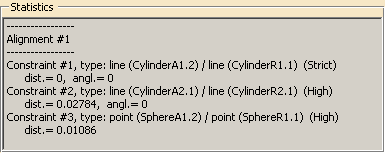
Click Apply, then More.
- The Statistics
windows appears.
Alignment #1 indicates this is the first computation you
have launched since you have opened the dialog box,
For each constraint (e.g.
Constraint #1) is given:
- the type of the constraint and the constraint element selected
type: line (CylinderA1.2) / line (CylinderR1.1).
- the priority applied to this constraint (Strict),
- the distance (dist.=0) and the angle (angl.=0)
between the constraint element on the Cloud to Align
and the constraint element on the reference.
- You can see that the constraint with a strict priority is fully
respected.
|
 |
|
|
|
-
You can easily retrieve the history of the computations
and revert to a given combination of constraints
before creating the aligned model.
-
You will find the distance gaps for constraints of the
types point/point, point/line, point/plane, line/line,
line/plane and plane/plane, as well as the angular gaps for constraints of
the types line/line, line/plane and plane/plane.
Since those gaps are computed from the infinite support of lines and
planes that make the constraints,
the distance between two non parallel planes (or a line and a plane) will
be null.
Only significant gaps between a line and a plane or between two planes
will be displayed
(i.e. only when the two constraint elements are parallel).
-
The Statistics are given for the constraint elements, they
do not refer to the real gaps between
the Cloud to Align and the reference. Those gaps are given by the
Distance Analysis.
-
A constraint with a Strict priority is not fully respected
when the distance is greater than 0.001 or
the angle is greater than 0.5.
This may happen when a constraint with a
Strict priority is applied simultaneously
to other constraints.
A message warns you that the constraint could not be
fully respected.
-
If the constraints are not consistent, an information
message is displayed.
You can then decide whether the result is satisfactory or not.
|
|
|
| |
-
Once you
are satisfied with the alignment computed, click OK to validate
and exit the action.
-
-
-
|
-
|
In both cases, an Axis Systems is created with:
- AxisTrs.x (system axis computed on the Cloud to Align) and
- AxisRef.x (axis system created on the output cloud).
|
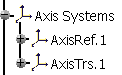 |
Those Axis Systems can be used with the
Axis
to Axis action on other elements to align.
Align with previous transformation is
also available. |
|
 |
When the alignment cannot be computed, an information
message is displayed (Update error). You can:
- delete constraints
- delete and add other constraints
- check the consistency of the constraints
- eventually, re-compute the basic shapes used.
The method we suggest is:
-
Exit the action,
-
Restart the alignment with one single constraint,
-
Click Apply.
-
If the computation is still impossible, restart the
alignment with another constraint.
-
If the computation is possible, add another constraint and
repeat the process from step 3 in loops
until the result is satisfactory.
|
|
|
If constraints are deleted, the intermediate computation is
erased. |
|
 |