- by entering translation values
- by selecting geometric elements to define a translation direction (not described in this scenario)
The component to be translated must belong to the active component.
-
Click the Translation or Rotation icon
 .
.
The 3D compass is automatically snapped onto the referential axis of the father part (the Product1 axis system).
The Move dialog box is displayed.
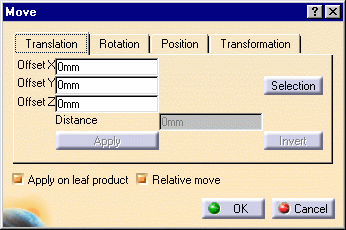
Either you specify an offset value between the element and the x, y or z axis, or you select a geometric element to define the direction you need (see Translate Components in the Assembly User's Guide). The move is defined in terms of an offset along x, y or z axes.
-
Select the component to be translated, e.g. GARDENA,NOZZLE_2_2.1
The 3D compass is automatically snapped onto the referential axis of Product3, the father of GARDENA,NOZZLE_2_2.1 .
![]()
-
To define the translation, enter an offset value for x, y or z in the Offset boxes e.g. 100 mm for y.
-
Click Apply.
The selected component is translated accordingly i.e. with respect to Part.2 (Product3 axis system).
-
Click Invert to reverse the previous operation and translate the component in the opposite direction.
The translation is reversed.
The move is defined by selecting elements or selecting an element and entering a distance.
-
Click Selection to define your translation with respect to a element. The Translation tab contents is grayed.
-
If you select a line or a plane you also need to enter a distance value. The translation is then done along the selected line or normal to the selected plane. Selecting two faces or planes assumes these elements are parallel. See Translate Components in the Assembly User's Guide.
-
Click OK to close the dialog box.
-
Repeat steps 1 and 2; this time uncheck the Relative move option.
-
Repeat step 3.
-
Click Apply.
The selected component is translated accordingly with respect to Part.2 (Product1 axis system) this time.
![]()
-
Now click the Invert button to reverse the previous operation.
-
Uncheck the Apply on leaf product option.
-
Repeat steps 2 and 3.
-
Click Apply.
The selected component is translated accordingly with respect to the Root product Product1.
-
Click OK to close the dialog box.
![]()