-
From your CATIA session, select Tools > Options... to access the options you need.
The Options dialog box appears. -
Select the General category in the left-hand box, if not already selected.
Document Tab
-
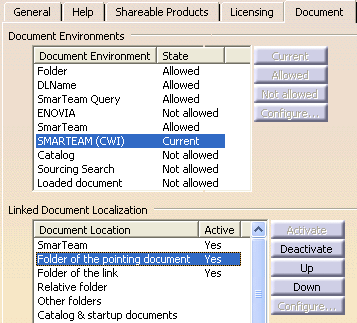
Click the Document tab.
The Document Environments area defines the various ways of accessing your documents. -
Select SmarTeam (CWI).
-
Click the Current button.
This lets you access documents stored in the SmarTeam vault. -
In the Linked Document Localization area select SmarTeam.
The Linked Documents Localization capability lets you define a personal strategy that will be used to locate your linked documents and therefore resolve document links. -
Click the Up button.
-
Repeat the operation for Folder of the pointing document, which provides the current folder of your document.
When done, you must get this:
SmarTeam Tab
-
Select the Compatibility category in the Options dialog box.
-
Click the SmarTeam (CWI) tab.
The SmarTeam tab lets you customize compatibility settings in CATIA V5 in order to work in a SmarTeam CWI - CATIA Interoperability context. -
Select Show menu and toolbar in the User Interface area.
This option displays SmarTeam CWI menu and toolbar in your CATIA session.
-
In the Expose Mode area, clear Internal components of CATProduct document and Sheets of CATDrawing document in order to be compatible with the SmDemo database. This ensures you do not create SmarTeam objects corresponding to the components of product documents and sheets whenever you check in CATProduct and CATDrawing documents.

-
Select SmarTeam detailed status (new, checked-out, checked-in, etc.). This ensures that icons identifying all possible statuses for documents (new, checked-out, checked-in, released etc.), are displayed in CATIA specification tree.

-
Take a look at the SmarTeam Web Server area to ensure that you are using the requested server. Otherwise, enter the server's address.

-
Click OK
 to close
the Options dialog box.
 -
Restart a CATIA session to take your modifications into account.
You are ready to connect to the SmarTeam Database.