- After a feature you select (default option)
- Before a feature you select
- Inside a body, a solid body or a geometrical set. In this case, the feature is repositioned at the bottom position within the feature list.
The Reorder capability allows you to reorganize your design, group features together, but also rectify design mistakes and eliminate some problems.
This section includes two scenarios showing you how to:
Additionally, it provides reference information on the following issues:
Reordering Sketch-Based Features
When reordering sketch-based features, your environment configuration affects the way sketches are located in the specification tree. To know how sketches are located in the specification tree, see Reordering Sketch-Based Features.
Reordering Dress-Up Features
Remember that dress-up features cannot be created as the first features of bodies. Consequently, when reordering this type of features, you must keep in mind this rule which explains why you cannot reorder dress-up features just below bodies.
Reordering One Feature using the After option
-
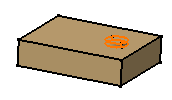
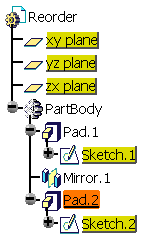
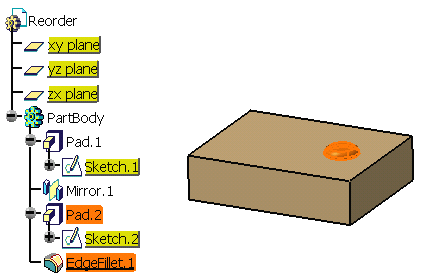
Your initial data consists of a pad that was mirrored and a second pad created afterwards. As the order of creation is wrong, you are going to reorder the second pad so as to mirror the whole PartBody. Position your cursor on Pad.2. and select Edit > Pad.2 object > Reorder...

The Feature Reorder dialog box appears. The default reorder option is After. For the purpose of this scenario, keep this option.
-
Select Pad.1 to specify the new location of the feature.
This name appears in the field close to After.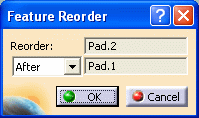
-
Click OK.
The part rebuilds itself completely or partially, depending on the chosen option for Update operations. -
When the update is complete, to see the resulting geometry, use Define in Work Object to set Mirror.1 as the current feature.
The mirror feature appears after the creation of the second pad, which explains why this second pad is now mirrored.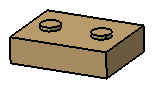
Yellow Nodes
Non-available locations are indicated in yellow in the tree. A yellow feature indicates that the feature to be reordered cannot be located:
-
Below the yellow feature, if the position option you selected is After
-
Above the yellow feature, if the position option you selected is Before
-
Inside the yellow feature, if the position option you selected is Inside.
If you select one of these forbidden locations, an error message is issued. In the example below, the user is trying to reorder Pad.1. As indicated by the yellow color set on all of the nodes, this feature cannot be reordered.
 |
What You Can Do
-
You can reorder features located in a solid body (body that do not integrate wireframe nor generative shape design geometry), part body, body or ordered geometrical set. The general rule is that a feature must remain in the same branch under the part where the notion of order is defined, but there are exceptions to that:
-
Solid features can be moved from one body to another one even if these bodies do not belong to the same branch. However, these bodies must be of the same type: you cannot move a solid feature from a body to a solid body, nor move a solid feature from a solid body to a body. And additionally, a solid feature can only be moved to a body containing no surface features.
-
Non-solid features (GSD features, sketches and datum features) can be moved from one Ordered Geometrical Set (or body) to another (body) in another branch provided that they are independent: they have no parents (except for XY, YZ or ZX planes or axis systems located just below the part in the tree) and no children.
-
-
A root OGS (Ordered Geometrical Set located directly under the Part) can be reordered to any empty set. But the root OGS has to be reordered alone: if two root OGSs are selected, an error message will be issued.
Specifying the new location
In ordered structures, such as ordered geometrical sets or bodies, the Reorder command guaranties that the order is preserved.
Solid features are of only one type: they are all considered as modification features (except for the first one of the body)
In OGS or bodies, a distinction is to be made between modification features and creation features for surface features.
-
creation features (such as Extrude, Offset etc.) create a new object.
-
modification features (such as Split, Edge Fillet, Trim, Join etc.) create a new state in an existing object as well as absorb the preceding state.
When reordering surface features, the yellow node analysis is based upon the distinction between creation features and modification features. Both examples below illustrate the application behavior.
Reordering a Modification Feature
 |
Reordering a Creation Feature
If a creation feature is directly based upon a modification feature (the Parent/Children capability lets you see this relationship), the rule is that you can reorder the creation feature within the main input chain of the modification feature. However, in some particular cases, the Reorder operation may result in update errors as illustrated in the following case.
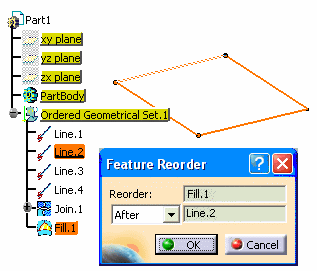
If you wish to reorder Fill.1 and locate it before Join.1, which is its parent, the application allows you to do so because Join.1 is a modification feature. As Line.1 is the main input of Join.1 and as Line.1 is a creation feature, the application allows you to reorder Fill.1 up to Line.1.
To know more about reordering features in geometrical sets and ordered geometrical sets, refer to the Managing Geometrical Sets and Managing Ordered Geometrical Sets tasks described in the Generative Shape Design User's Guide.
Update Operations
-
Manual Update
If the Manual update option is on, a warning message is issued to inform you that you need to update the geometry. -
Automatic Update
If the Automatic update option is on, the whole part is updated.
We recommend you use Manual update for complex geometry. This will help you control the way you gradually rebuild your geometry. Depending on your reorder operation, you will see more easily how the different features of the part are affected.
In Work Objects
After reordering a feature in the specification tree, local objects are defined as follows: the application sets the first feature that is not affected by the reorder operation as the new defined in work object. This is convenient when using the Scan command after the reorder operation to update the modified geometry step-by-step.
-
When reordering upwards, the in work object is the feature positioned just before the new position of the reordered feature.
-
When reordering downwards, the in work object is the feature positioned just before the original position of the reordered feature.
Reordering Several Features At a Time
You can reorder two or more features at a time as explained in the following second scenario.
-
Multi-select Pad.2. and EdgeFillet.1 then select Edit > Selected objects > Reorder....
Our selection includes two features consecutively positioned under the same tree node.Non-Consecutive Features
If the features are not strictly consecutively positioned under the same tree node, you can reorder them provided they are independent: with no parents (except for XY, YZ or ZX planes or axis systems located just below the part in the tree) and with nor children.
Otherwise, the operation is not possible and an error message is issued.
In our scenario, the application detects non-available locations and display them in yellow.
-
The Feature Reorder dialog box appears. Select Pad.1 to indicate the new location for Pad.2 and EdgeFillet.1.
The dialog box shows that two elements are to be reordered after Pad.1.
-
Click OK to confirm.
The part rebuilds itself. Both Pad.2 and EdgeFillet.1 are now mirrored. To see the resulting geometry as shown below, set PartBody as the current object using Define in Work Object.