Setting Text Properties |
|
Text properties such as font style, size and justification can be applied to text, dimension text, text with leader, balloon and datum target, as well as to text included in datum features and geometrical tolerances. You can set the properties of a text either before or after creating it.
If the Text Properties toolbar is not displayed, choose View > Toolbars, and select Text Properties.
 |
-
Select the text.
")
-
Choose the properties you want to apply to this text in the Text Properties toolbar. For instance, select Italic and Bold. The properties you chose are applied to the selected text.
")
Specifying the Position and Orientation of a Text |
|
If the Position and Orientation toolbar is not displayed, choose View > Toolbars, and select Position and Orientation.
 |
-
Select the text whose position and/or orientation you want to specify.
-
Enter the required values in the Position and Orientation toolbar.
-
X: sets the horizontal position.
-
Y: sets the vertical position.
-
A: sets the orientation.
-
More About the Text Properties Toolbar
|
Option |
Name |
Description |
|
|
Font Name | Changes the style of the text. |
|
|
Font Size | Changes the size of the text. Note that this size cannot be inferior to 0.2 mm. |
|
|
Bold | Changes the weight of the text. Toggles between normal and heavy (bold). |
|
|
Italic | Changes the angle of the text. Toggles between normal and slanted (italic) |
|
|
Underline | Adds a line under the text. |
|
|
Strike Thru | Adds a line through the center of the text. |
|
|
Overline | Adds a line above the text. |
|
|
Superscript | Raises the text above the normal text line. |
|
|
Subscript | Lowers the text below the normal text line. |
|
|
Left Justify | Aligns multiple lines of text to the left edge of the text frame. |
|
|
Center Justify | Centers multiple lines of text within the text frame. |
|
|
Right Justify | Aligns multiple lines of text to the right edge of the text frame. |
|
|
Anchor point | Changes
the position of the point that connects the text to the drawing or to
an element. Choices are as follows:
|
|
|
||
|
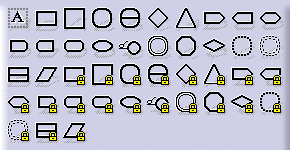
|
Frame | Draws a
single-line frame around the text. A variety of different shapes is available. You can choose to create each frame with either a variable or a
fixed size. For a rectangular frame, for example, the icon
|
|
|
||
|
|
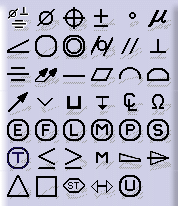
Insert Symbol |
IInsert a symbol if the selected element allows it. |
|
|

Limitations |
|
Annotations
- In the Drafting workbench, it is impossible to store annotations in a selection set.
- If you multi-select annotations and geometry and then try to drag the selected elements, then either annotations or geometry will be moved (depending on what elements are located under the mouse), but not both. To bypass this limitation, you can translate the elements instead of trying to drag them.
Dimensions
In case of a dimension, the symbol inserted from the Text Properties toolbar is a prefix. You cannot have both a prefix and a suffix on a dimension. If a suffix is displayed on a dimension, creating a prefix with the Text Properties toolbar deletes it from the view, and the prefix only is displayed.
![]()