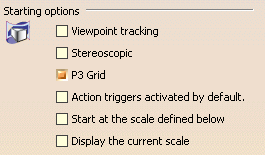
This page deals with the following options:
Starting Options
Viewpoint trackingIf you select this check box, the viewpoint changes as your head turns if you use a head tracker device.
This option is linked to Stereoscopic option which enables or disables 3D visualization of your session. You need to launch the device driver. Please refer to Customizing Devices Settings
By default, this check box is cleared.
Stereoscopic
Enables or disables stereoscopic visualization of graphical data with a perception of realistic, three-dimensional images.
By default, this check box is cleared.
P3 grid
Enables to display the P3 grid when you enter the DMU Immersive Workbench
By default, this check box is selected.
Action triggers activated by default
If you select this check box a "demo mode" is launched which means each time you select an object which has been assigned an action trigger, the operation is automatically launched (the CATScript macro is triggered). In this case, only the standard toolbar is available, the action triggers command is activated.
If you clear this check box, you need to click the Action Triggers icon first and then select the object. All immersive review toolbars are available.
By default, this check box is cleared.
Scale of the Review
To get the most of this capability, make sure either the Stereoscopic check box is selected (MPK compliant) or both Viewpoint Tracking and Stereoscopic check boxes are selected. Note: when selecting the Start at the scale defined below check box, the following warning message is displayed:
Start at the scale defined belowActivates the scale command when entering Immersive Review workbench.
By default, this check box is selected.
Display the current scale
Activates the display of the current scale factor (at the bottom left in the review window)
Scale of the review:
Allows the user to define a specific scale factor (i.e. the required scale, applied by the Scale command)


