-
Select the Start > Mechanical Design > Assembly Design command to launch the required workbench.
The workbench is opened. The commands for
assembling parts are available in the toolbar to the right of the
application window. For information on these commands, please refer to
Product Structure documentation.
You can notice that Product1 is displayed in the specification
tree, indicating the building block of the assembly to be created.
To know how to use the commands available in the Standard and View toolbars located in the application window border, please refer to Infrastructure documentation.
-
Before following the scenario, set the following options:
-
Make sure the option Work with the cache system option is deactivated: use the Tools > Options command, click Infrastructure > Product Structure to the left of the dialog box that appears and uncheck the option Work with the cache system. Do not forget to restart the application after turning off the cache.
For more information, refer to Working with a Cache System. -
Use the Tools > Options command, click Infrastructure > Product Structure to the left of the dialog box that appears, then click the Product Structure tab and uncheck the option Manual Input.
For more information, refer to Customizing Product Structure Settings. -
Use the Tools > Options command, click Infrastructure > Part Infrastructure to the left of the dialog box that appears, then check the option Keep link with selected Object.
For more information, refer to Customizing General Settings.
Note also that the default mode for the Update capability is "manual". For the purposes of this scenario, set the automatic mode.
-
Open the Assembly_01.CATProduct document.
Start the scenario with an existing assembly. Product1 is composed of three parts created in the Part Design Workbench:
-
CRIC_FRAME (in turquoise)
-
CRIC_BRANCH_3 (in blue)
-
CRIC_BRANCH_1 (in red)
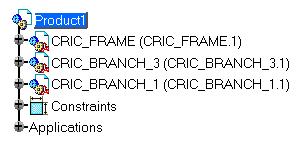
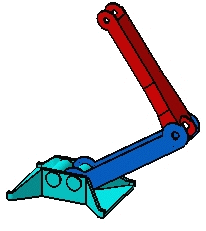
Surface and Coincidence constraints have been defined for these parts in the Assembly workbench.
-
Click the + sign to the left of the Constraints text in the tree and apply the show mode on these constraints if you wish to view them in the geometry area.