In addition to the standard UNIX authentication system, the Network Information Services NIS and NIS+ and the Network File System (NFS) provide a means to authenticate users and machines in networks on a message-by-message basis. This additional authentication system uses Data Encryption Standard (DES) encryption and public key cryptography.
This section discusses the following topics:
Throughout history, various groups of people have sought to communicate in such a way that only the sender and receiver know the contents of a given message. To achieve this secrecy, senders and receivers use a cipher, a scheme for converting a plaintext message into ciphertext and back again. Encryption is the process of converting plain text into cipher text, and decryption is the process of converting cipher text into plain text.
One of the earliest ciphers, the Caesar cipher, is attributed to Julius Caesar. In this cipher, one letter is substituted for another. For example, 'A' becomes 'C', 'B' becomes 'D', ..., 'Y' becomes 'A', and 'Z' becomes 'B'. So, the Caesar cipher encrypts the phrase ATTACK AT DAWN as CVVCEM CV FCYP.
If the Carthaginians could cryptanalyze the Caesar cipher and break it, the Roman cryptographers would have to invent an entirely new cipher. Since cipher development is an expensive process, the Romans might use a cipher key in order to get more use out of their cipher. For example, instead of specifying a letter-for-letter substitute, the Romans might specify a key K, where K indicates the number of positions to shift a letter. That is, if K = 2, then 'A' becomes 'C'. If K = 4, then 'A' becomes 'E', and so on. With this scheme, if the Carthaginians break the cipher, all the Romans must do is change the key. Of course, the Carthaginians might realize what algorithm the Italians were using, and exhaustively try every value of K from 1 to 26. If the Carthaginians had a computer, their task would be a trivial programming exercise.
Modern ciphers are designed to address the fact that computers can be powerful tools for an intruder attempting to break a cipher. In 1977, the U.S. government adopted a cipher as its Data Encryption Standard. This cipher is widely used in industry. DES is a highly complex algorithm which converts 64-bit blocks of plain text into 64-bit blocks of cipher text using a 56-bit key. Because of the complexity of the algorithm and the size of the cipher key, DES is essentially unbreakable. For example, if an intruder had a computer which could compute the DES algorithm at a rate of one key per microsecond, the computer would need over two thousand years to try every possible key.
A significant weakness in any encryption algorithm is the key that is used. If the sender and receiver are to communicate securely using a cipher, both the sender and receiver must know the key. They must agree upon a key either using a separate communications link, which itself must be secure, or in person.
To address this problem, two researchers (Diffie and Hellman) developed a technique by which the sender and receiver can exchange keys publicly without compromising the security of their communication. Their technique has three requirements:
where E is the encryption key (known to the public), and D is the decryption key (known only by the receiver).
That is, Encipher and Decipher functions are inverses of each other. Therefore, if you take the encrypted text string returned by Encipher( plaintext, E), and use it along with the key D for the Decipher function, Decipher returns the original plain text.
The following outline describes how a sender sends a secret message to a receiver.
ciphertext = Encipher( plaintext, E )
plaintext = Decipher( ciphertext, D )
Even if an intruder intercepts the message, the intruder will not be able to decipher it because the intruder does not have the decipher key. (For that matter, the sender cannot decipher the cipher text message either.)
A primary application of secrecy is authentication. One common method of authentication (which is the standard UNIX method of authentication) uses a password. When a user wants to log in, the operating system requires the user to provide a password known only by the operating system and the user. If the user provides the correct password, the operating system concludes that the user is who the user claims to be. Note that this method requires the operating system to store the user passwords in a file on the system, although in encrypted form. This means that two different entities know a single password.
Public key cryptography provides an alternative to password authentication. Suppose a sender wants to send a message, and the receiver wants to be certain that the message is from the sender and not from an intruder pretending to be the sender. The authentication process will occur in the following manner:
Note that, unlike password authentication, the receiver is able to authenticate the sender without knowing the sender private key. For more information on authentication systems, see Understanding RPC Authentication in AIX 5L Version 5.1 Communications Programming Concepts.
NFS, NIS, and NIS+ use the DES algorithm for different purposes. NFS uses DES to encrypt a time stamp in the Remote Procedure Call (RPC) messages sent between NFS servers and clients. This encrypted time stamp authenticates machines just as the "token" authenticates the sender, as described in Authentication. (For information about NIS and NIS+ see AIX 5L Version 5.1 Network Information Services (NIS and NIS+) Guide.)
Because NFS can authenticate every single RPC message exchanged between NFS clients and servers, this provides an additional, optional, level of security for each file system. By default, file systems are exported with the standard UNIX authentication. To take advantage of this additional level of security, you can specify the secure option when you export a file system.
Both the public key and the secret key of the user are are stored and indexed by net name in the publickey.byname map. The secret key is DES-encrypted with the user login password. The keylogin command uses the encrypted secret key, decrypts it with the login password, then gives it to a secure local key server to save for use in future RPC transactions. Users are not aware of their public and secret keys because the yppasswd command, in addition to changing the login password, generates the public and secret keys automatically.
The keyserv daemon is an RPC service that runs on each NIS and NIS+ machine. For information on how NIS+ uses keyserv, see AIX 5L Version 5.1 Network Information Services (NIS and NIS+) Guide. Within NIS, keyserv executes the following three public key subroutines:
The key_setsecret subroutine tells the key server to store the secret key of the user (SKA) for future use; it is normally called by the keylogin command. The client program calls the key_encryptsession subroutine to generate the encrypted conversation key, which is passed in the first RPC transaction to a server. The key server looks up the server public key and combines it with the secret key of the client (set up by a previous key_setsecret subroutine) to generate the common key. The server asks the key server to decrypt the conversation key by calling the key_decryptsession subroutine.
Implicit in these subroutine calls is the name of the caller, which must be authenticated in some manner. The key server cannot use DES authentication to do this, because it would create a deadlock. The key server solves this problem by storing the secret keys by the user ID (UID) and only granting requests to local root processes. The client process then executes a root user owned setuid subroutine which makes the request on the part of the client, telling the key server the real UID of the client.
Secure NFS authentication is based on the ability of a sender to encrypt the current time, which the receiver can then decrypt and check against its own clock. This process has two requirements:
If the network uses time synchronization, then the timed daemon keeps the client and server clocks synchronized. If not, the client computes the proper time stamps based on the server clock. To do this, the client determines the server time before starting the RPC session, and then computes the time difference between its own clock and that of the server. The client then adjusts its time stamp accordingly. If, during the course of an RPC session, the client and server clocks become unsynchronized to the point where the server begins rejecting the client requests, the client will redetermine the server time.
The client and server compute the same DES encryption key by using public key cryptography. For any client A and server B, there is a key that only A and B can deduce. This key is called the common key. The client derives the common key by computing the following formula:
KAB = PKBSKA
where K stands for the common Key, PK stands for Public Key, and SK stands for Secret Key, and each of these keys is a 128-bit number. The server derives the same common key by computing the following formula:
KAB = PKASKB
Only the server and client can calculate this common key since doing so requires knowing one secret key or the other. Because the common key has 128 bits, and DES uses a 56-bit key, the client and server extract 56 bits from the common key to form the DES key.
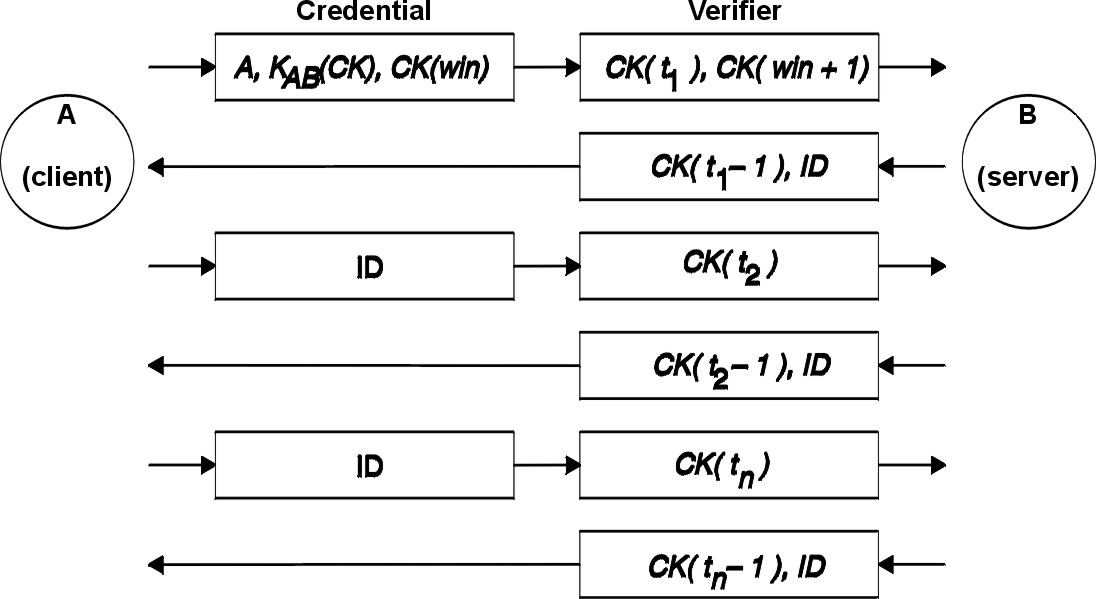
When a client wants to talk to a server, it randomly generates a key used for encrypting the time stamps. This key is known as the conversation key (CK). The client encrypts the conversation key using the DES common key (described in Authentication Requirements) and sends it to the server in the first RPC transaction. This process is illustrated in the following figure.
Figure 10-1. Authentication Process. This figure illustrates the authentication process which is described in the surrounding text.
|
This figure shows client A connecting to server B. The term K(CK) means CK is encrypted with the DES common key K. In its first request, the client RPC credential contains the client name (A), the conversation key (CK), and the variable called win (window) encrypted with CK. (The default window size is 30 minutes.) The client verifier in the first request contains the encrypted time stamp and an encrypted verifier of the specified window, win + 1. The window verifier makes guessing the right credential much more difficult, and increases security.
After authenticating the client, the server stores the following items in a credential table:
The server only accepts time stamps that are chronologically greater than the last one seen, so any replayed transactions are guaranteed to be rejected. The server returns to the client in the verifier an index ID into the credential table, plus the client time stamp minus one, encrypted by CK. The client knows that only the server could have sent such a verifier, because only the server knows what time stamp the client sent. The reason for subtracting one from the time stamp is to ensure that it is not valid and cannot be reused as a client verifier. After the first RPC transaction, the client sends just its ID and an encrypted time stamp to the server, and the server sends back the client time stamp minus one, encrypted by CK.
DES authentication does its naming by using net names. The following paragraphs describe how NIS handles DES authentication. For information on how NIS+ handles DES authentication, see AIX 5L Version 5.1 Network Information Services (NIS and NIS+) Guide.
A net name is a string of printable characters to authenticate. The public and secret keys are stored on a per-net-name rather than a per-user-name basis. The netid.byname NIS map maps the net name into a local UID and group-access list.
User names are unique within each domain. Net names are assigned by concatenating the operating system and user ID with the NIS and Internet domain names. A good convention for naming domains is to append the Internet domain name (com, edu, gov, mil) to the local domain name.
Network names are assigned to machines as well as to users. A net name of a machine is formed much like that of a user. For example, a machine named hal in the eng.ibm.com domain has the net name unix.hal@eng.ibm.com. Correct authentication of machines is important for diskless machines that need full access to their home directories over the network.
To authenticate users from any remote domain, make entries for them in two NIS databases. One is an entry for their public and secret keys; the other is for their local UID and group-access list mapping. Users in the remote domain can then access all of the local network services, such as the NFS and remote logins.
The /etc/publickey file contains names and public keys, which NIS and NIS+ use to create the publickey map. The publickey map is used for secure networking. Each entry in the file consists of a network user name (which refers to either a user or a host name), followed by the user public key (in hexadecimal notation), a colon, and the user encrypted secret key (also in hexadecimal notation). By default, the only user in the /etc/publickey file is the user nobody.
Do not use a text editor to alter the /etc/publickey file because the file contains encryption keys. To alter the /etc/publickey file, use either the chkey or newkey commands.
When restarting a machine after a power failure, all of the stored secret keys are lost, and no process can access secure network services, such as mounting an NFS. Root processes could continue if there were someone to enter the password that decrypts the secret key of the root user . The solution is to store the root user decrypted secret key in a file that the key server can read.
Not all setuid subroutine calls operate correctly. For example, if a setuid subroutine is called by owner A, and owner A has not logged into the machine since it started, the subroutine cannot access any secure network services as A. However, most setuid subroutine calls are owned by the root user, and the root user secret key is always stored at startup time.
Secure NFS affects system performance in two ways.
First, both the client and server must compute the common key. The time it takes to compute the common key is about one second. As a result, it takes about two seconds to establish the initial RPC connection, because both client and server have to perform this operation. After the initial RPC connection, the key server caches the results of previous computations, and so it does not have to recompute the common key every time.
Second, each RPC transaction requires four DES encryption operations:
Because system performance is reduced by secure NFS, weigh the benefits of increased security against system performance requirements.
The following is a checklist of items to help ensure that secure NFS operates properly:
To configure secure NFS on NIS master and slave servers, use the Web-based System Manager Network application or use the following procedure. For information on using NFS with NIS+ see AIX 5L Version 5.1 Network Information Services (NIS and NIS+) Guide.
#if [ -x /usr/sbin/keyserv ]; then
#  startsrc -s keyserv
#fi
#if [ -x /usr/lib/netsvc/yp/rpc.ypupdated -a -d /etc/yp/`domainname` ]; then
#  startsrc -s ypupdated
#fi
#DIR=/etc/passwd
#if [ -x /usr/lib/netsvc/yp/rpc.yppasswdd -a -f $DIR/passwd ]; then
#  startsrc -s yppasswdd
#fi
To configure secure NFS on NIS clients, start the keyserv daemon using the startsrc command.
You can export a secure NFS using the Web-based System Manager Network application or by using one of the following procedures.
/usr/sbin/exportfs -a
The -a option tells the exportfs command to send all information in the /etc/exports file to the kernel. If NFS is not running, start NFS using the instructions in Start the NFS Daemons.
Enter:
exportfs -i -o secure /dirname
where dirname is the name of the file system you want to export. The exportfs -i command specifies that the /etc/exports file is not to be checked for the specified directory, and all options are taken directly from the command line.
To mount a secure NFS directory explicitly:
showmount -e ServerName
where ServerName is the name of the NFS server. This command displays the names of the directories currently exported from the NFS server. If the directory you want to mount is not listed, export the directory from the server.
mount -o secure ServerName:/remote/directory /local/directory
where ServerName is the name of the NFS server, /remote/directory is the directory on the NFS server you want to mount, and /local/directory is the mount point on the NFS client.
Note: Only the root user can mount a secure NFS.
See Establishing Predefined NFS Mounts for more details on mounting with NFS.