[ Previous |
Next |
Contents |
Glossary |
Home |
Search ]
AIX Version 4.3 Messages Guide and Reference
Accessing a System That Will Not Boot
The procedure in this section describes how to access
a system that does not boot from the hard disk.
Note: This procedure is intended
only for experienced users who
have knowledge of how to boot or recover data from a system that is unable
to boot from the hard disk. Most
users should not attempt this procedure but should instead contact their service
representative. If you are
unable to boot from the hard disk after completing a new installation, contact
your service representative.
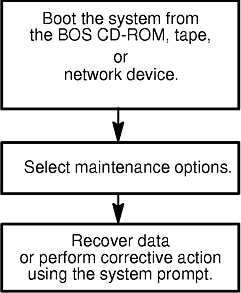
Flowchart for Accessing a System That Will Not Boot
The flowchart
outlines the procedure for accessing a system that will not boot.
Prerequisites
- You want to boot your system for Maintenance Mode.
- All hardware is installed.
- The AIX Version 4 Base Operating System (BOS) is installed.
- Your system unit is set to Off.
- Locate the key for the key lock on your system unit.
Accessing the System
Use this procedure if you want to boot for Maintenance mode.
The beginning of this procedure is similar to the one you used to install the Base Operating System.
You will, however, be using the maintenance screens instead of the installation screens to
complete this procedure. The maintenance screen illustrations in this procedure are provided
as examples only. The actual online screens may be somewhat different in appearance.
- Turn the system key, if present, to the Service position.
- Turn on all attached external devices, such as terminals,
CD-ROM drives, tape drives, monitors, and external disk drives before turning on the system unit.
Do not turn the system unit on until step 5. Turning on the external devices first is necessary so
that the system unit can identify them during the startup (boot) process.
- Insert the installation media into the tape or CD-ROM drive.
If you are using CD-ROM that utilizes a separate disc caddy, insert the CD-ROM into the disc
caddy and then insert the caddy into the CD-ROM drive.
Notes:
- You may find that on specific hardware, the tape drive door
will not open while the system unit is turned off. If you have trouble opening the tape drive
door during installation, use the following procedure:
- Turn the system unit on.
- Insert the
AIX Version 4
BOS tape.
- Turn the system unit off and wait 30 seconds.
- On some models that have a door to the tape drive, there may be
a waiting period of up to three minutes before the tape drive door opens after you have pressed
the button to open the tape drive. Some models also require that the button for the tape drive
door be held in the pressed position for a few seconds before the tape drive door will open.
- On some models, the eject button must be pressed for at least
2 seconds in order to eject a CD-ROM that is already in the disc caddy.
- If you are not using an ASCII terminal, skip to step 5.
If you are using an ASCII terminal, set the communications options as follows:
- Line Speed (baud rate) = 9600
- Word Length (bits per character) = 8
- Parity = no (none)
- Number of Stop Bits = 1
- Interface = RS-232C (or RS-422A)
- Line Control = IPRTS
Set the keyboard and display options as follows:
- Screen = Normal
- Row and Column = 24x80
- Scroll = jump
- Auto LF (line feed) = off
- Line Wrap = on
- Forcing Insert = line (or both)
- Tab = field
- Operating Mode = echo
- Turnaround Character = CR
- Enter = return
- Return = new line
- New Line = CR
- Send = page
- Insert Character = space
Note: If your terminal is an IBM 3151, 3161,
or 3164, press the Ctrl+Setup keys to display the Setup Menu and follow the on-screen
instructions to set these options. If you are using some other ASCII terminal, refer to
the appropriate documents for information about how to set these options. Some other
terminals have different option names and settings than those listed here.
- Turn the system unit power switch to the On position.
The system begins booting from the installation media. If your system is booting from tape,
it is normal for the tape to move back and forth. After several minutes, c31
is
displayed in the three-digit LED.
Depending on your system, either or both of the following
screens may be displayed:
| If you have more than one console |
Each terminal and direct-attach display device (or console) may display a screen that
directs you to press a key to identify your system console. A different key is specified for
each terminal displaying this screen. If this screen is displayed, then press the specified
key on the device to be used as the system console. The system console is the keyboard and
display device used for installation and system administration. Press a key on only one console. |
| If you have a non-U.S. English (101)
keyboard or an ASCII terminal |
|
|
A screen may be
displayed that prompts you to select an installation language.
Follow the directions on this screen to select the language in which
all further instructions will be displayed. |
- Select option 3, start Maintenance Mode
for system recovery, from the Welcome to the Base Operating System Installation and Maintenance
screen when it is displayed.
Note: If you customized the bosinst.data
file in your installation media to specify a nonprompted installation, the installation and
maintenance screens will not be displayed. The system will instead reboot from the installation
media using the settings already defined in the bosinst.data file. To access the
installation and maintenance screens, you need to override the nonprompted mode. An opportunity
to do this occurs when three zeros are displayed on the screen. When you observe the three zeros,
type the following:
000
and press Enter.
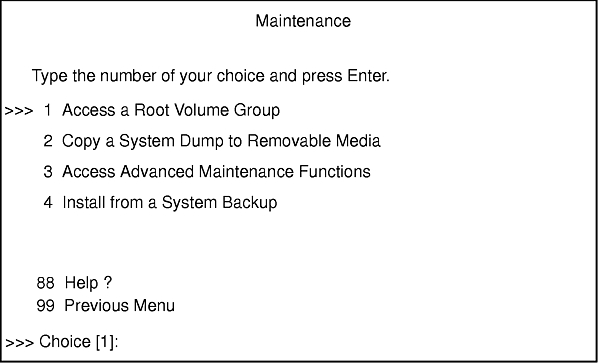
The >>> (greater-than signs) on this menu indicate the default selection. You can select 88 to
display help on this or any subsequent screen.
After you have selected the Maintenance option,
the Maintenance screen is displayed.
- Select option 1, Access a Root Volume Group, from the
Maintenance screen. The Warning screen is displayed.
- Read through the information displayed on the Warning screen.
When you are ready to continue, type 0
and press Enter. The Access a Root Volume
Group screen is displayed.
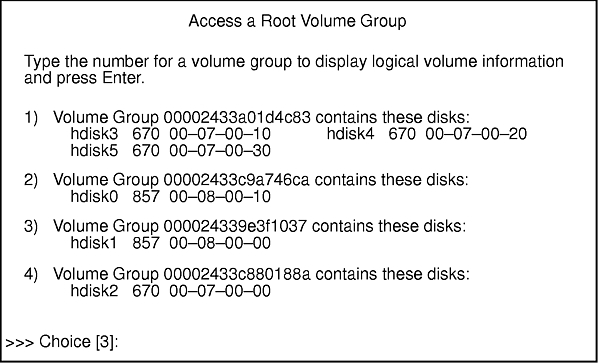
- Select the option for the root volume group whose logical volume
information you want to display. The Access a Root Volume Group
screen lists all of the volume groups (root and otherwise) on
your system. After entering your selection, the Volume Group Information screen is displayed.
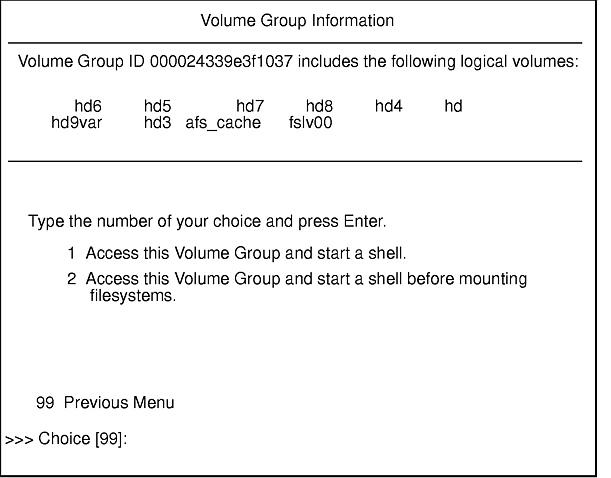
Note: Reviewing the disk and location code
information on the Volume Group Information screen allows you to determine whether or not the
volume group you selected was the root volume group. You can return to the Access a Root
Volume Group screen if the choice you made was not the root volume group. If you have not
chosen a root volume group, you will not be able to continue beyond the Volume Group Information
screen.
- Select one of the options from the Volume Group Information
screen and press Enter. Each option does the following:
| Choice 1 |
Access this volume group and start a shell. Selecting this choice imports and
activates the volume group and mounts the file systems for this root volume group before
providing you with a shell and a system prompt. |
| Choice 2 |
Access this volume group and start a shell before mounting file systems.
Selecting this choice imports and activates the volume group and provides you with a shell and
system prompt before mounting the file systems for this root volume group. |
| Choice 99 |
Entering 99
returns you to the Access a Root Volume Group screen. |
After either choice 1 or 2 is selected and processed, a shell and system prompt are displayed.
[ Previous |
Next |
Contents |
Glossary |
Home |
Search ]