This section details the procedure for installing BOS from a system backup.
The following conditions should be met before beginning the procedure:
| Tape | BOS tapes, created in one of the following ways:
|
| Network | The path to your backup image file. Refer to AIX Version 4.3 Network Installation Management Guide and Reference for information about installing a backup across a network. |
Note: Before you begin, select the tape drive as the primary boot device. For additional information, refer to the System Management Services section in your hardware documentation.
Use this procedure to start your machine:
shutdown -FThe Halt completed ... message appears when the shutdown process completes.
Note: On some models, the shutdown command turns off the power to the system unit. It does not, however, automatically turn the power switch to the Off position.
Notes:
- You may find that on specific hardware the tape drive door will not open while the system unit is turned off. If you have trouble opening the tape drive door during installation, use the following procedure:
- On some models that have a door to the tape drive, there may be a waiting period of up to three minutes before the tape drive door opens after you have pressed the button to open the tape drive. Some models also require that the button for the tape drive door be held in the pressed position for a few seconds before the tape drive door will open.
Note: If your terminal is an IBM 3151, 3161, or 3164, press the Ctrl+Setup keys to display the Setup Menu and follow the on-screen instructions to set these options. If you are using some other ASCII terminal, refer to the appropriate documents for information about how to set these options. Some terminals have different option names and settings than those listed here.
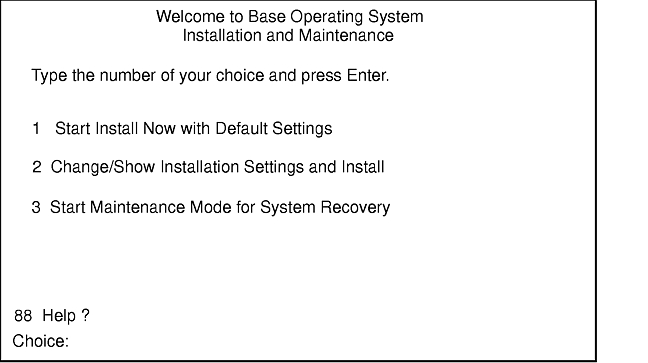
Note: You can boot from production media (tape or CD-ROM) if your backup tape fails to boot. The initial Welcome screen includes an option to enter a maintenance mode in which you can continue the installation from your backup tape. Refer to "Troubleshooting an Installation from a System Backup" for more information.
If you have more than one console on your machine, each terminal and direct-attached display device may present a screen that instructs you to press a key to identify your system console. If these screens appear, press the specified key on the device you choose for your system console. (The system console is the keyboard and display device used for installation and system administration.) Press a key on only one console.
However, if the bosinst.data file lists a valid display device for the CONSOLE variable, you do not manually choose a system console. Read "Customizing the BOS Install Program" for more information about the bosinst.data file.
A successful nonprompted installation requires no further instructions because the installation is automatic. The sequence of events follows:
The screen pauses for five to 10 seconds before the next screen appears. If you wish, you can use the short pause to interrupt the automatic installation and start a prompted session. Do this by typing three 000 (zeros) at the terminal. The installation will continue in a prompted mode.
Note: The nonprompted installation stops and prints the Welcome to Base Operating System Installation and Maintenance screen if the backup image holds configuration information incompatible with the machine you are installing. For example, if the image specifies a target disk that does not match what is in the machine, BOS installation starts a prompted session in which you can modify the installation.
This second screen signals the start of the BOS installation, reporting the rate of completion and duration.
The Please turn the system key to the NORMAL Position message appears on this screen if the key is not already in the Normal position. You can turn the key at any time while the screen is showing. The installation continues regardless of the key position.
The reboot is automatic if the system key (if present) is in the Normal position. Otherwise, another screen directs you, at the end of the installation, to turn the key to Normal and press Enter. The system reboots, in this case, when you press the Enter key.
The Welcome to the Base Operating System Installation and Maintenance screen is the first screen to appear for prompted installations. This and subsequent BOS installation screens provide help text, which you can view by entering 88 .
The System Backup Installation and Settings screen appears.
This screen shows current settings for the system. An ellipsis follows the disk listed in the first line if there is more than one disk selected.To accept the settings and begin the installation, skip to step 8.
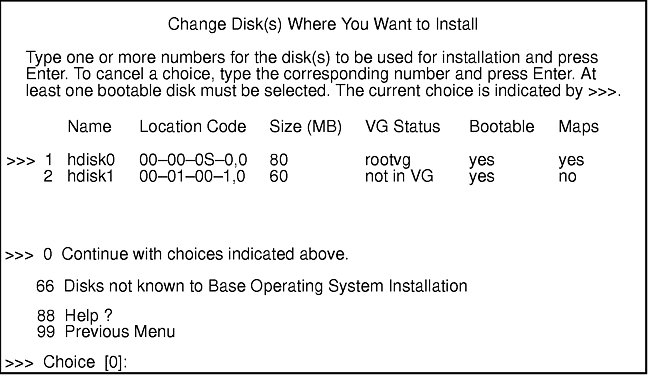
You can also specify a supplemental disk by entering 66 (type 66 and press the Enter key) for the Disks not known to Base Operating System Installation option. This option opens a new menu that prompts for a device support diskette for the supplemental disk. BOS installation configures the system for the disk and then returns to the Change Disk(s) Where You Want to Install screen.
The screen that appears next depends on whether all the selected disks have map files available:
For more information about map files, see "Using Map Files for Precise Allocation" in AIX Version 4.3 System Management Guide: Operating System and Devices.
When you complete this choice, BOS installation returns to the System Backup Installation and Settings screen.
File systems on your backup image might be larger than required for the installed files. Press the 2 key to toggle the Shrink File Systems option between Yes and No in the System Backup Installation and Settings screen. The default setting is No.
Note: Shrinking the file system will disable the use of maps.
The Installing Base Operating System screen appears, reporting the rate of completion and duration. Step 2 under "Nonprompted Installation" shows an example depiction of this screen.
The Please turn the system key to the NORMAL Position message appears on this screen if the key is not already in the Normal position. You can turn the key at any time while the screen is showing. The installation continues regardless of the key position.
An untitled screen temporarily replaces the Installing Base Operating System screen if you specified a supplemental disk in step 4 . This screen pops up about halfway through the installation, instructing you to again put the device-support diskette in the drive and press the Enter key. BOS installation reconfigures the supplemental disk, then returns to the Installing Base Operating System screen, which continues to report the progress of the installation.
The system reboots automatically when the installation completes.
The reboot is automatic if the system key (if present) is in the Normal position. Otherwise, a new screen directs you, at the end of the installation, to turn the key to Normal and press Enter. The system reboots, in this case, when you press the Enter key.
In new installations on graphical systems, a post-installation program, Configuration Assistant, starts automatically when BOS installation reboots the system. For ASCII systems, the post-installation configuration program is Installation Assistant. Whether this configuration program starts following your backup installation depends on settings in your backup image:
Go to "Customizing Your Installation" to configure the installed machine with optional software, network communications, user accounts, and other settings.
If the Configuration Assistant (or Installation Assistant for ASCII) does not start automatically, and you do not want to configure the machine, the installation from backup is complete.