[ Previous |
Next |
Contents |
Glossary |
Home |
Search ]
AIX Version 4.3 Installation Guide
Installing the Base Operating System
The basic steps for installing the Base
Operating System are summarized below. Detailed procedures for performing these steps are included in this chapter. The procedures in this chapter contain illustrations of the online screens used during installation. These illustrations are provided as examples only. The actual online screens may be somewhat different in appearance.
- Prerequisites
- Start the System
- Verify the Default Installation and
System Settings
- Change the Installation Method, if needed
- Change the Destination Disk, if needed
- Change the Primary Language
Environment, if needed
- Change the Trusted Computing Base
setting, if needed
- Install from CD-ROM or Tape
Press the Reset button on the system unit if you need to cancel the installation once it is in progress. If you cancel an
installation, you must start from the beginning of the installation process to
continue installing the system.
Prerequisites
Before installing the Base Operating
System, complete the following prerequisites:
- All hardware must already be connected,
including any external devices, such as tape and CD-ROM drives. If you need
instructions, refer to the hardware documentation that accompanied your
system.
- Obtain the system key for the lock (if present)
on your system unit.
- Locate your installation CD-ROMs or tapes. If
you are installing from CD-ROM, you should have two volumes. You may have multiple volumes of CD-ROMs or tapes.
- If you need to determine whether a display
adapter is installed, consult the "About Your Machine" document shipped with the
system. This document contains a list of the factory hardware that came with
your system.
- Refer to the documentation that came with the
product installation media if you have not already done so.
- If other users have access to your system, make sure they are logged off before you begin the installation.
- For AIX Version 4.3, memory requirements have been increased to 32MB. A system with less than 32MB of memory may not be able to boot from the installation media.
- For disk space requirements for AIX Version 4.3, see AIX Version 4.3 Release Notes.
- If AIX Version 3.2 is currently
installed and you want to use the Migration Installation method to install AIX
Version 4.3, ensure that the root user has a primary authentication method of
SYSTEM. To check the value, enter:
lsuser -a auth1 root
To change the value, enter:
chuser auth1=SYSTEM root
For information about the Migration Installation method, see "Installation Methods."
- If the system you are installing contains data,
create or locate a backup of the system:
- If AIX Version 4.2 is currently installed, refer to the AIX Version 4.2 Installation Guide for instructions on how to create a backup copy of your Version 4.2 system. After you have created a backup of your system, continue with "To Start the System."
- If AIX Version 4.1 is currently
installed, refer to the AIX Version 4.1 Installation Guide for
instructions on how to create a backup copy of your Version 4.1 system. After
you have created a backup of your system, continue with "To Start the System."
- If AIX Version 3.2 is currently
installed, refer to the AIX Version 3.2 Installation Guide for
instructions on how to create a backup copy of your Version 3.2 system. After
you have created a backup of your system, continue with "To Start the System."
- If AIX Version 3.1 is currently
installed, refer to the AIX Version 3.1 Installation Guide for
Version 3 for instructions on how to create a backup copy of your Version
3.1 system. After you have created a backup of your system, continue with "To Start the System."
- If you are reinstalling AIX Version 4.3, refer
to "Backing Up Your System". After you have created a backup of
your system, continue with "To Start the System."
- If the system you are installing will
communicate with other systems and access their resources, determine the
following information: network interface, IP address, hostname, and route to the
network. Contact your system administrator for the correct information for your
system.
To Start the System
Use this procedure to start your machine:
- If you have a new system or your system is
turned off, skip to step 2. If the system is already turned on, do the following
to insert the installation media into the appropriate drive and then shut down
the system:
- Log in as root user.
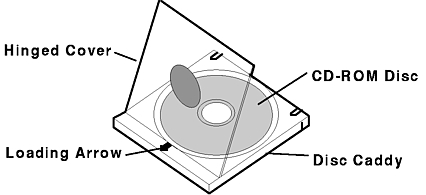
- Insert Volume 1 of the installation media into the
tape or CD-ROM drive. Some CD-ROM drives have a removable disc caddy, while others have a sliding
drawer. If the CD-ROM drive on your system has a sliding drawer, place the
CD-ROM in the drawer and push the drawer in. If the CD-ROM drive on your system does not have a sliding drawer, insert the CD-ROM into the disc caddy and then insert the caddy into the CD-ROM drive.
- Enter the following command:
shutdown -F
The Halt completed ...
message is displayed when the shutdown
process completes.
Note: On some models, the
shutdown command turns off the power to the system unit. It does not,
however, automatically flip the power switch to the Off (0
)
position.
- Flip the system unit power switch to the Off
(0
) position when the shutdown process is complete.
- Turn the system key (if present) to the Service
position.
- Turn on all attached external devices, such as
terminals, CD-ROM drives, tape drives, monitors, and external disk drives. Do
not turn the system unit on until step 6. Turning on the external devices first is
necessary so that the system unit can identify them during the startup (boot)
process.
- If you have not already inserted the
installation media into the tape or CD-ROM drive,
do so now. Some CD-ROM drives have a removable disc
caddy, while others have a sliding drawer. If the CD-ROM drive on your
system has a sliding drawer, place the CD-ROM in the drawer and push the drawer in. If the CD-ROM drive on your system does not have a sliding drawer, insert the
CD-ROM into the disc caddy and then insert the caddy into the CD-ROM drive.
Notes:
- You may find that on specific hardware, the
tape drive door will not open while the system unit is turned off. If you have
trouble opening the tape drive door during installation, use the following
procedure:
- Turn the system unit on.
- Insert the AIX Version 4.3 installation tape
(insert Volume 1 if you received more than one volume).
- Turn the system unit off and wait for 30
seconds.
- On some models that have a door to the tape
drive, there may be a waiting period of up to three minutes before the tape
drive door opens after you have pressed the button to open the tape drive. Some models also require that the button for the tape drive door be held in the depressed position for a few seconds before the tape drive door will open.
- On some models, the eject button must be
pressed for at least 2 seconds in order to eject a CD-ROM that is already in the disc caddy.
- If you are not using an ASCII terminal, skip to
step 6. If you are using an ASCII terminal, set the communications options as
follows:
- Line Speed (baud rate) = 9600
- Word Length (bits per character) = 8
- Parity = no (none)
- Number of Stop Bits = 1
- Interface = RS-232C (or RS-422A)
- Line Control = IPRTS
Set the keyboard and display options as follows:
- Screen = normal
- Row and Column = 24x80
- Scroll = jump
- Auto LF (line feed) = off
- Line Wrap = on
- Forcing Insert = line (or both)
- Tab = field
- Operating Mode = echo
- Turnaround Character = CR
- Enter = return
- Return = new line
- New Line = CR
- Send = page
- Insert Character = space
Note: If your terminal is an IBM
3151, 3161, or 3164, press the Ctrl+Setup keys to display the Setup Menu and
follow the on-screen instructions to set these options. If you are using some
other ASCII terminal, refer to the appropriate documents for information about
how to set these options. Some terminals have different option names and
settings
than those listed here.
- Turn the system unit power switch from Off
(0
) to On (|
). The system begins booting from the
installation media. If your system is booting from tape, it is normal for the
tape to move back and forth. After several minutes, the three-digit LED displays
c31
.
If you have more than one console, each terminal and direct-attached display
device (or console) may display a screen that directs you to press a key to
identify your system console. A different key is specified for each terminal
displaying this screen. If this screen is displayed, then press the specified
key on the device to be used as the system console. The system console is the
keyboard and display device used for installation and system administration.
Press a key on only one console.
- A screen is displayed that prompts you to
select an installation language. Follow the directions on this screen to select
the language in which the installation instructions will be displayed.
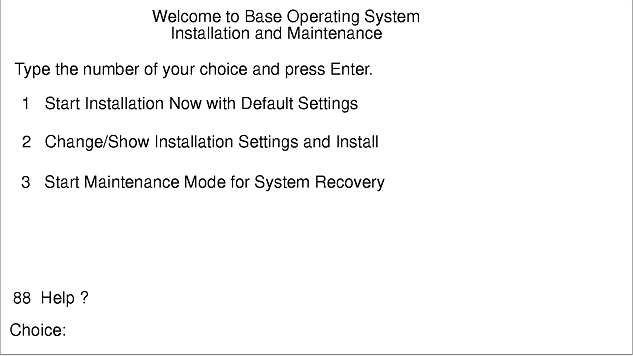
- The Welcome to the Base Operating System
Installation and Maintenance screen is
displayed.
You can select 88
to display help on this or any subsequent
installation screen.
To Install from CD-ROM or Tape
If you chose to confirm or change
installation and system settings, enter 0
on the Installation and
Settings menu to begin the installation process.
If the system key is present and is not already
in the Normal position, turn the system key to the Normal position when you are
prompted with the message:
Turn the system key to the NORMAL
position.
The Installing Base Operating System screen is displayed.
If you select Migration Installation, after a
few minutes, the Migration Confirmation screen is displayed.
Note: To skip the Migration
Confirmation screen, press Enter when the Installing Base Operating System
screen displays.
The Migration Confirmation screen enables you
to do the following:
- List the software on your system that is
incompatible with AIX Version 4.3 and that will be installed at the new
level.
- Reboot the system without completing the
migration. This selection cancels the installation.
- Continue with the installation.
After you enter a selection from the Migration
Confirmation screen, the installation status screen is redisplayed.
As the installation progresses, the numbers in
the Approximate percent complete and Elapsed time fields increment to indicate
the installation status. After the base run-time environment is installed,
status information about other software that is being installed is displayed. After the installation is complete, the system automatically reboots.
Where Do I Go Next?
The type of install you are doing and the
type of media you are installing from determines what you do next:
- If you are installing from tape and you
are doing either a preservation install or a complete-overwrite install:
Go to "Customizing Your Installation" and complete the post-installation
tasks.
- If you are installing from tape and you are
doing a migration install:
Go to "Customizing Your Installation" and complete the post-installation
tasks. If you received multiple tape volumes, the system prompts you to insert
the next tape to complete the migration install for software you have installed
on your system.
- If you are installing from CD-ROM and you are
doing either a preservation install or a complete-overwrite install:
Go to "Customizing Your Installation"
and complete the post-installation tasks. After you complete the
post-installation tasks, refer to
"Installing Optional Software and Service Updates"
for instructions on installing additional software on the current CD-ROM volume and on any other CD-ROM volumes that you may have.
- If you are installing from CD-ROM and you are
doing a migration install:
Go to "Customizing Your Installation" and complete the post-installation
tasks. If you have multiple CD-ROMs to install, complete the
post-installation tasks after installing Volume 1 of the CD-ROM.
If you have a graphical system, you can complete the migration installation by selecting the option Update installed software after a migration installation on the post-installation program, Configuration Assistant.
If you have an ASCII system, complete the migration install for software you have installed on your system that is shipped on the second volume of the CD-ROM. Insert Volume 2 and enter the following command:
smit update_all
Refer to "Installing Optional Software and Service Updates" for more information.
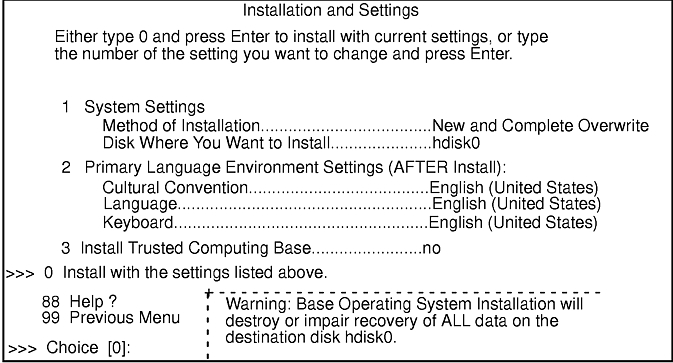
To Verify the Default Installation and System
Settings
The Installation and Settings screen
displays the default installation settings for your machine. The default
settings are determined by the state of your system. For example, the default
installation method for a new machine is different from the default installation method for a machine that has an earlier version of AIX installed. Usually, you can use the default settings for your installation.
If you want to change the default installation
method, be sure to read "To Change
the Installation Method."
The default installation method is based on the
following:
| New and Complete Overwrite |
This is the only possible installation method for a new machine. |
| Preservation Install |
This is the default setting for a machine installed with Version 3.1
or 4.3. |
| Migration Install |
This is the default setting for a machine installed with Version 3.2, 4.1, or 4.2. |
The default settings for a new machine with a
standard U.S. keyboard are shown in the following screen.
Attention: Do not select
the 0 option on the Installation and Settings screen until you have
either verified the default settings or changed them to the correct settings. Selecting the 0 option on this screen begins the installation process.
To verify the default installation settings,
check the default settings on the Installation and Settings screen.
- If the default settings do not need to be
changed, type 0
and press Enter to confirm that these settings are
correct. Skip the rest of this procedure and go to "To Install from CD-ROM or Tape."
- If the default settings need to be changed,
continue with one of the following:
To Change the Installation Method (Preservation
or Migration Only)
This section describes the different
installation methods and the procedure for changing the default setting. The
following terms are used in this section:
| Volume Group |
A single hard disk or group of hard disks on your system.
|
| Root Volume Group (rootvg) |
A volume group containing the Base Operating System.
|
| /usr |
A file system containing files and programs that can be shared among
machines. Some of the directories included in the /usr file system are:
/usr/bin, which contains ordinary commands and shell scripts;
/usr/lib, which contains architecture-independent libraries;
/usr/lpp, which contains optionally installed software.
|
| /tmp |
A file system providing a temporary shared storage location for
files.
|
| /var |
A file system containing files that are variable on a per-client
basis, such as spool and mail files.
|
| / |
The root file system contains files that have machine-specific
configuration data.
|
Installation Methods
This section describes AIX Version 4.3
installation methods.
If you want only to go to the next maintenance level of AIX, see "To Install Optional Software and Service Updates. Or, you can use smit update_all to update the filesets currently installed.
- New and Complete Overwrite Installation. Use this method if:
- You have a new machine. In this case the
hard disk or disks on which you are installing BOS are empty. This is the
only possible installation method for a new machine.
- You want to completely overwrite an existing
version of BOS that is installed on your system. Be sure to back up your system
before doing a New and Complete Overwrite installation. You may want to use the
New and Complete Overwrite installation when:
- You want to install onto a hard disk that
contains an existing root volume group that you wish to completely overwrite.
For example, this might occur if your root volume group has become corrupted.
- You want to reassign your hard disks. For example, assume you have four hard disks belonging to one root volume group, and you want to separate these disks into two volume groups. You might first do a Complete Overwrite installation and select the first disk as the installation destination. This disk would become the new root volume group.
You could then use either the Volumes application or the System Management Interface Tool (SMIT) to combine the remaining disks into a second (nonroot) volume group. The result would be two separate volume groups.
All of the operating system files would be in the root volume group, and you
could store user data in the second volume group. The advantage is that you can
update or reinstall the operating system without affecting the user's data.
Attention: The New and Complete Overwrite
installation overwrites all data on the selected destination disk. This means
that after the installation is complete, you will have to manually configure
your system using the Configuration Assistant application, SMIT, or the command line. If you want to preserve your system configuration and you do not need to completely overwrite your root volume group, do not use Complete Overwrite. Instead, use the Migration installation. (The Migration installation is available only for AIX Version 3.2, Version 4.1, or 4.2 machines.)
-
Migration Installation. Use this installation method to upgrade AIX
Version 3.2, AIX Version 4.1, or AIX Version 4.2 to AIX Version 4.3 while preserving the existing root volume group. This method preserves all file systems except /tmp, as well as the root volume group, logical volumes and system configuration files. Migration is the default installation method for
AIX Version 3.2, AIX Version 4.1, and AIX Version 4.2 machines.
During a Migration installation, the
installation process determines which optional software products must be installed on AIX Version 4.3. AIX Version 3.2, AIX Version 4.1, or AIX Version 4.2 software that exists on the system and has been replaced by new software in AIX Version 4.3 is installed at the AIX Version 4.3 level. When migrating from version 3.2, all files in /usr/lib/drivers, /usr/lib/microcode, /usr/lib/methods and /dev are removed from the system, so software support for non-device drivers must be reinstalled. Non-software products remain on the system. They are expected to function if they conform to the binary compatibility conditions described in "Compatibility between AIX Version 3.2 and
AIX Version 4.3."
When migrating from AIX Version 3.2, the
following software products are removed from the system:
- AIXwindows Interface Composer
- Remote Customer Services
- AIXwindows Development Environment
- Display PostScript functionality from
AIXwindows Run-Time Environment Extensions
- Performance Tools functionality from Extended
Commands
- OpenGL and PEX_PHIGS.
In most cases, user configuration files from the previous version of a product
are saved when the new version is installed during a Migration installation.
At the beginning of a migration install, the system verifies that there will be enough space to attempt the migration. If there is not, a message is printed explaining how much extra space is needed.
At this point, you must reboot the machine from the AIX Version 3.2, 4.1, or 4.2 disk and make some space available in the rootvg volume group to do the migration.
The following is a list of some actions you might take in this situation:
- Add another disk to the rootvg volume group using either the SMIT smit extendvg fast path or the extendvg command.
- Move any user data logical volumes from the rootvg volume group to another volume group. You can use either the SMIT smit migratepv fast path or the migratepv command to move individual logical volumes to another volume group's disk. It is a good idea to have only system logical volumes in the rootvg, and user data logical volumes in other volume groups.
For more detailed information about manipulating logical volumes and volume groups, refer to Logical Volumes in AIX Version 4.3 System Management Guide: Operating System and Devices.
- Remove unneeded logical volumes (and file systems) from the rootvg. Run the lsvg -l rootvg
command to see all the logical volumes in the rootvg volume group. The only logical volumes that must be in the rootvg are: hd2, hd3, hd4, hd5, hd6, hd8, and hd9var. The hd1 (/home) logical volume can reside in another volume group if necessary.
The hd7 (system dump) logical volume is no longer needed in AIX Version 4 because the paging space logical volume (hd6) is used. The migration code automatically removes this logical volume if space is needed, but you can remove it ahead of time with the following commands:
  sysdumpdev -P -p /dev/hd6
  rmlv -f hd7
- If you cannot find extra space in your rootvg, you may have to do a preservation install instead of a migration install to AIX Version 4.3. A preservation install will save all the "non-system" logical volumes and file systems (for example, /home), but will remove and recreate the following logical volumes: hd2, hd3, hd4, hd5 and hd9var.
If you do a preservation install, you must reinstall any applications that were installed in your rootvg after the preservation install has completed. You must also reconfigure devices, as well as recreate users and groups. See "Preservation Installation" for more information on this type of installation.
After you have freed up enough space, reboot from your installation media, and try the Migration Installation again.
To complete the Migration Installation, you
must have at least 8MB of free disk space. If there is insufficient space to
complete the Migration Installation during the BOS installation process, a
message similar to the following is displayed at the end of the installation:
An error occurred while migrating packages.
Some packages have not been installed.
Please see /var/adm/ras/devinst.log for details or perform an
overwrite or preservation install.
If space limitations prevent the migration of all software that is usually
automatically migrated, the installation program attempts to install the
software that is usually installed for a Preservation of Overwrite installation. If there is still not enough disk space available, the minimum set of software required to support the use of the system is installed.
If there is not enough space to migrate all of
the usually migrated software, a collection of software called a Migration
Bundle will be available when you install additional software later. If the minimum set of software is installed, or if the installation is not performed from a graphics console, a Graphics_Startup Bundle is created. Before installing either of these bundles, you will need to create additional disk space on the machine you want to install. Refer to "Installing
Optional Software and Service Updates" for more information about installing software bundles and for information on migrating or installing optional software products. "Maintaining Optional Software" describes how to remove software from the system to free up disk space.
-
Preservation Installation. Use this installation method when a version of
BOS is installed on your system and you want to preserve the user data in the root
volume group. However, this method overwrites the /usr, /tmp,
/var, and / (root) file systems by default, so any user data in
these directories is lost. These file systems are removed and recreated, so any other LPPs or filesets that you installed on the system will also be lost. Think of a preservation install as an overwrite installation for these flle systems. System configuration must be done after doing a Preservation installation.
The /etc/preserve.list file contains a
list of system files to be copied and saved during a preservation BOS
installation. The /etc/filesystems file is listed by default. Add the
full path names of any additional files that you want to save during the Preservation Installation to the preserve.list file. You must create the /etc/preserve.list file on an AIX Version 3.1 machine. On an
AIX Version 4.1 or later system, edit the file that exists on your
system.
You can modify the preserve.list file
and
copy it to a diskette to be used during BOS installation. For information about
creating a supplemental diskette, see "Customizing the BOS Install
Program." If a
preserve.list
file exists on diskette, the installation program uses this information instead
of the default file on the installation media or a user-created file on the
system you are installing. If no diskette data exists, the installation program
uses the preserve.list file you created on the system you are installing.
Lastly, the program uses the preserve.list file on the installation media
if no other file is found.
In addition to the amount of disk space
required for BOS installation, be sure you have sufficient disk space in the /tmp file system to store the files listed in the /etc/preserve.list file.
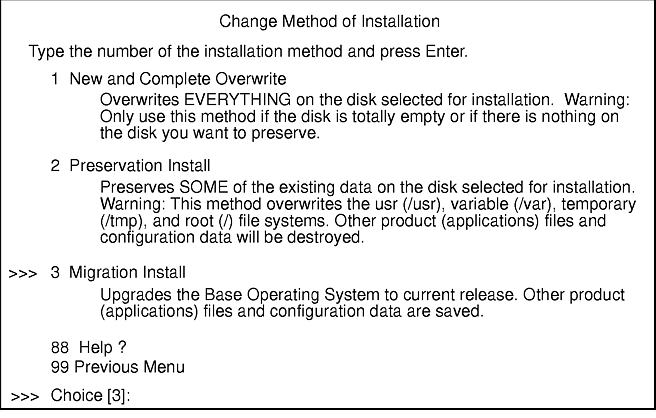
To Change the Installation Method
Use the following procedure to change the
default installation method if your default installation method is either the
Preservation or the Migration installation. If your default installation method
is New or Complete Overwrite, then this installation method cannot be changed.
- Enter 1
to select the
System Settings
option. The Change Method of Installation screen is displayed.
- Enter the number indicating the installation
method you want to use. The Change Disks Where You Want to Install screen is
displayed.
If you need to change the default installation
disk, continue with "To Change the
Destination Disk." Otherwise,
return to the Installation and Settings screen by pressing Enter and continue
with one of the following:
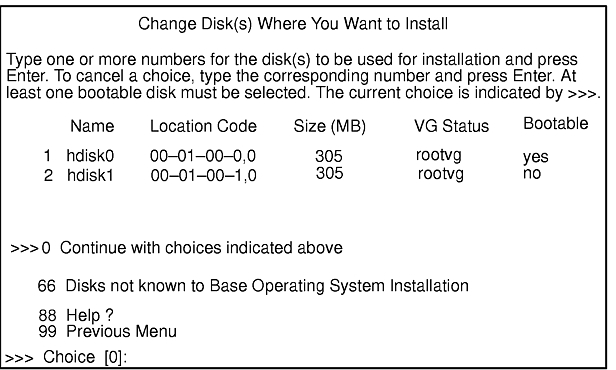
To Change the Destination Disk
The Change Disks Where You Want to Install
screen allows you to change the hard disk where BOS will be installed. The
location codes of the hard disks are displayed in the Location Code column of
the Change Disks Where You Want to Install screen. The format for the location code
for a direct-attached disk is: AA-BB where AA is 00 (zero)
and BB is the slot number for the hard disk. The format for the location
codes for all other hard disks is described in "Location Codes," in
POWERstation and POWERserver Common Diagnostics Information Manual.
Note: You may wish to keep a
record of the location code for the destination disk. In the future, you can use
this location code to identify which disk contains the root volume group in
order to do system maintenance.
For a New or Complete Overwrite Installation
Use the following procedure to change the
destination disk when performing a new or Complete Overwrite installation:
- If necessary, enter option 1
to select System Settings
on the Installation and Settings screen. The
Change Disk(s) Where You Want to Install screen is displayed.
- Type the number, but do not press Enter, for
each disk you choose. Type the number of a selected disk to deselect it. You can
select more than one disk.
You can also specify a supplemental disk by
entering 66
(type 66
and press the Enter key) for the
Disks not known to Base Operating System Installation option. This option
opens a new menu that prompts for a device support diskette for the supplemental
disk. A supplemental device diskette is only needed when the device will not
configure with the generic SCSI or bus attached device drivers. BOS installation
configures the system for the disk and then returns to the Change Disk(s) Where
You Want to Install screen.
- Press the Enter key when you finish selecting
disks.
After you have selected one or more installation
disks, the Installation and Settings Screen is displayed with the selected disks
or the newly configured disk listed under System Settings
.
Continue with one of the following:
For a Preservation or Migration Installation
Use the following procedure to change the
destination disk or root volume group when installing AIX Version 4.3 on a
Version 3.1, 3.2, 4.1, or 4.2 machine.
- If necessary, display the Change Disks
Where
You Want to Install screen by doing the
following:
- If the Installation and Settings screen is
displayed, then enter option 1
to select the System Settings
option.
- If the Change Method of Installation screen is
displayed, then either select an installation method or keep the default method
and press Enter.
- Enter the number indicating the root volume
group where you want to install AIX Version 4.3 on the Change Disks Where You
Want to Install screen. After you have selected a root volume group, the
Installation and Settings screen is displayed.
Attention: It is extremely important to
select the correct root volume group because some of the existing data in the
destination root volume group will be destroyed during BOS installation.
Continue with one of the following:
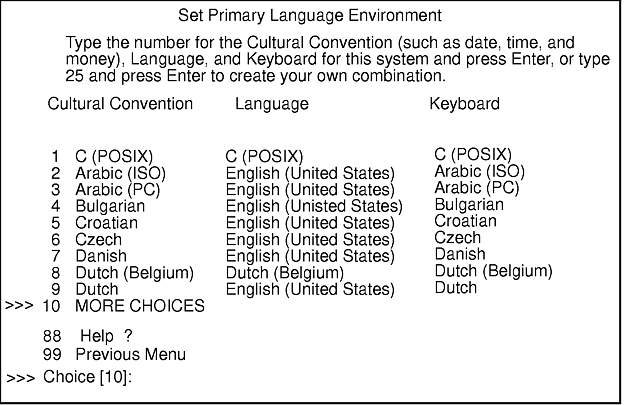
To Change the Primary Language Environment
The Set Primary Language Environment screen allows you to change the language
environment used to display text and messages after BOS installation. The
Cultural Convention field determines the way numeric, monetary, and time
characters are displayed. The Language field determines the language used to
display text and system messages. The environments that are available depend on
the type of keyboard you are using.
Note: Changes to the primary
language environment do not take effect until after BOS is installed and your
system is rebooted. The Latin-1 countries (U. S., Canada, Western Europe) and
Japan are supported by two code sets. The default code set for the Latin-1
countries is ISO8859-1, and for Japan the default code set is IBM-932. For
information about changing language environments and code sets after
installation, refer to "Changing Your
Locale" in AIX Version 4.3 System Management Guide: Operating System and Devices. This article provides information on identifying language conventions and on using the Web-based System Manager Users application or the System Management Interface Tool (SMIT) to change your language environment and code set after installation.
Use the following procedure to change the
language environment:
- Enter 2
on the Installation
and Settings screen to select the Primary Language Environment Settings
option. The Set Primary Language Environment screen is displayed.
- View the options listed on the Set Primary
Language Environment screen. The full list of options may be displayed on more
than one screen. Select the MORE CHOICES option to view the next screen.
Most of the options are a predefined combination of cultural convention,
language, and keyboard. There is, however, an option for defining your own
combination of cultural convention, language, and keyboard.
- Select an option on the Set Primary Language
Environment screen.
- If you selected a predefined option, then
the Installation and Settings screen is displayed. Skip the rest of this
procedure and continue with one of the following:
- If you selected the option to define your own
combination of cultural convention, language and keyboard, then the Set Primary
Cultural Convention screen is displayed.
- Enter the number indicating the cultural
convention required on the Set Primary Cultural Convention screen. The Set
Primary Language screen is displayed.
- Enter the number indicating the primary
language
required. The program displays the Set Keyboard screen.
- Enter the number indicating the keyboard
attached to the system. The Installation and Settings menu is displayed again,
reflecting your changes.
- Continue with one of the following:
To Change the Trusted Computing Base Setting
When you install the Trusted Computing Base
(TCB), the trusted path, the trusted shell, and system integrity checking are
installed. The trusted path protects your system in case a program is
masquerading as the program you want to use. The trusted path tries to ensure
that the programs you run are trusted programs.
If you want to enable the TCB setting, you must
do so now. You cannot enable the TCB setting late, but you can disable the TCB setting
later. When TCB is not installed, installation time is reduced.
To change the setting for installing TCB to
yes, enter 3
. Entering 3
again changes the
setting back to no.
Note: When migrating from
AIX Version 4.1 or AIX Version 4.2, the install menu TCB setting is ignored. The TCB setting of the installed system will be the same as on the AIX Version 4.1 system.
Continue with To Install from CD-ROM or Tape.
[ Previous |
Next |
Contents |
Glossary |
Home |
Search ]