This procedure describes how to recover or restore data in logical volumes if a disk drive is failing. Before proceeding with this procedure, you should try the procedure "Migrating the Contents of a Physical Volume". That procedure is the preferred way to recover data from a failing disk.
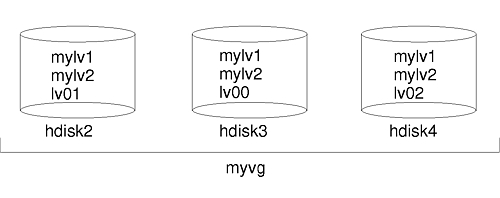
The hdisk2 disk drive contains the nonmirrored logical volume lv01 and a copy of the logical volume mylv . The mylv logical volume is mirrored and has three copies, each of which takes up two physical partitions on its disk. The hdisk3 disk drive contains another copy of mylv and the nonmirrored logical volume lv00 . Finally, hdisk4 contains a third copy of mylv as well as lv02 . The myvg diagram shows this scenario.
If you fix the bad disk and place it back in the system without reformatting it, then you can simply let the system automatically activate and resynchronize the stale physical partitions on the drive at boot time. A stale physical partition is a physical partition that contains data you cannot use. To discover if a physical partition is stale, use the lspv -M command to display information about a physical volume. Stale physical partitions will be marked stale .
If you must reformat or replace the failing drive, you should remove all references to nonmirrored file systems from the failing disk and remove it from the volume group and system configuration before replacing it. If you do not do this, you will create problems in the ODM and system configuration databases.
lspv -M -n hdisk4 hdisk3The lspv command displays information about a physical volume within a volume group. The output might look something like the following:
hdisk3:1        mylv:1
hdisk3:2        mylv:2
hdisk3:3        lv00:1
hdisk3:4-50
The first column displays the physical partitions and the second column displays the logical partitions. Partitions 4 through 50 are free.
unmount /Directory
rmfs /Directory
rmlvcopy mylv 2 hdisk3By removing the copy on hdisk3 , you reduce the number of copies of each logical partition belonging to the mylv logical volume from three to two (one on hdisk4 and one on hdisk2),
Note: Do not use rmlvcopy on the hd5 and hd7 logical volumes from physical volumes in the rootvg volume group. The system will not allow you to remove these logical volumes because there should be only one copy of these.
sysdumpdev -P -p /dev/sysdumpnullThe sysdumpdev command changes the primary or secondary dump device location for a running system. When you reboot, the dump device will return to its original location.
rmlv -f lv00The rmlv command removes a logical volume from a volume group.
reducevg -df myvg hdisk3This example reduces the size of the myvg volume group to omit the hdisk3 drive.
You can now power off the old drive using the SMIT fast path smit rmvdsk . Change the KEEP definition in database field to no. Power off the system and allow your next level of support to add the new or reformatted disk drive.
shutdown -FThe shutdown command halts the operating system.
Since the disk has been reformatted, the volume group defined in the disk is gone. If you have forgotten to or were unable to reducevg the disk from the old volume group before the disk was formatted, the following procedure can help clean up the VGDA/ODM information.
exportvg VGName
varyonvg VGName
hdiskX PVID PVNOTFND
varyonvg -f VGNameThe missing disk is now displayed with the PVREMOVED label.
hdiskX PVID PVREMOVED
reducevg -df VGName PVID
Attention: The logical volumes defined on this missing disk will be deleted from the ODM and VGDA areas of the remaining disks that make up the volume group VGName.
If you would prefer not to reboot the system after reformatting the disk drive, you must configure the disk and create the device entry:
cfgmgr
mkdev -1 hdisk3
If you want to reboot the system, this will automatically configure the new drive. After rebooting, use the following procedure:
lsdev -C -c diskIn this example, the disk that was just attached will be called by the same name as before (hdisk3 ).
chdev -l hdisk3 -a pv=yes
extendvg myvg hdisk3The extendvg command increases the size of the volume group by adding one or more physical volumes. This example adds the hdisk3 drive to the myvg volume group.
mklv -y lv00 myvg 1 hdisk3This example recreates the lv00 logical volume on the hdisk3 drive. The 1 means that this logical volume is not mirrored.
crfs -v jfs -d LVname -m /Directory
mklvcopy mylv 3 hdisk3The mklvcopy command creates copies of data within a logical volume. This example creates a mirrored third partition (the mylv logical volume) onto hdisk3 .
syncvg -p hdisk3The syncvg command synchronizes logical volume copies that are not current.
After performing this procedure, all mirrored file systems should be restored and up-to-date. If you were able to back up your single-copy file systems, they will also be ready to use. You should be able to proceed with normal system use.
To recover from a failed disk drive, back out the way you came in; that is, list the steps you went through to create the volume group, and then go backwards. The following example is an illustration of this technique. It shows how a mirrored logical volume was created and then how it was altered, backing out one step at a time, when a disk failed.
Note: The following example of a specific instance and is given for illustration only. It is not intended as a general prototype on which to base any general recovery procedures.
mkvg -y workvg hdisk1
extendvg workvg hdisk2

extendvg workvg hdisk3
mklv -y testlv workvg 10

mklvcopy testlv 3
rmlvcopy testlv 2 hdisk2
reducevg workvg hdisk2
rmdev -l hdisk2 -d
shutdown -F
Because you have a new disk (the system sees that there is a new PVID on this disk), the system will choose the first OPEN hdisk name. Because the -d flag was used in step 6, the name hdisk2 was released. Thus the configurator chooses hdisk2 for the name of the new disk. If the -d flag had not been used, hdisk4 would have been chosen as the new name.
extendvg workvg hdisk2
mklvcopy testlv 3