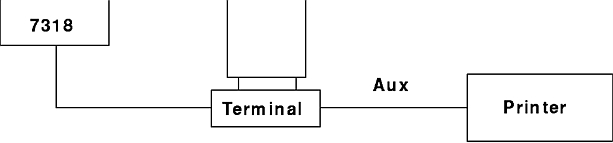
The terminal-attached printer allows you to use printers attached to the auxiliary RS-232 ports of some terminals as general purpose system printers, independent of work being done on the associated terminal. To the host, they are no different from the serial and parallel printers described earlier in this chapter. Some additional configuration is required to attach the printer to the terminal and the 7318.
The communication between the terminal and the printer must be set up at the terminal. The terminal should have a setup mode that allows the communications parameters of its auxiliary port to be set. These parameters must match between the terminal and the printer.
The following list shows important parameters and recommended settings:
| Setting | Value |
|---|---|
| Baud Rate | 9600 |
| Stop Bits | 1 |
| Parity | None |
| Character Size | 8 |
| Flow Control | None |
Note: No flow control is used. To use a terminal-attached printer without affecting terminal operation, you must prevent the printer from ever issuing a flow control character to the terminal. If it does, the terminal will lock and you will temporarily lose screen updates.
The following information explains how to enable a terminal-attached printer, how to change terminal-attached print data rate, and how to specify enter and exit strings.
term=terminalwhere terminal is one of the built-in terminal types.
tprint=1
[Telnetd02]
device=tprint
port=11
session=7
tcpPort=5211
Note: When you configure a terminal-attached printer on a port, you can only use seven sessions. The eighth session is used for the terminal-attached printer.
The terminal-attached printer interface on the 7318 includes a mechanism that will help you prevent the printer from flow controlling. It has a rate entry that automatically throttles the average data rate to a specified number of characters per second. It does this by pausing between bursts of characters to slow down the average character delivery rate.
Note: The rate entry does not change the baud rate. Each character is transmitted at the normal baud rate.
You should set the rate to the highest number of characters per second that your printer can sustain without overflowing its buffers. Normally this will be much lower than the equivalent baud rate used to transmit individual characters.
You can calculate your printer's effective printing rate by measuring how long it takes to print a large file. Simply divide the number of characters in the file by the number of seconds it took to print the file. Alternatively you can set the terminal-attached printer device rate to an arbitrary value such as 100 characters per second, then tuning it to improve performance. If you set the rate too high, your terminal will pause intermittently or your print output will be garbled. In this case, set the rate to a lower value.
The default configuration file uses a default rate of 100 characters per second on each port. You can change this default value with the following procedure:
rate=Nwhere N is the new rate in characters per second.
The terminal-attached printer interface on the 7318 operates by periodically issuing the terminal escape sequence that switches data received by the terminal from its screen to its auxiliary port. The 7318 then transmits a block of data to the printer via the terminal auxiliary port. When the 7318 has finished sending the block, it sends the terminal escape sequence to switch data received by the terminal from the auxiliary port back to the terminal screen. This switching occurs multiple times per second while the terminal-attached printer is printing and should not be noticeable by the terminal user except as a slight slowing of screen updates.
The 7318 already knows the necessary escape sequences for the terminal types built in to the software. If you do not have one of these terminals, you can specify the escape sequences in the configuration file. The escape sequence used to switch data to the auxiliary port is called the enter string and the escape sequence used to switch data back to the terminal screen is called the exit string. You can specify these using the following procedure.
enterstr=\033d#The string following the "=" is a configuration file escape string.
exitstr=\024