
|
55.585 bytes |
Service Hints & Tips |
Document ID: JBAR-3D7K2M |
IBM PC - IDE CD-ROM problem solving map
Applicable to: World-Wide
Trouble Shooting IBM PC Desktop Installation Problems
These documents contain valuable tips and techniques for the IBM Desktop computers. It is intended to be used as a guide to assist users of these products with problem determination and other product information resolutions.
IBM PC Desktop CD ROM Problem Solving
Have you followed all of the instructions in your CD-ROM installation manual and are still unable to use your IDE CD-ROM? This page contains useful information on IBM PC desktops that can help you resolve your IDE CD-ROM installation problem. Keep in mind that in this day of Plug and Play operating systems and Plug and Play BIOS; the line between software and hardware failure is very thin. This makes trouble shooting hardware installation problems more involved. None the less, one of the first things we will do is determine if we are looking at a Software or a Hardware problem/conflict. We will be detailing five avenues for trouble shooting installation problems.
I. Physical Installation
IDE Data Cable Connections
IIn recent models of IBM Personal Computers, there are two IDE connectors on the system board: the primary and secondary IDE controllers. The combination of the two IDE controllers allows up to four storage devices to be connected through IDE (a primary IDE controller with a master device and a slave device, and a secondary IDE controller with a master device and a slave device). You can connect the IDE CD-ROM drive to either the primary or secondary IDE controller on the system board, depending upon what other IDE devices you currently have installed in your computer.
The Three Possible CD-ROM Configurations:
Example of a System Board Layout
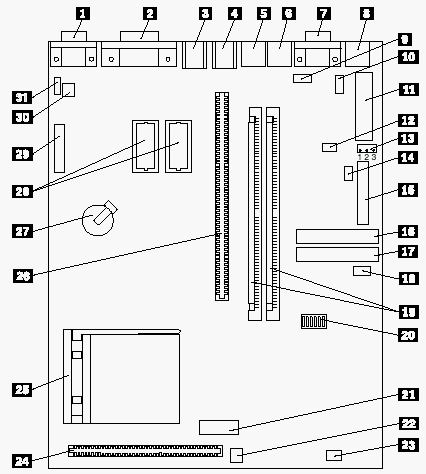
#16 is the Primary IDE controller
#17 is the Secondary IDE controller
1. Use one of the following procedures to connect the cable and set the jumper in your CD-ROM drive, depending on the current configuration of IDE devices in your computer:
- There are currently no IDE devices in your computer.
Using the IDE data cable provided with the IDE CD-ROM drive, connect the CD-ROM drive to the primary IDE controller as a master device. The default jumper setting for IBM IDE CD-ROM drives is "Master." If you are installing a non-IBM IDE CD-ROM drive, check the Master/Slave jumper settings to ensure that the jumper is set to "Master."
- One or two IDE devices are already installed on the primary IDE controller.
Using the IDE data cable provided with the IDE CD-ROM drive, connect the CD-ROM drive to the secondary IDE controller as a master device. The default jumper setting for IBM IDE CD-ROM drives is "Master." If you are installing a non-IBM IDE CD-ROM drive, check the Master/Slave jumper settings to ensure that the jumper is set to "Master."
- Two or three IDE devices are already installed in the computer.
Attach the IDE CD-ROM drive as a slave device to the middle connector on the existing IDE cable connected to the secondary IDE controller. The default jumper setting for IBM CD-ROM drives is "Master," so you must change the jumper setting on the back of the CD-ROM drive to "Slave." If you are installing a non-IBM IDE CD-ROM drive, check the Master/Slave jumper settings to ensure that the jumper is set to "Slave."
2. Remove the cover from the computer, following the instructions in your Installing Options in Your Personal Computer manual.
3. Follow the instructions in the "Working with Internal Drives" chapter of your Installing Options in Your Personal Computer manual to remove any devices that might interfere with the installation of your new CD-ROM drive.
4. Remove the 5-1/4" drive bezel.
5. Check the jumper settings on the CD-ROM drive.
- Important: See section II (below) for information on IDE CD-ROM drive jumper settings.
6. Slide the CD-ROM drive into the empty bay.
7. Using the screws supplied with the drive, fasten the drive into place flush with the front of the computer.
8. Locate the IDE-device connectors on the system board.
9. Connect the IDE cable to the CD-ROM drive.
10. Connect the power cable to the CD-ROM drive.
11. Replace any adapters or devices that were removed in step 3.
12. Replace the computer cover.
II. IDE CD-ROM Jumper Setting and Descriptions:
Cable Select/Slave/Master (Master is default)
"Master" is the default setting for this jumper. This jumper sets the logical position on the IDE bus data cable. In a Personal Computer with one IDE port, the hard disk drive is usually the master device , and the CD-ROM drive is usually the slave device. In a PC with two IDE ports, the CD-ROM drive should be attached to the secondary IDE port as the master. In some computers, the cable-select setting might be required. These computers use a special IDE data cable to automatically assign the "Slave" or "Master" setting to an IDE CD-ROM drive or hard disk drive.
Power-On Locked/Power-On Unlocked (Power-On Unlocked is default)
"Power-On Unlocked" is the default setting for this jumper. This jumper sets the state of the drive-tray mechanism at power-on. To ensure that the media cannot be removed from the drive during and after power-on, set the jumper to the "Power-On Locked" position. The jumper set should be clearly labeled on the back of the drive.
 Click here for jumper settings for various preloaded IBM CD-ROM and PD/CD ROM drives.
Click here for jumper settings for IBM OBI 24X-10X and 16X-8X MAX IDE CD-ROM jumper settings.
Non-IBM IDE CD-ROM Jumper Settings
Refer to the Manual provided by the Manufacturer of your CD-ROM or look at the back of the drive to see if there is a label that identifies the Master / Slave jumper settings.
III. System Configuration (BIOS):
The physical installation of the CD-ROM drive must be completed before you set the system configuration.
1. Turn on the computer (do not use Ctrl+Alt+Delete to restart the computer).
2. When the Configuration/Setup Utility prompt appears in the lower-left corner of the screen, press F1.
3. A 162 POST error code is displayed to indicate that a new device has been installed in the computer.
4. The Configuration/Setup Utility program menu is displayed. If it is not, turn off the computer and check the CD-ROM drive jumper settings again.
5. A right arrow should be displayed next to System Summary and Devices and I/O Ports to indicate a configuration change. Select each of these items to verify that the computer recognizes the new CD-ROM drive.
6. Select Save Settings from the Configuration/Setup Utility program menu.
7. Press Esc to exit from the Configuration/Setup Utility program, and restart the computer.
If your computer successfully restarts without a POST error code, go to section IV (below) to install the software. If your computer does not successfully restart or you receive POST error codes, look further along in this document for a list of possible causes.
IV. Software Installation:
These pages provides access to basic software installation instructions for DOS/Windows, Windows 95, and OS/2 operating systems. Use these instructions along with the User guide provided by your CD-ROM Manufacturer and your Operating Systems User guide to help resolve Software/Driver related installation problems.
Select the link that corresponds to your system's operating system.
- DOS/Microsoft Windows 3.x
- Microsoft Windows 95/Windows NT
- OS/2 and OS/2 Warp
V. IDE CD-ROM Related Documents and Helpful Notes:
PS/ValuePoint IDE CD-ROM Related Documents
- ValuePoint Models 6472, 6482, 6484, 6492 and 6494:
These computers have a dual-port, high-performance IDE controller. The IDE 2X or 4X CD-ROM drive can be connected to either IDE controller in the computer. However, the system configuration code is not designed to recognize IDE CD-ROM drives. Therefore, you must manually select a special mode (not the default) to run an IDE 2X or 4X CD-ROM drive in these computers. This selection can be made through the Configuration/Setup Utility program as follows:
1. Turn on the computer (do not use Ctrl+Alt+Delete to restart the computer).
2. When the Configuration Utility program symbol appears on the screen, press F1.
3. Go to the Mass Storage Devices information, which includes two entries: Primary IDE Mode and Secondary IDE Mode. Use these entries to set the performance mode for each IDE controller. For the IDE controller to which the IDE 2X or 4X CD-ROM drive is connected, set the mode to "compatible." (For best performance, the CD-ROM drive should be connected to the secondary IDE controller.)
4. Press Esc to save the changes and exit from the Configuration Utility program.
- ValuePoint Models 6387 Wxx and Xxx:
When level-2 (L2) cache has been added to a ValuePoint 6387 Wxx or Xxx computer, the IDE controller will run faster. If you have a 2X IDE CD-ROM drive in the computer, add the /T:1 parameter to the device driver statement in the CONFIG.SYS file, as shown below:
DEVICE=C:\IBMIDECD.SYS /D:IBMCD100 /T:1
- Personal computers manufactured before 1994:
The IDE 2X or 4X CD-ROM Drive will not be recognized by the system BIOS and configuration code. This is not a problem, because the drive will be run by a device driver. However the standard self-checking that systems do during power-on does not include the IDE 2X or 4X CD-ROM Drive.
- PC 730 (6877) and PC 750 (6887):
Some PC 730 and PC 750 computers running Windows 95 have a conflict with bus mastering IDE device drivers. Windows 95 reports this as a conflict between the secondary IDE controller and an unknown PCI device, which is actually the universal serial bus (USB).
The reason for the conflict is that BIOS does not reserve IRQ 15 for the secondary IDE controller if nothing is attached to that controller. However, the USB is a Plug and Play device, and it takes IRQ 15. The bus-mastering IDE device drivers for Windows 95 are coded to take IRQ 14 for the primary IDE controller and IRQ 15 for the secondary IDE controller. So Windows 95 reports a conflict, because the device driver for the secondary IDE controller is trying to use IRQ 15 when the USB is actually using it.
There are two ways to prevent the USB from using IRQ 15:
- Attach a device to the secondary IDE controller.
- Make IRQ 15 unavailable in the Configuration/Setup Utility program.
There is not actually a conflict and the system will run fine in this configuration. In addition, if you attach anything to the secondary IDE controller the USB will automatically move to another IRQ to prevent an actual conflict.
Helpful Notes:
1.Operating-System-Specific Notes
Windows 3.x
If the IDE CD-ROM drive is attached to the primary IDE controller, problems might occur when Windows 3.x operates in Enhanced mode. You might be able to solve these problems by editing your Windows SYSTEM.INI file (the default path is C:\WINDOWS\SYSTEM.INI). Look for the following statements:
[386Enh]
...VirtualHDirq=off
This statement is required only if the CD-ROM drive is a master on the primary IDE controller. If the value is set to "on," change it to "off." If this statement is not present, add it to the SYSTEM.INI file.
32BitDiskAccess=off
If the value is set to "on," change it to "off." If this statement is not present, add it to the SYSTEM.INI file.
OS/2 Warp
If the IDE CD-ROM drive is attached to the secondary IDE controller as a master device, you might get a TRAP 3 error when you install OS/2 Warp from diskettes. If this occurs, turn off the computer and disconnect the IDE CD-ROM drive. Then install OS/2 Warp. When the installation is complete, copy the IBM1S506.ADD file from the IBM IDE CD-ROM Drive Option/Device Driver diskette to the root directory of your hard disk. Then turn off the computer and reconnect the IDE CD-ROM drive.
2. IBM IDE CD-ROM Drive Diagnostic Program
A general-purpose diagnostic program is provided on the IBM IDE CD-ROM Option/Device Driver diskette. The diagnostic program is self-documented and can be run only from DOS (not virtual DOS on OS/2 or DOS under Microsoft Windows). To start the diagnostic program, do the following:
1. Insert the IBM IDE CD-ROM Option/Device Driver diskette into drive A.
2. At a DOS prompt, type A:CDFT and press Enter.
3. Audio Adapters
Many audio adapters default to IRQ 7. If possible, use a different interrupt to avoid problems with some applications.
4. SMARTDRV
SMARTDRV.EXE Invoked from the CONFIG.SYS File:
This note applies only to DOS 5.0 through DOS 6.2. When SMARTDRV is installed in the CONFIG.SYS file as a device driver, IDE CD-ROM drive performance might be reduced. If you suspect this, remove the following statement from the CONFIG.SYS file:
DEVICE=SMARTDRV.EXE
SMARTDRV 4.0:
If your IDE CD-ROM drive is configured as a slave device, SMARTDRV 4.0 might intermittently suspend operation of the computer when you read from the CD-ROM. The DOS installation program has an option to disable hard-disk write caching to correct the problem. The installation program assumes that SMARTDRV is in the WINDOWS directory on your hard disk. If it is not, you must update your AUTOEXEC.BAT file manually. Using a text editor, add the drive letters of your hard disk partitions after the SMARTDRV statement in the AUTOEXEC.BAT file (for example, SMARTDRV C D).
SMARTDRV 5.0:
If you have SMARTDRV 5.0 with MS-DOS 6.2 or PC-DOS 6.3, you might have problems reading multisession CDs such as Kodak Photo CD. The DOS installation program has an option to automatically disable SMARTDRV CD-ROM caching to correct the problem. The installation program assumes that SMARTDRV is in the DOS directory on your hard disk. If it is not, you must update your AUTOEXEC.BAT file manually. Using a text editor, add a /U parameter after the SMARTDRV statement (for example, SMARTDRV /U).
|
Search Keywords |
| |
|
Hint Category |
CD-ROM Drives, Hardware Installation/Configuration | |
|
Date Created |
10-01-97 | |
|
Last Updated |
25-02-99 | |
|
Revision Date |
25-02-2000 | |
|
Brand |
IBM PC | |
|
Product Family |
PC 100, PC 140, PC 300GL, PC 300XL, PC 300PL, PC 330, PC 340, PC 350, PC 360, PC 365, PC 730, PC 750, PS/2, ValuePoint | |
|
Machine Type |
6271, 6281, 6260, 6272, 6282, 6284, 6561, 6591, 6588, 6562, 6592, 6862, 6892, 6571, 6573, 6575, 6576, 6577, 6560, 6581, 6583, 6585, 6586, 6587, 6598, 6589, 6875, 6876, 6877, 6885, 6886, 6887, 8530, 8535, 8540, 8550, 8555, 8556, 8557, 8560, 8565, 8570, 8573, 8580, 8590, 8595, 9533, 9553, 9556, 9557, 9576, 9577, 9590, 9595, 6381, 6382, 6384, 6387, 6472, 6482, 6484, 6492, 6494 | |
|
Model |
various | |
|
TypeModel |
| |
|
Retain Tip (if applicable) |
| |
|
Reverse Doclinks |