IBM PC ECA012 - HDD Replacement Instruction (ECA012)
IBM PC ECA012 Hard Disk Drive Replacement Instructions
(Form 05L1432 USA - Nov-1997)
Replacement Kit for Backplane II and Non-RAID HDDs - FRU P/N 02K0300
Replacement Kit for Backplane III HDDs - FRU P/N 02K0303
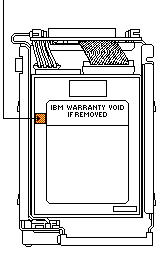
 Place the ORANGE STICKER on the hard disk drive and
RETURN the DRIVE BACK to IBM.
Place the ORANGE STICKER on the hard disk drive and
RETURN the DRIVE BACK to IBM.
For Non-RAID Environments.
- Ensure that customer has a current tape back up of all data on the hard drives being replaced.
- If the system is non hot-swap, then remove the hot swap tray assembly from the hardfile.
- Set the new hard drive to the same SCSI ID and termination settings as the old drive.
Use the jumpers from the old drive to set the SCSI ID and termination on the new hard drive.
- Replace the old hard drive with the new hard drive and have the customer restore the data to the new hard drive.
For RAID Level 0 Environments:
- Ensure that customer has a current tape back up of all data on the hard drives being replaced.
- Replace the old hard drive with the new hard drive and have the customer restore the data to the new hard drive.
For RAID Levels 1 and 5 Environments:
The following procedure was developed to assist in implementing
fixed disk replacement when multiple fixed disks are being replaced
in a RAID-1 or RAID-5 Array.
Very Important
- Ensure that customer has a current tape back up of all data on the hard drives being replaced.
- Keep track of which drives are located in which bay.
- Backup a copy of the customers RAID configuration.
- In the event of drive failure, inspect the connectors for damage. The drives could have been swapped out quite a bit.
Installation Instructions:
- Ensure that there are no DDD drives in the system prior to starting.
- While the drives are still in the system, place the stickers on the drives indicating what bays they are in.
Do the same to the new drives once they are installed.
Backing Up the Current Configuration:
- Insert the RAID Adapter Option Diskette (for the particular adapter) into the primay diskette drive and start the system.
- For IBM F/W PCI-Bus Streaming RAID Adapter (FRU PN 06H5078)
IBM PCI F/W Streaming RAID Adapter Option Diskette Version 2.02 Filename: 4227109.exe
- For IBM F/W Streaming RAID Adapter/A (FRU PN 06H3059 or 92F0335)
IBM F/W Streaming RAID Adapter/A Option Diskette 1 of 2 Version 2.31 Filename: 4227110.exe
- For IBM PC ServeRAID Adapter (FRU PN 06H9334)
IBM PC ServeRAID Adapter Option Diskette 1 of 3 Version 2.00 Filename: 84H7118.exe
- Select Start RAID Configuration Program after each restart
For the IBM FAN Streaming RAID Adapter/A and the IBM PC ServeRAID Adapter.
- From the Main Menu, select Advanced Options.
- Select Backup Configuration to Diskette.
- Insert a blank diskette into drive A:
- Enter a filename for this backup (default filename is 'config').
NOTE: If the same backup diskette is used for other systems,
give each system a different filename and keep track of the specific filenames.
PE recommends using the system serial number as the filename.
Performing RAID Array Synchronization
- Select Initialize/Synchronize Array .
- Select Synchronize Logical Drive .
- Press the spacebar to select each logical drive.
- Once all logical drives are highlighted, press Enter to begin synchronization.
- Select Yes to confirm.
Identifing/Removing Hot Spare Drive
- Exit Advanced Options .
- Select View Configuration from the Main Menu.
- Identify which bay contains the Hot Spare drive (HSP). If there is no HSP drive, proceed to (below)
'Replacing/Rebuilding Drives'.
- Gently pull the hot spare drive out of the bay.
- Exit View Configuration and the Main Menu
- Restart the system.
- Press Y to update configuration with HSP bay as DDD.
NOTE: The hot spare drive is pulled out first and is left out
during replacement/rebuilding of the other drives. It then becomes the last drive replaced and its status turns to
HSP. The hot spare drive does not require rebuilding (it's a spare).
Replacing/Rebuilding Drives
You are now ready to pull out the first drive to be replaced.
NOTE: Replacing/Rebuilding drives must be done one at a time.
- Choose an order you would like to replace the drives that the
Hardfile Identify Utility instructed you to replace. For example:
Bays 1, 2, 3,4, and so forth.
NOTE: Remember the order that you have chosen.
- Gently pull out the first drive.
- Restart the system from the RAID Option diskette.
- Press Y when prompted to update the configuration with DDD drive.
- Restart the system.
- Install the new drive into the bay.
- Select Rebuild/Device Management from the Main Menu.
- Select Replace Drive
- Highlight the correct DDD drive in the bay that you are replacing. The system will start the drive.
- After a successfully start, the drive status will change from DDD to OFL.
- Select Rebuild Device from the Rebuild/Device Management menu.
- Highlight the correct OFL drive in the bay you are rebuilding. The system will rebuild the drive from 0 to 100%.
After a successful rebuild, the status of the drive will change from OFL to ONL.
- Repeat steps 2 through 13 of this section until all identified drives have been replaced.
Replacing a Hot Spare Drive
After all the drves are replaced and rebuilt successfully, replug the Hot Spare Drive back into its bay.
- From Main Menu select Rebuild Device .
- Select Replace Drive .
- Highlight the hot spare drive which will have the DDD status.
- Restart the system.
After a successful restart, the drive status will change from DDD to HSP.
- Ensure all suspect drives have been replaced.
- Restart the system with the Hardfile Update Utility diskette again to verify that there are no more suspect
drives installed in the system.
- Fill in the date on the following label and place it on the rear, left-hand corner of the server.
NOTE: Ensure that you do not cover any air vents.
ECA# | DATE
-------|-------
12|
-------|-------
12|
-------|-------
- The system is now ready to return to the customer.
Recovering from a Rebuild Failure
Synchronization is run before any replacements in order to ensure
that there are no bad sectors on the hardfiles, ensuring that all the
drives you are rebuilding from are good. Therefore, you will not
receive a rebuild failure unless the drive you are rebuilding has a
GROWN DEFECT. If a rebuild failure occurs, which is a rare event, it
will be due to the drive that you are rebuilding.
To confirm that the failure is due to the drive you are rebuilding, do the following:
- Select Drive Information from the Main Menu.
- View the Drive Information for the drive you just tried to rebuild.
You should see errors on this drive and no errors on the other drives.
NOTE: Soft errors initialize to zero upon restarting the system.
DO NOT RESTART your system before viewing the error counters.
- Physically replace the drive and start the replace/rebuild again with the new drive.
Recovering from Soft Errors
- Replace the new drive that you were rebuilding with the original drive back into this bay.
This bay will indicate OFL status.
- Exit the Main Menu .
- Select Advanced Options .
- Select Restore config from diskette .
- Place the backed up config diskette into drive A:
- Enter the filename of the saved configuration for this server.
- Once the RAID configuration is restored, all drives will indicate ONL.
- Remove the drive that logged the soft errors on the drive information screen.
- Restart your system from the RAID Option Diskette.
- Press Y to update the status of the hard disk drive to DDD.
When the update is complete, press Ctrl+Alt+Del to reboot the system.
- Install the new drive into the DDD bay.
- Select Rebuild Device from the Main Menu.
- Select Replace Drive
- Highlight the correct DDD drive in the bay you are replacing and restart the system.
(Be careful NOT to select the HSP drive bay.) The bay status of the drive will change from DDD to OFL.
- Select Rebuild Device from the Rebuild Menu.
- Highlight the correct OFL drive in the bay you are rebuilding.
The system will rebuid th3 drive from 0 to 100%. After a successful rebuild, the drive status will change from OFL to ONL.
- The drive with the Soft Errors (that caused the Rebuild Failure) has been replaced.
Continue with step 2 on page 5 and replace the rest of the drives (one at a time).
Recovering from Fatal Errors
- Replace only the original drive back into the system that has not been rebuilt successfully.
- Restart your system from the RAID Option Diskette and restore the configuration.
- From the Main Menu, select Advanced Options Menu
- Select Restore Configuration from diskette
- Put the diskette with the backup configuration into the diskette drive and type in the filename for that particular system.
- Then, continue replacing and rebuilding the drives.
If during the restoring from diskette an, 'ADAPTER IS NOT RESPONDING TO CONTROLLER COMMANDS' message appears, do the following:
Restart your system and restore the configuration from the backup RAID Support Diskette until it says restoration completed successfully.
Back to 
Please see the LEGAL - Trademark notice.
Feel free - send a  for any BUG on this page found - Thank you.