AMD-K7™ Processor Module (Aptiva 2174 - SL-A)
AMD-K7™ Processor Module (Aptiva 2174 - SL-A)
The AMD-K7™ Slot A Processor Module comes in one package.
Removing the AMD-K7™ CPU Module
Follow these steps to remove the AMD-K7™ CPU module from slot A.
Note: Determine the type of processor you are installing and make sure the
jumpers are set correctly.
Run the
Setup Utility
after installing a processor.
 -ATTENTION- Processors are sensitive to static discharge.
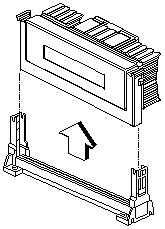
- Unlock the latches that secure the processor module.
- Firmly hold the processor module and pull it out of the socket.

AMD-K7™ Processor Installation
Follow these steps to install the AMD-K7™ processor module with fan sink to
slot A on the system board.
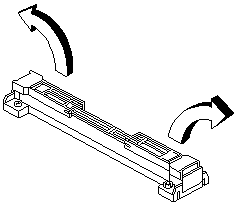
- Locate the universal retention mechanism around the processor slot. Fold
out the retainers.

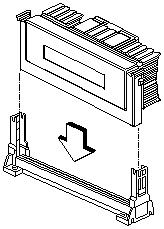
- With the processor module electrical contacts pointing downward, align the
processor to the posts of the universal retention mechanism, then lower it down.

 -CAUTION- The electrical contacts of the AMD-K7™ module are slotted in such a
way that the module only fits in one direction. Make sure that the module
groove matches the one on the processor socket.
Installing the Processor Fan Sink
The AMD-K7™ processor module has holes on one side to hold the clips of the
fan sink. The upper set of holes (near the latches) on the processor are wider
and should match the wider ends of the clips on the fan sink. The lower set of
holes are smaller and should match the narrow ends of the fan sink clips.
Package Installation
Follow these steps when installing the fan sink to the AMD-K7™ processor
module:
- Remove the thermal tape protector at the back of the fan sink.
- Attach the fan sink to the PC board side of the AMD-K7™ processor.
- Press the fastener towards the fan sink side to lock the fan sink.
- To remove the fan sink, use a screw driver to slide the fastener nodes
outward to unlock the fan sink from the processor, then carefully remove the
fan sink from the processor.
Installing the Universal Retention Mechanism (URM)
Follow these steps to install the universal retention mechanism:
- Pull out the sides.
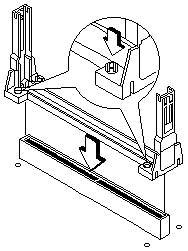
- Place the universal retention mechanism over the CPU connector on the
system board and press it until it clicks into place.
- Press down the four plastic rivets to secure the URM. Make sure all four
rivets are properly inserted into the holes on the system board.

Back to 
Please see the LEGAL - Trademark notice.
Feel free - send a  for any BUG on this page found - Thank you.
 -ATTENTION- Processors are sensitive to static discharge.


