Quick Setup (9516-Bxx)
Quick Setup
This procedure does not display a color-bar pattern before the setup main
menu. To obtain better image quality, you should perform auto setup according to the
procedures on the preceding pages with the setup option diskettes for
PC-DOS, Window 3.1, Windows 95, Windows NT, OS/2, RS/6000, AIXwindows, or OpenWindows on SUN Workstation
(if the diskettes do not run, perform this quick setup).
For the HP Workstation, if you are unable to perform auto-setup with the
diskettes, perform the quick setup without them.
For other systems, use this quick setup procedure.
- Turn on the monitor and the PC and wait for about 15 minutes until the machines warm up.
NOTE: Check that the screen resolution and the frequencies are within
the supported screen resolutions. If not, change the settings on the computer
to set them within the range.
- Start the operating system on your PC.
- Display a full-screen image.
A full-screen image is needed
Auto setup of the monitor involves detecting the conditions at the vertical and horizontal edges
of the screen. Therefore, you need a full screen image to perform proper auto setup. You also need a
clear contrast between the brightest part of the screen and the darkest for correct adjustment.
Otherwise, the screen may flicker. If necessary, try to display some other full-screen image.
- Push the setup switch on the back of the monitor.
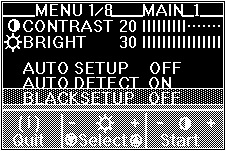
The setup main menu appears:
- Push one of the brightness control buttons to select AUTO SETUP.
- Push one of the contrast control buttons. After about 10 seconds,
the message "Save parameters?" is displayed.
- To save the settings for the monitor, push a contrast control button. To
discard the settings (because some problem such as a screen flicker occurs),
push a brightness control button. If the "Save Parameters?" message is not displayed
If the "Save Parameters?" message is not displayed or the auto setup value "START"
does not change, push the contrast control button to exit auto setup and go back to step 4.
Display another full-screen image and redo auto setup. If auto setup is not completed after
several tries, perform manual setup.
If, after you save the settings, the display is still distorted, adjust
"PHASE" and "CLOCK" in manual setup described.
If you are using a workstation
If you are using a workstation, the screen appears greenish because the black level
is shifted due to the difference of the voltage level of the video signals.
If this happens, adjust OFFSET G in manual-adjust menu.
- Push the setup switch on the back of the monitor to turn off the setup main menu.
Back to 
Please see the LEGAL - Trademark notice.
Feel free - send a  for any BUG on this page found - Thank you.