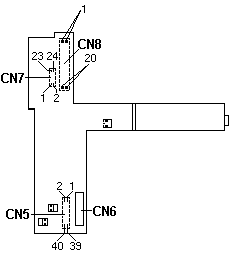
Testing the Voltage Converter (8551)
Testing the Voltage Converter
Use the following procedure to isolate the voltage converter from
the problem.
NOTE:
If the problem occurs only when using the computer with a good
battery pack, replace the voltage converter.
- Power-off the computer.
- Power-off all attached devices and disconnect them from the computer.
- Unplug the AC adapter from the computer.
- Remove the battery pack and the bottom cover.
- Disconnect the standby-battery connector and the flexible
cable from connector CN6 on the voltage converter.
- Power-off the computer.
- Plug the AC adapter into the computer.
 The computer goes into suspend mode in about 20 seconds after
plugging in the AC adapter. The following procedure must be performed
during this period. If the computer is already in suspend mode, unplug
the AC adapter and plug it in again to reactivate it.
- Check the voltages of the voltage converter
using the following table.

| Conn- ector |
Pin |
Signal |
V dc Min. |
V dc Max. |
| CN5 |
1 |
VCCA |
+4.9 |
+5.3 |
| CN5 |
3 |
VCCB |
+4.7 |
+5.3 |
| CN5 |
7, 8 |
GND |
- |
- |
| CN5 |
9, 10 |
GND |
- |
- |
| CN5 |
13 |
+20 Vdc |
+19.0 |
+21.0 |
| CN5 |
21 |
POWER_GD |
+4.0 |
+5.3 |
| CN5 |
32 |
POWER_ON# |
0 |
+0.5 |
| CN7 |
2 |
VCCG |
+4.7 |
+5.3 |
| CN7 |
23,24 |
GND |
- |
- |
- If all the voltages are correct, the voltage converter is good.
- If +.20 V dc is not correct, check the output voltage of the AC
adapter (see 'Testing the AC Adapter'). If the voltage is correct, replace
the voltage converter.
- If any of the measured voltages except +.20 V dc is not correct,
replace the following FRUs one at a time to correct the problem.
- Voltage converter
- System board
- I/O panel assembly
NOTE:
Reconnect the standby-battery connector and the flexible cable that
were removed in Step 5, before leaving this procedure.
Back to 
Please see the LEGAL - Trademark notice.
Feel free - send a  for any BUG on this page found - Thank you.
 The computer goes into suspend mode in about 20 seconds after
plugging in the AC adapter. The following procedure must be performed
during this period. If the computer is already in suspend mode, unplug
the AC adapter and plug it in again to reactivate it.

