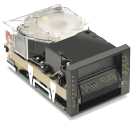
 40/80 GB DLT Internal Tape Drive
FRU P/N OPT P/N
-------------------------------------------
Tape Drive 5.25-Inch ??????? ???????
-------------------------------------------
Tape Cartridge 59H3040 (5-pack)
Cleaning Cartridge 59H3092
See > TIP Tape Drive Cleaning Strategies - Media/Cleaning-tape P/Ns
Requirements
Ship Group
External Tape Drive
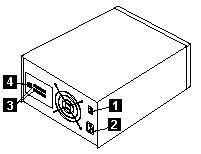
| 1 | Power switch |
|---|---|
| 2 | Power cord connector |
| 3 | SCSI interface connectors |
| 4 | SCSI ID-selection push switch |
Configuration jumperblocks
NOTE: The SCSI adapter can be part of the computer system board
or can be an adapter installed in an expansion slot.
Density changes can occur only when writing from the beginning of the tape. You cannot mix capacities on a
single data cartridge.
Physical Specifications
Please see the LEGAL - Trademark notice.
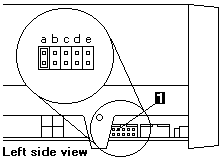
1
SCSI ID jumperblock
2
SCSI termination power jumperblock
3
SCSI termination jumper
4
SCSI parity jumperblock
5
SCSI disable parity jumper
Some SCSI cables will provide self termination and do not require terminators.
To terminate the bus at the drive, attach a SCSI terminator (not provided) to the drive
connector before attaching the SCSI cable.
However, if your SCSI adapter does not provide termination power, you
must place a jumper in the enable termination power position -3- on the jumperblock -2-.
Check the documentation that come with the PC or SCSI adapter for more information.
SCSI-ID
pos-a
pos-b
bit-8pos-c
bit-4pos-d
bit-2pos-e
bit-1
0
ON
Off
Off
Off
Off
1
ON
Off
Off
Off
ON
2
ON
Off
Off
ON
Off
3
ON
Off
Off
ON
ON
4
ON
Off
ON
Off
Off
5
ON
Off
ON
Off
ON
6
ON
Off
ON
ON
Off
7
ON
Off
ON
ON
ON
8
ON
ON
Off
Off
Off
9
ON
ON
Off
Off
ON
10
ON
ON
Off
ON
Off
11
ON
ON
Off
ON
ON
12
ON
ON
ON
Off
Off
13
ON
ON
ON
Off
ON
14
ON
ON
ON
ON
Off
15
ON
ON
ON
ON
ON
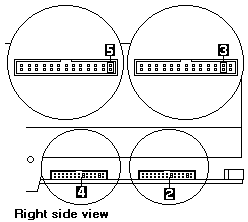
Do not force the cable onto the drive.
Using the Drive - Button / Indicators
(See drawing on left side)
LED
ButtonFunction
Description
1
Write Protect
(orange)When indicator is on, the tape is write protected.
2
Tape in Use
(yellow)When indicator is blinking, the tape is in motion.
When indicator lights steadily, the tape is loaded
and ready for use.
3
Use Cleaning Tape
(yellow)When indicator is on, the drive head needs cleaning,
-or- the tape (media) is damaged,
-or- the tape head is damaged.
4
Operate Handle
(green)When indicator is on, the Cartridge Insert/Release
handle can be lifted.
When indicator blinking, push the handle down and wait
for the indicator to turn solid green.
5
Unload
Press this button to unload a tape or to reset the
tape drive.
6
Cartridge
Insert/ReleaseLift this handle to insert or to remove a cartridge
when the Operate Handle indicator lights.
7
Select
When the Density Override indicator 8 is flashing,
you can press this button to cycle through tape
capacity options.
8
Density Override
(yellow)When indicator is lit, it indicates you use the
Select button 7 to change tape capacity.
9
Compress
(yellow)When indicator is lit, data compression is enabled.
10
40.0
(yellow)When indicator lights steadily, the tape is recorded
at 40.0 GB capacity.
When indicator is blinking, it indicates you requested
this capacity.
11
35.0
(yellow)When indicator lights steadily, the tape is recorded
at 35.0 GB capacity.
When indicator is blinking, it indicates you requested
this capacity.
12
20
(yellow)When indicator lights steadily, the tape is recorded
at 20.0 GB capacity.
When indicator is blinking, it indicates you requested
this capacity.
13
10.0/15.0 GB
(yellow)When indicator lights steadily, the tape is recorded
at 10.0 GB 0r 15.0 GB capacity.
When indicator is blinking, it indicates you requested
this capacity.
If the Indicators flash in unison, it indicates a tape drive hardware failure.
Try to reset the drive (press the Unload button, or turn the
computer off and back on again.
Selecting Data Cartridges

The front of the cartridge has an orange Write Protect indicator 1,
and Write Protect switch 2 to prevent accidential erasure. Slide the switch to the right
to write enable 3 or to the left to write protect 4.
You can change the Write Protect switch before or after inserting the tape.
If you change the Write Protect switch while the tape is inserted, there is a delay of a few seconds before
the Write Protect indicator changes.
NOTE: The backup/restore software might also provide write protection for the cartridge.
For writing data, use only DLT data cartridges
Any of the following data cartridges are acceptable and require no
formatting or other media conditioning before use.
Selecting Record Capacity
You might want to decrease tape capacity for compatibility with older tapedrives, or
increase capacity for better performance.
Insert a tape cartridge, and wait for the tape motion to stop and the Tape in Use indicator
to light steadily. The capacity indicators show the current tape capacity.
If they are not lit, it means the tape is blank.
Press Select button to change density.
When the Density Override indicator is blinking, you can press the Select button to
change the recording capacity of the tape.
Press the Select button until the desired capacity indicator is flashing.
The indicator will continue flashing until the tape drive begins recording in the new capacity. Then, the new capacity
indicator is on steadily (the old capacity indicator is off).
Product Specifications
---------------------------------------------------------------
Height (with bezel) 86.3mm (3.4-in)
Width (with bezel) 184.3mm (5.84-in)
Length (with bezel) 243.8mm (9.6-in)
Weight 2.9kg (6.7-lb, 7 oz)
---------------------------------------------------------------
Input Voltages
Standard +5 Vdc and +12 Vdc ±5%
---------------------------------------------------------------
Maximum Sustained Data-Transfer Rates
Compressed data 10MB per second
Uncompressed data 6MB per second
---------------------------------------------------------------
Maximum Data Capacity
Tape Uncompressed Data Compressed Data
DLTtape III 10 GB 20 GB
DLTtape IIIxt 15 GB 30 GB
DLTtape IV 40 GB 80 GB
IBM Data Cartridge 40 BG 80 GB
(P/N 59H3040)
---------------------------------------------------------------
SCSI Cable Specifications
Connector 68-pin male, shielded AMP 786090-7
Maximum length 3m (10ft)
---------------------------------------------------------------
Operating Environment
Tape path temperature
(operating) +10°C to +40°C (+50°F to +104°F)
Relative humidity 20% to 80% non condensing
Wetbulb 25°C (77°F) maximum
Altitude -152 to 12192 m (-500 to +40000-ft)
Temperature gradient 11°C per hour
Humidity gradient 10% per hour
Back to ![]()
Feel free - send a  for any BUG on this page found - Thank you.