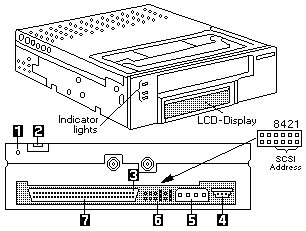

The following table describes the indicator light
combinations that occur during tape operation:
If the drive fails with a flashing amber indicator light, three sets
of numbers appear on the LCD showing the three most recent errors.
The first two digits in error 1 are the fault symptom code for the most
recent error. Using this fault symptom code, go to the table below
to help resolve the problem.
Indicator Lights
Top light (amber)
When this light is flashing, an error has occured.
When this light is on, the tape drive needs cleaning.
Middle light (green)
When this light is on, the tape cartridge is loaded,
and the tape drive is operational.
Bottom light (green)
When this light is flashing, the tape is in motion
LCD Messages
Reset Messages
When the tape drive is reset, the LCD cycles through this messages.
RESET
First message during the power-on sequence
MODEL
Model number of the tape drive
SUBMOD
Submodel number of the tape drive
SN
Serial number of the tape drive
CODE
Level of the tape drive microcode
LASTCLN
Number of hours since the tape drive was cleaned
COMPRESSION
Compression turned on or off by default
SINGLE ENDED
Drive is single ended SCSI
WIDE
Drive has wide SCSI configuration
SCSI ID
SCSI ID of the tape drive
LANGUAGE
Current language for the LCD appears when you hold
the UNLOAD button after the RESET message appears
Press and hold the button to cycle through the available
languages until the one you want appears.
Tape Drive Status Messages
READY-NO TAPE
Drive is ready to accept a cartridge
LOADING
Drive is loading the tape
READY-TAPE
Drive has successfully loaded the tape and is ready
for read and write operations.
EJECT
Unload button was pressed. Drive will eject the cartridge
as soon as it has finished its current operation
EJECT PREVNT
Software has disabled the eject function with the
PREVENT/ALLOW MEDIA REMOVAL command. Drive will rewind
and unload the tape, but will not eject the cartridge.
ILLEGAL TAPE
Drive detected an incomplete cartridge and eject it
Tape Motion Messages
READ
Drive is reading data. The + sign appears when the
data is compressed. The boxes show the amount of tape used
WRITE
Drive is writing data. The + sign appears when the
data is compressed. The boxes show the amount of tape used
PROTECTED
Drive cannot write data because the data cartridge is
write protected
ILLEGAL WRT
Drive cannot write the type of tape cartridge inserted.
This message remains until an appropriate tape is
inserted and a tape motion command is issued.
SEARCH
High-speed search in progress
REWIND
Tape rweind in progress
ERASE
Drive is erasing data on the tape
Cleaning Messages
CLEAN SOON
Drive should be cleaned at the next convenient time
MUST CLEAN
Drive must be cleaned after a metal particle tape has
been used in the drive. If you attempt to insert a data
cartridge before cleaning the tape drive, the cartridge
will be ejected.
CLEANING
Cleaning in progress
DEPLETED
Cleaning tape in the cartridge is depleted, the drive
ejects the cartridge. Use a new cleaning cartridge.
Error Messages
When a tape drive error occurs, the LCD cycles through the
current error code and previous error codes.
ERR 1: xx yy zz
The most recent error displays where xx is the fault
symptom code, and yy and zz indicate secondary errors (if any)
ERR 2 (or 3): xx yy zz
Previous eror messages display
Tape Drive Condition
Top Light
Middle Light
Bottom Light
POST or reset
On
On
On
Error or failed POST
Flash
Off
Off
Ready, no tape loaded
N/A
Off
Off
Ready, tape loaded
N/A
On
Off
Normal tape motion
N/A
On
Flash
Time to clean
On
N/A
N/A
Clean in progress
On
Off
Flash
The following table lists fault symptom codes that might
display on the LCD. The fault symptom codes are arranged in
alphanumeric order: