Using the Configuration/Setup Utility main menu
From the Configuration/Setup Utility main menu, you can select settings that you want to change.
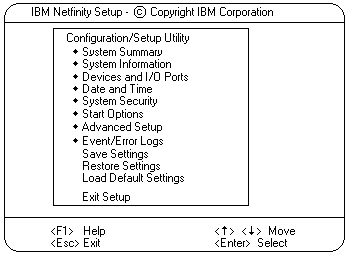
The Configuration/Setup Utility main menu is similar to the following screen.
Note: The choices on some menus might differ slightly, depending on the BIOS version that comes with the server.
 ) or Down Arrow (
  ) key to highlight the menu item for
the configuration setting
that you want to change; then, press Enter.
) or Down Arrow ( ) key to choose the appropriate setting
for the selected menu item; then, press Enter.
) key to highlight the menu item for
the configuration setting
that you want to change; then, press Enter.
) or Down Arrow ( ) key to choose the appropriate setting
for the selected menu item; then, press Enter.
Note: The Configuration/Setup Utility main menu selections do not save settings, restore settings,
or load default settings for the PCI Slot/Device Information choice.
To save settings, or restore settings for the PCI Slot/Device Information choice, you must use the menu selections
available from the PCI Slot/Device Information choice.
System summary: Select this choice to display configuration information, including the type and speed of
the processors and amount of memory.
Changes that you make to configuration settings appear on this summary screen.
You cannot edit the fields.
The System Summary choice appears on the full Configuration/Setup Utility main menu and on the limited
Configuration/Setup Utility main menu.
System information: Select this choice to display information on the Netfinity 8500R server.
Changes that you make on other menus might appear on this summary screen.
You cannot edit any fields.
The System Information choice appears only on the full Configuration/Setup Utility main menu.
Product data: Select this choice to view system information, such as the machine type and model,
the system serial number, and the revision level or issue date of the BIOS stored on the flash EEPROM.
System card data: Select this choice to view vital product data (VPD) for some Netfinity 8500R server components.
Devices and I/O ports: Software recognizes ports through their port assignments.
Each port must have a unique port assignment.
The Configuration/Setup Utility program normally handles this, but you might have special
hardware or software that requires you to change these assignments.
Select the Devices and I/O Ports choice to view or change the assignments
for devices and input/output ports.
You can add serial ports by installing a serial adapter in an expansion slot.
See the documentation that comes with the serial adapter for information on port assignments.
You can configure the parallel port as bidirectional ; that is, so that data can
be both read from and written to a device.
In bidirectional mode, the server supports Extended Capabilities Port (ECP) and Enhanced Parallel Port (EPP).
To display or change the assignments for devices, the serial ports, or parallel port:
Notes:
Date and time: Select this choice to set the system date and time.
The system time is in a 24-hour format:
hour:minute:second.
The system date is in the standard format for your country.
For example, in the United States, the format is MM/DD/YYYY (Month/Day/Year).
Select Date and Time; then, use the Left Arrow (<) or Right Arrow (>) key to advance through each data field.
Type the new information; the system saves the information as you type it.
The Date and Time choice appears only on the full Configuration/Setup Utility main menu.
Please see the LEGAL - Trademark notice.
Feel free - send a  for any BUG on this page found - Thank you.