Installing a Server in a Rack Enclosure - Netfinity 5600 - Type 8664
Installing a Server in a Rack Enclosure
Use the following instructions for installing a server in a rack.
The server comes with all the rack installation hardware (rack model only).
Review the preinstallation information in 'Preparing to install the server in a rack enclosure'; then,
continue with 'Installing the rack model in a rack enclosure.'
 -Caution-
Do not place any object weighing more than 82 kg (180 lbs.) on top of rack-mounted devices.
 > 82 kg (180 lbs.)
Installing the rack model in a rack enclosure: During this procedure, you must install
parts on the rack enclosure and the server.
This process can be divided in two parts:
- Preparing the rack enclosure
- Installing the server into the rack enclosure
Preparing to install the server in a rack enclosure: You will need the following items:
- One rack mounting kit
- Two slide-rail assemblies
- One cable-management arm, including hitch pins
- One bag of screws and nuts
- Hook and loop fastener strips
- One installation template
- One packet of tie wraps
- Two wheel-shaped knobs
- Flat-blade screwdriver
- The documentation that comes with the rack
Before you begin
- Before you begin to install the server in the rack, review the safety and handling guidelines
specified under 'Safety information'.
- To ensure rack stability, plan the installation of servers in the rack starting from the bottom.
If you are installing different server models in the rack enclosure, install the heaviest models in the
lower part of the rack enclosure.
For more information, refer to the IBM Netfinity Rack Configurator program provided with the ServerGuide CDs.
Refer to 'ServerGuide and Netfinity Manager Information' section of this Server Library.
- Review the documentation that comes with the rack enclosure for safety or cabling considerations.
Ensure that the planned installation is within the rack's guidelines for heat generation, electrical
requirements, air flow, and mechanical loading.
- Verify that the rack can meet the operating parameters, as detailed in 'Specifications'.
- Turn off the server, if it is on.
Preparing the rack enclosure: To attach the mounting hardware to the rack enclosure:
- Mark the positions of the slide brackets and the cable management arm on the mounting rails of the rack enclosure.
- Position the template on the front mounting rail, aligning the holes.
- Mark the holes for the slide bracket cage nuts, using the dots supplied with the template.
Also mark the holes for the chassis bracket cage nuts.
- Move the template to the rear mounting rails.
Mark the locations for the slide bracket cage nuts and the cable-management-arm mounting bracket.
Note: You must align the slide brackets correctly or the installation cannot be completed.
- Install the cage nuts or clip nuts, as required for the rack enclosure, in the marked positions.
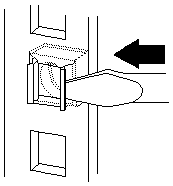
- Attach the slide rails to the rack.
- Insert the left slide-rail rear bracket pin into the hole between the two cage nuts for the slide rail
at the rear of the rack.
The two holes in the rear bracket line up with the cage nuts.
- Pull the slide-rail front bracket to the front of the rack; insert the front bracket pin into the hole
above the cage nuts for the slide rail.
The two holes in the front bracket line up with the cage nuts.
- Do the same for the other slide rail.
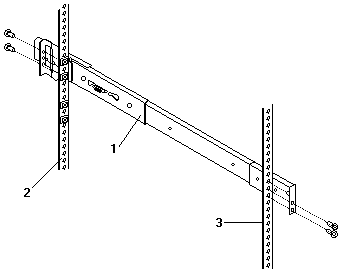
1 Left slide rail
2 Left rear
3 Left front
- From the outside of the rack enclosure, insert two M6 by 16-mm screws through each slide-rail
bracket and cage nut; then, tighten the screws.
- Attach the cable-management arm to the left rear of the rack enclosure.
- Align the cable-management-arm mounting bracket with the cage nuts on the rear mounting rail.
- Insert two M6 by 16-mm screws to secure the mounting bracket to the rack.
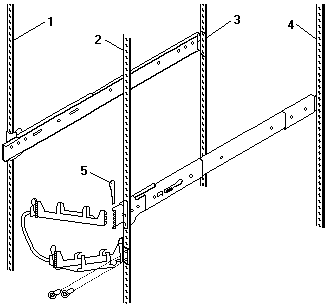
1 Right rear
2 Left rear
3 Right front
4 Left front
5 Hitch pin
- Attach the free end of the cable-management arm to the rear of the left slide rail, using a hitch pin -5-.
Installing the server: To install the server in the rack enclosure:
- Mount the server on the slide rails.
- Extend the slide rails fully from the rack until the slide rails lock.
- Rest the wheel-shaped knobs -1- on the slide rails at a point close to the rack.
- Lower the front of the server until the bottom notch in each chassis bracket fits into the top
notch in the slide rail end.
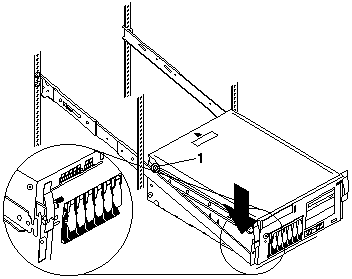
Slide the server backward or forward as necessary until the notches meet.
- Attach the rails to the sides of the server with M4 by 5-mm screws.
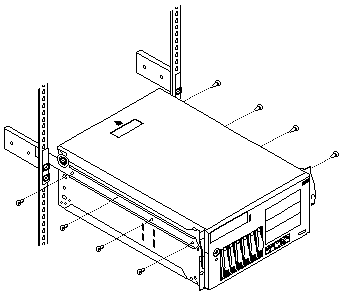
- Remove the wheel-shaped knobs from the server.
Store the knobs in a safe place to use if you need to remove the server from the rack at a later time.
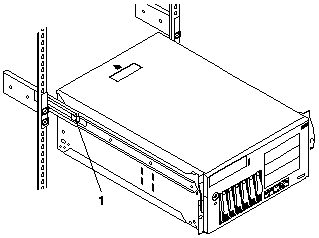
- Press the safety latches on the slide rails -1- and slide the server about halfway into the rack enclosure.
Note: When the server is fully extended, safety latches on the slide rails lock into place.
This prevents the server from being accidentally pulled out too far and dropped.
To release the safety latch, press in.
- Attach the cables to the server.
- Attach all cables to the corresponding connectors on the server.
Refer to the 'Express Setup and Installation' section of this Server Library for instructions.
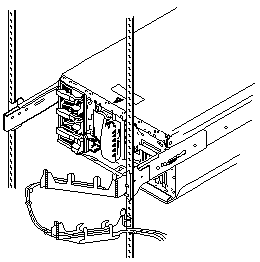
- Route the power cords, mouse cable, and keyboard cable through the cable-restraint bracket.
- Route all cables through the cable-management arm, attaching the cables to the arm with the
hook and loop fastener strips provided.
The wraps are provided for additional cable management.
- Secure the server in the rack enclosure.
- Slide the server into the rack enclosure until the slide latches on the front chassis brackets click into place.
- Using a screwdriver, tighten the screws that hold the rear of the slide rails to the rear of the rack.
- Release the server and pull the server forward about half-way.
Note: To release the server, release the left and right slide latches and pull the server forward.
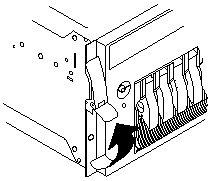
- Using a screwdriver, tighten the screws that hold the front of the slide rails to the front of the rack.
- Slide the server into the rack enclosure again until the slide latches on the front chassis brackets click into place.
- (Optional) For additional security, such as when transporting the rack, fasten the server to the rack
enclosure by inserting a M6 by 16-mm screw through the chassis bracket, mounting rail, and cage nut on each side.
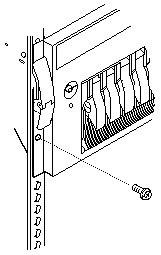
- To complete the installation, refer to the documentation that comes with the rack enclosure.
Back to 
Please see the LEGAL - Trademark notice.
Feel free - send a  for any BUG on this page found - Thank you.
 -Caution-
 > 82 kg (180 lbs.)


