Replacing a Hot-swap Fan Assembly - Netfinity 5600 - Type 8664
Replacing a Hot-swap Fan Assembly
The server comes with three hot-swap fan assemblies.
 -Attention- Replace a fan that has failed within 48 hours to help ensure proper cooling.
Note: You do not need to turn off the power to the server to replace a hot-swap fan assembly.
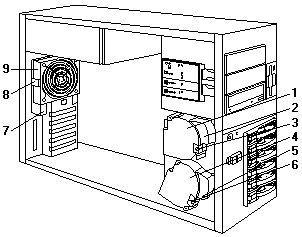
The following illustrations show the replacement of a hot-swap fan assembly.
Refer to these illustrations while performing the steps in this procedure.

1 Hot-swap fan assembly 1
2 Fan assembly 1 LED
3 Fan 1 release latch
4 Hot-swap fan assembly 2
5 Fan assembly 2 LED
6 Fan 2 release latch
7 Fan Assembly 3 LED
8 Fan 3 release latch
9 Hot-swap fan assembly 3
To replace a hot-swap fan assembly:
- Remove the cover.
See 'Removing the left-side cover (tower model)' or
'Removing the cover (rack model)'.
 -Attention- To ensure proper system cooling, do not remove
the top cover for more than 30 minutes during this procedure.
- Determine which fan assembly (fan 1 -1-, fan 2 -4-, or fan 3 -9- to replace by checking the fan LEDs on
the diagnostic LED panel (see 'Diagnostics panel LEDs') and the LEDs located on the fan assemblies.
- Remove the fan assembly from the server by pressing the orange release latch (-3-, -6-, or -8-)
for the fan and pulling the fan away from the server.
- Slide the replacement fan assembly into the server until it clicks into place.
- Verify that the FAN LED on the diagnostic panel is not lit.
If the FAN LED is lit, reseat the fan.
- Replace the cover. For a tower model, see 'Completing the tower model installation'.
For a rack model, see 'Completing the rack model installation'.
Back to 
Please see the LEGAL - Trademark notice.
Feel free - send a  for any BUG on this page found - Thank you.
 -Attention- Replace a fan that has failed within 48 hours to help ensure proper cooling.

