Installing a Hot-swap Power Supply - Netfinity 5600 - Type 8664
Installing a Hot-swap Power Supply.
The server comes with two power supplies.
You can add a third power supply.
After you install a power supply, check the power-supply status indicators to verify that the
power supply is operating properly.
See 'Power supplies' for details.
 -Caution- Never remove the cover on a power supply or any
part that has the following label attached.
-Caution- Never remove the cover on a power supply or any
part that has the following label attached.

Hazardous voltage, current, and energy levels are present inside any component that has this label attached.
There are no serviceable parts inside these components.
If you suspect a problem with one of these parts, contact a service technician.
Refer to the following illustration of the tower model while performing the steps in this procedure.
Note: You do not need to turn off the power to the server to install hot-swap power supplies.
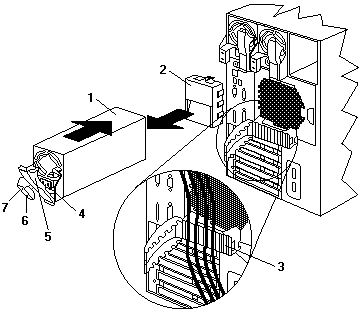
1 Power supply
2 Filler panel
3 Cable-restraint bracket
4 Power cord connector
5 Handle on power supply (in open position)
6 AC Power light
7 DC Power light
To add a power supply:
- Remove the filler panel -2- from the empty power supply bay by inserting your finger into the depression
on the filler panel and pulling it away from the server.
- Save the filler panel in case you remove the power supply at a later time.
Note: During normal operation, each power-supply bay must have either a power supply or filler panel
installed for proper cooling.
- Install the power supply -1- in the bay:
- Place the handle -5- on the power supply in the open position (that is, perpendicular to the power supply)
and slide the power supply into the chassis.
- Gently close the handle to seat the power supply in the bay.
- Plug the power cord for the added power supply into the power cord connector -2-.
- Route the power cord through the cable-restraint bracket -3-.
- Plug the power cord into a properly grounded electrical outlet.
- Verify that the DC Power light -7- and AC Power light -6- on the power supply are lit, indicating that
the power supply is operating correctly.
- If you have other options to install or remove, do so now; otherwise, go to 'Completing the installation'.
Back to 
Please see the LEGAL - Trademark notice.
Feel free - send a  for any BUG on this page found - Thank you.