Hot-swap fan assembly replacement
Hot-swap fan assembly replacement
The server comes with four hot-swap fan assemblies.
 -Attention- Replace
a fan that has failed within 48 hours to help ensure proper cooling.
-Attention- Replace
a fan that has failed within 48 hours to help ensure proper cooling.
Note:
You do not need to turn off the power to the server to
replace a hot-swap fan assembly.
The following illustrations show the replacement of a
hot-swap fan assembly. Refer to these illustrations while
performing the steps in this procedure.
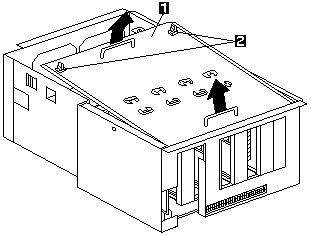
1 Processor support tray cover
2 Quarter-turn fasteners for support tray cover
To replace a hot-swap fan assembly:
Caution:
To avoid personal injury, disconnect the hot-swap fan
cables before removing the fan from the device.
- Remove the top cover (see
Top Cover Removal).
-Attention- To
ensure proper system cooling, do not remove
the top cover for more than 30 minutes during
this procedure.
- Determine which fan assembly (fan 1 4, fan 2 6,
fan 3 9, or fan 4 7) to replace by checking the fan
LEDs on the diagnostic panel (see
Diagnostics Panel LEDs).
- If you are replacing fan assembly 1, 2, or 3:
- Disconnect the fan power cable 3 from the fan
assembly that you are replacing.
- If you are removing fan assembly 1 4, turn the
two quarter-turn fasteners 2 one quarter turn
and remove the processor support tray cover 2.
- Turn the fan assembly quarter-turn fastener 10
one quarter turn and remove the fan assembly from the server.
- Slide the replacement fan assembly into the
server. (If you are replacing fan assembly 1 4,
make sure the tabs 5 fit into the slots at the
bottom of the fan opening in the server.)
- When you have the fan assembly correctly
seated, turn its quarter-turn fastener 10 one
quarter turn to secure the fan in the server.
- If you removed the processor support tray cover
1, install it and turn the two quarter-turn
fasteners 2 one quarter turn to secure the cover.
- Connect the fan power cable 3 to the power connector.
- If fan assembly 4 7 needs to be replaced:
- Turn the two processor support tray cover
quarter-turn fasteners 2 one quarter turn and
remove the processor support tray cover 1.
- Lift up on the fasteners 8 for fan assembly 4
7 and remove the fan assembly from the server.
- Slide the replacement fan assembly into the
server. (Make sure the fan assembly fits into the
slots on the processor support tray.)
- When you have the fan assembly correctly
seated, push down on the fasteners 8 until
they click into place.
- Install the processor support tray cover 1 turn
the two quarter-turn fasteners 2 one quarter
turn to secure the cover.
- Replace the top cover (see 'Installing the top cover').
Back to 
Please see the LEGAL - Trademark notice.
Feel free - send a  for any BUG on this page found - Thank you.