Rack-Mounted Installation
Rack-Mounted Installation
The rack-mounted tape library is configured for mounting into:
- An EIA-310-D 19-inch instrument rack
- A PCCO instrument rack
The 7337 Tape Library Model 306 (differential, RS/6000 attached) is mounted into an EIA-310-D 19-inch instrument rack.
The 3447 Tape Library Model 106 (single-ended, PC attached) is mounted into the PCCO instrument rack.
Tape libraries for mounting into instrument racks do not have covers, and slide rails are attached to the chassis.
The installation consists of:
- Mounting slide rail assemblies onto the instrument rack
- Sliding the rails on the tape library into rails in the slide assemblies
Below figure 46 shows the major components tor installing a 7337 Tape Library Model 306 into an EIA instrument rack
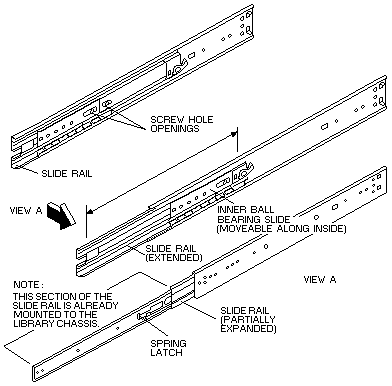
Figure 46. Rack-Mounting Components for the 7337 Tape Library Model 306.
The front and rear brackets must be mounted to the inside of the pedorated strip on the rack enclosure.
Except for the instrument rack, the components for the 3447 Tape Library Model 106 are similar to the 7337 Tape Library Model 306.
Below figure 47 provides a detailed view of the slide assembly, showing the features with which the installer needs to be familiar.
Notee the spring latch shown in view A. The spring latch locks the rails on the chassis to the slide rail assembly.
Note: The slides shown in Figure 47 come with the front and rear mounting brackets attached.
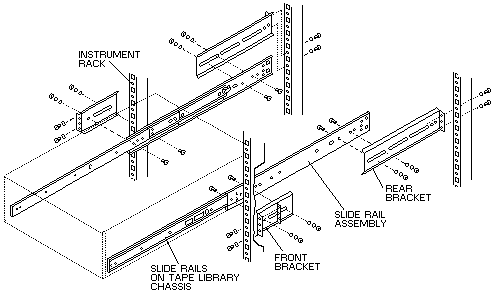
Figure 47 Slide Assembly
For proper tape library operation and to meet regulatory requirements, make sure the tollowing conditions are met.
- The maximum ambient operating temperature, as measured at the tront of the tape library, is not to exceed 95° F (35° C).
- The airflow from the cooling fans must be unrestricted.
- Make sure that mounting the tape library into the instrument rack will not tip the instrument rack over, even when the tape
library is fully extended from the rack.
- Make sure that the tape library is connected to the correct power circuit.
- Make sure that the tape library is properly grounded through the power cord while in the instrument rack.
The following sections provide the detailed steps for performing a rack-mounted installation.
Back to 
Please see the LEGAL - Trademark notice.
Feel free - send a  for any BUG on this page found - Thank you.