| J12 (VRM 1) |
J13 (VRM 2) |
J14 (VRM 3) |
J16 (VRM 4) |
J17 (VRM 5) |
J17 (VRM 6) |
|---|---|---|---|---|---|
| Installed | Installed |
TWO Microprocessors Installed in J1 and J4:
Note:
If you need to install only one VRM, store
the remaining VRM in a safe place to use as a replacement.
Please see the LEGAL - Trademark notice.
J12
(VRM 1)J13
(VRM 2)J14
(VRM 3)J16
(VRM 4)J17
(VRM 5)J18
(VRM 6)
Installed
Installed
Installed
Installed
THREE Microprocessors Installed in J1, J2, and J4:
J12
(VRM 1)J13
(VRM 2)J14
(VRM 3)J16
(VRM 4)J17
(VRM 5)J18
(VRM 6)
Installed
Installed
Installed
Installed
Installed
FOUR Microprocessors Installed in J1, J2, J3, and J4:
J12
(VRM 1)J13
(VRM 2)J14
(VRM 3)J16
(VRM 4)J17
(VRM 5)J18
(VRM 6)
Installed
Installed
Installed
Installed
Installed
Installed
Refer to the following illustrations of the processor housing
and processor board that come with this option
while you perform the steps in this procedure.
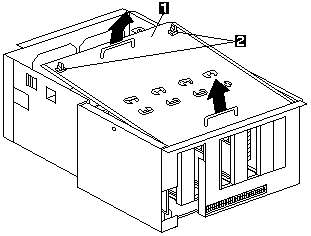
1 Processor housing cover
2 Quarter-turn fasteners

3 Latches
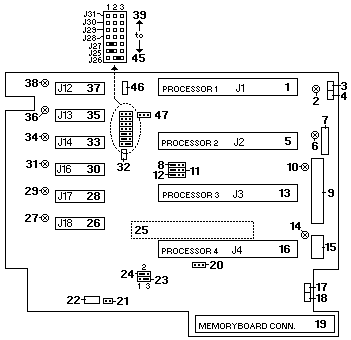
4 Second installed microprocessor (CPU or processor 4)
5 First installed microprocessor (CPU or processor 1)
6 Microprocessor connector 1 (J1)
7 Microprocessor connector 2 (J2)
8 Microprocessor connector 3 (J3)
9 Microprocessor connector 4 (J4)
10 Terminator card
11 VRM connectors 5 (J17) and 6 (J18)
12 VRMs for second microprocessor (VRMs 5 and 6)
13 VRMs for first microprocessor (VRMs 1 and 2)
Complete this procedure to install a microprocessor in the
processor housing that comes with this option.
then, remove the microprocessor from the package.
 - Attention: - Make sure
the microprocessor is oriented
and aligned correctly before you try to close the latches.
-Attention-
If the microprocessor bus-to-core ratio is
incorrect, system-board components will overheat
and component damage might occur.
- Attention: - Make sure
the microprocessor is oriented
and aligned correctly before you try to close the latches.
-Attention-
If the microprocessor bus-to-core ratio is
incorrect, system-board components will overheat
and component damage might occur.
Be sure that the microprocessor core-ratio selection is properly set.
-39- (J31) and -42- (J28) Microprocessor core-ratio-selection:
The microprocessor upgrade kit comes with two
VRMs. You might need to install only one,
depending on the number of microprocessors in the server.
Make sure that the VRM is oriented and aligned
correctly; then, press the VRM into the connector.
Back to ![]()
Feel free - send a  for any BUG on this page found - Thank you.