Replacing the Power Backplane, AC Box, and Power Supplies


Replacing the Power Backplane, AC Box, and Power Supplies

Complete this procedure to replace the power backplane, ac box, and power supplies.

  1.  Loosen the two screws and remove the ac box.
  2.  Remove the power supply:
    1.  Remove any shipping screws from the power supply.
    2.  Pull the handle on the power supply; then, slide  the power supply out of the chassis.
    3.  Repeat this procedure if a second power supply is installed.

  3.  Loosen the five screws -2-, disconnect all power  cables, and remove the power backplane -1-.

     
  4.  Install the power backplane contained in this option:
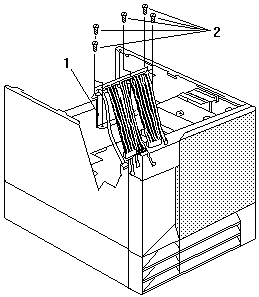
    1.  Lower the power backplane with the power  supply connectors toward the rear of the server.
    2.  Seat the power backplane on the guide pins and secure with screws.

  5.  Install the power supply separator -2- contained in  this option and secure with screws -1-.

    Note:  The power supply separator replaces the ac box in this option.

  6.  Install the power supply contained in this option -3-.

    Note:  The power supplies you might have in the server  are not compatible with this option.

    1.  Secure the handle to the power supply with screws.
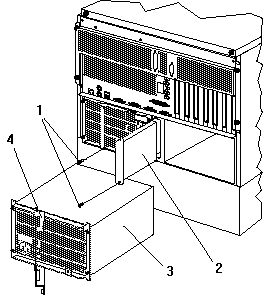
    2.  Place the handle -4- on the power supply in the  open position, and slide the power supply into the chassis.
    3.  Close the handle on the power supply to seat  the power supply in the bay.
    4.  Repeat this procedure if a second power supply is installed.

     
  7.  If you are not installing a second power supply, attach  the filler panel over the open bay.
  8.  Go to Installing a Microprocessor Kit.


Back to  Jump to TOP-of-PAGE

Please see the LEGAL  -  Trademark notice.
Feel free - send a Email-NOTE  for any BUG on this page found - Thank you.