Installing the Automatic Bus Transfer in a Netfinity 7000
Installing the Automatic Bus Transfer in a Netfinity 7000
Perform the following steps to install the automatic bus transfer.
 -Important-
Some Netfinity 7000 servers might have an ac power-assembly mounting
screw located beneath the shuttle. If the server has this screw, it
must be removed before continuing. Go to (below) "Step 1. Remove the AC Power
Assembly Mounting Screw" to determine if the server has this screw.
Step 1. Remove the AC Power Assembly Mounting Screw
- Perform the steps in "Preparing for the Installation"
- Set the power switches -1- on all power supplies to the Off position.
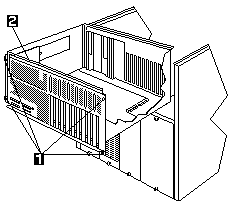
- Loosen the two thumbscrews -2- that secure the top cover -3- and remove the cover.

- Loosen the four shuttle-retention thumbscrews -1- and slide the shuttle
-2- towards the rear of the server until it reaches the stops.
- Check for the screw.
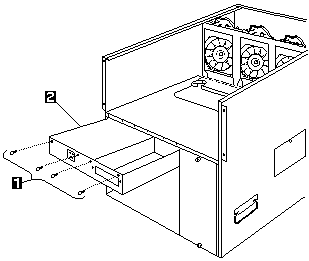
- Look down into the server in front of the shuttle -1.-
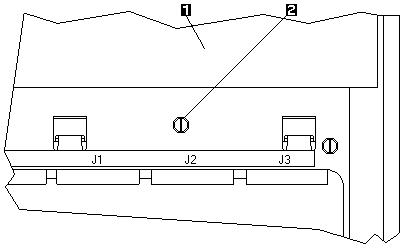
- If the server has a screw -2- adjacent to connector J2, remove
the screw and discard it. This screw is not used in the automatic bus transfer installation.
- Slide the shuttle towards the front of the server and tighten the four
shuttle-retention thumbscrews.
- Replace the top cover and tighten the two cover thumbscrews.
Step 2. Remove the Power Supplies
Refer to this illustration while performing the steps in this procedure.
-Attention-
When you remove a power supply, first loosen completely the bottom
screw that attaches the power supply to the server, then, loosen the
top screw. If you do not loosen the screws in this order, you might
damage the power supply.
- Loosen completely the bottom screw -1- on one power supply, then, loosen
the top screw -2-
- Grasp the handle on the power supply, then, slide the power supply out
of the chassis.
- Remove the other power supplies.
- If the server has only two power supplies, remove the two screws
secunng the power supply blank filler panel and remove the panel.
Step 3. Remove the 5-Volt Regulator Card
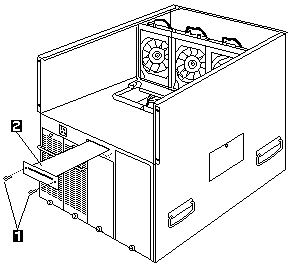
- Remove the two screws -1-.
- Pull the regulator card -2- out of the server.
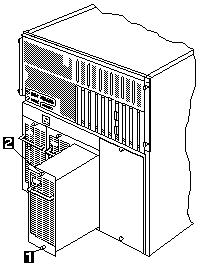
Step 4. Remove the AC Power Assembly
- Support the power assembly from the bottom with your hand and remove
the four screws -1-.
- Pull the assembly -2- out of the server.
Step 5. Install the Automatic Bus Transfer Assembly
- Support the automatic bus transfer assembly from the bottom with your hand.
- Align the assembly to the left chassis wall and the bottom of the
shuttle support shelf.
- Slide the assembly into the server until the connector on the front of
the assembly plugs into the socket on the power backplane.
- Install and tighten the four screws.
Step 6. Reinstall the 5-Volt Regulator Card
- Slide the regulator card into the plastic card guides in the automatic
bus transfer assembly until the connector on the front of the regulator
card plugs into the socket on the power backplane.
- Install and tighten the two regulator card screws.
Step 7. Reinstall the Power Supplies

- Install the power supply blank filler panel.
- Support the power supply by the handle on the back.
- Slide the power supply into the chassis.
-Attention-
When you install a power supply, first tighten the top screw
that attaches the power supply to the server, then, tighten
the bottom screw. If you do not tighten the screws in this
order, you might damage the power supply.
- Tighten the top screw -1- on the power supply, then, tighten the bottom
screw -2-.
- Install the remaining power supplies.
Step 8. Completing the Installation
- Install the power rating label -3- that comes with this option on the
left side of the automatic bus transfer.
- Reconnect all cables and connectors to the server.
- If you are connecting two power sources to the Automatic Bus Transfer,
connect both power cords that come with this option to the Automatic
Bus Transfer. Discard the power cord that comes with the server.
-Important-
If you are connecting only one power source to the Automatic
Bus Transfer, you must connect one power cord that comes with
this option to the right-hand power connector on the
Automatic Bus Transfer.
- Set the power switch -4- on the power supplies to the On position.
- Turn on the server power.
- Verify that the AC Power and DC Power lights are on, indicating that
the power supplies are operating correctly.
Back to 
Please see the LEGAL - Trademark notice.
Feel free - send a  for any BUG on this page found - Thank you.