Battery (Netfinity 7000-M10 - Type 8680)
Battery
IBM has designed this product with the safety in mind.
The lithium battery must be handled correctly to avoid possible danger.
If you replace the battery, you must adhere to the following instructions.
 - Caution
When replacing the battery, use only IBM Part Number 33F8354 or an equivalent type battery
recommended by the manufacturer.
If the system has a module containing a lithium battery, replace it only with the same
module type made by the same manufacturer.
The battery contains lithium and can explode if not properly used, handled, or disposed of.
Do not:
- Throw or immerse into water
- Heat to more than 100°C (212°F)
- Repair or disassemble
Dispose of the battery as required by local ordinances or regulations.
Before you begin, be sure you have:
- Read 'Safety Information'
- Followed any special handling and installation instructions supplied with the replacement battery.
Note: After you replace the battery, you must reconfigure the server
and reset the system date and time.
To replace the battery:
- Turn off the server and peripheral devices and disconnect all external cables
and power cords (see 'Preparing to Install Options'), then remove the
top cover (see 'Removing the Top Cover').
- Remove the I/O function card from the server:
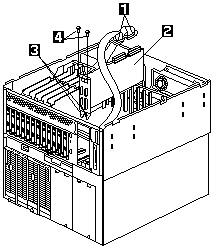
- Refer to the following illustration while you perform the steps in this procedure.

- Disconnect the cables -1- from the I/O function card -2-.
Note carefully where each cable is connected before you remove it.
- Remove the two screws -2- located on the metal connector plate inside the server.
- Carefully grasp the I/O function card by its top edge and pull the I/O function card out of the server.
- Place the I/O function card connector-side up on a flat, static-protective surface.
- Locate the battery on the I/O function card (see 'I/O Function Card Component Locations').
- Remove the battery:
- Use one finger to lift the battery clip over the battery.
- Use one finger to slightly slide the battery toward the rear of the I/O function card.
The spring mechanism behind the battery will push it out toward you as you slide it forward.
- Use your thumb and index finger to pull the battery from under the battery clip.
- Ensure that the battery clip is touching the base of the battery socket by pressing gently on the clip.

- Insert the new battery:
- Tilt the battery so that you can insert it into the front of the socket, under the battery clip.
- As you slide it under the battery clip, press the battery down into the socket.

- Install the I/O function card:
- Carefully grasp the I/O function card by its top edge, and insert the tabs -3- on the bottom
edge of the metal connector plate in the matching openings on the server back panel.
- Align the I/O function card with the guide on the opposite end of the adapter and the slot on the
I/O board.
- Press the I/O function card firmly into the slot.
Attention: - When you install the I/O function card in the server,
be sure that it is completely and correctly seated. Incomplete insertion might cause damage
to server components.
- Insert the two screws you removed in step 2c.
- Connect the cables you disconnected in step 2b.
- Reinstall the top cover and complete the installation (see 'Completing the Installation').
- Start the Configuration/Setup Utility program and reset configuration parameters as needed.
Back to 
Please see the LEGAL - Trademark notice.
Feel free - send a  for any BUG on this page found - Thank you.
 - Caution


