Installing the Expansion Unit in a Rack - EXP200 Type 3530 - 1RU, 1RX
Installing the Expansion Unit in a Rack
The EXP200 expansion unit requires 3U of EIA rack mounting space.
Before installing the expansion unit in your rack you must:
Use the rack mounting template that comes with the expansion unit to locate the rack mounting holes and
install the unit into a rack cabinet.
If you misplace the template, you can use the following steps to install your expansion unit:
- Use the following illustration of front and rear rack mounting flanges to determine the appropriate rack
mounting holes for installing cage nuts or clip nuts to secure your EXP200 rails.
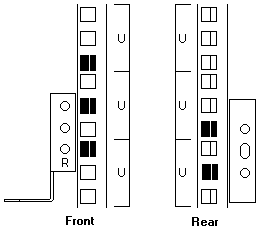
Note: Use clip nuts if your rack has round holes.
If your rack has square holes, you can use the rack insertion tool or a flat-blade screwdriver to install cage nuts.

- On the rail marked "L", remove and save the small screw -1-;
then, loosen the four large screws -2.
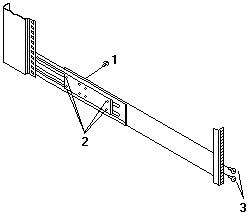
- Hold the rail against the outside of the left rack mounting flange and loosely insert the front black hex screws -3-.
- Extend the rail outside of the rear rack mounting flange; then, install and tighten both rear black hex screws -1-.
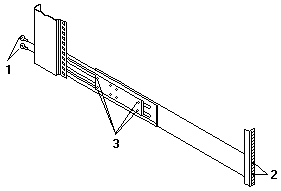
- Tighten the two front screws -2-; then, tighten the four large screws -3-.
Repeat (above) step 2 through step 5 to install the rail marked "R" on the right side of the rack.
- Slide the expansion unit into the rack; then, remove and discard both white screws and wingnuts -1- from the bezel.
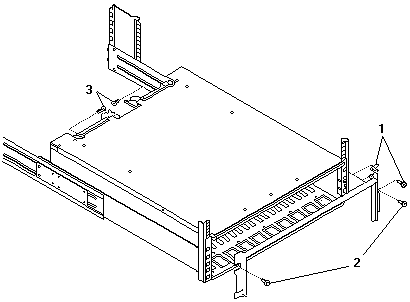
- Align the bezel locator pins with the expansion unit; then, secure the bezel and EXP200 with two black hex screws -2-.
- Use the two small screws -3- (removed in above step 2) to secure the rear of the expansion unit.
- Verify that Option Switch 5 is set to Off (see 'Setting the interface options' for further device settings).
- Install hard drives, fans, and power supplies in the EXP200 expansion unit
Back to 
Please see the LEGAL - Trademark notice.
Feel free - send a  for any BUG on this page found - Thank you.